
RadOS Academy
Mastering RadOS: the complete 18-lesson course
Every part of the platform, explained step by step — in the order most businesses actually build them. Start at Lesson 1 if you're brand new, or jump straight to the topic you need from the menu.
Overview of the platform
Before you build anything, get oriented. This lesson is a guided tour of your RadOS dashboard: what you see when you log in, where every tool lives, and how the pieces fit together. Every screenshot is from a real RadOS account.
Your Dashboard
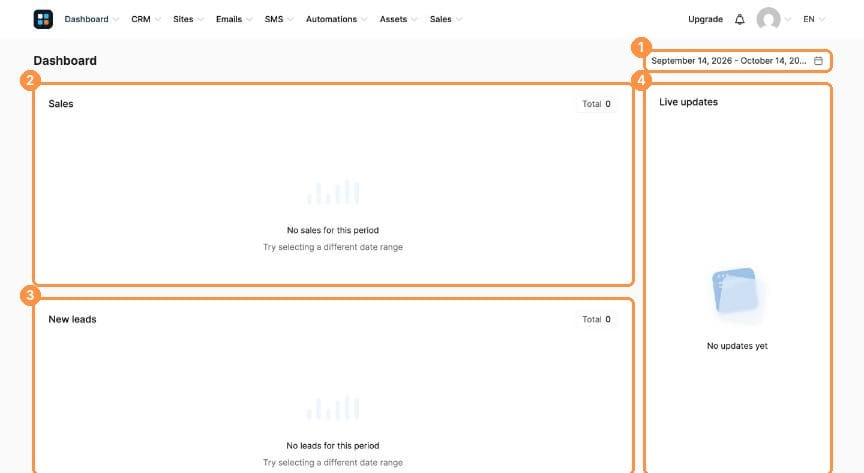
After you log in you land on your Dashboard, a snapshot of how your business is doing:
- Date range (top right): choose which period the numbers cover.
- Sales: revenue for the selected period.
- New leads: how many new contacts joined your list.
- Live updates: a running feed of new contacts and sales as they happen.
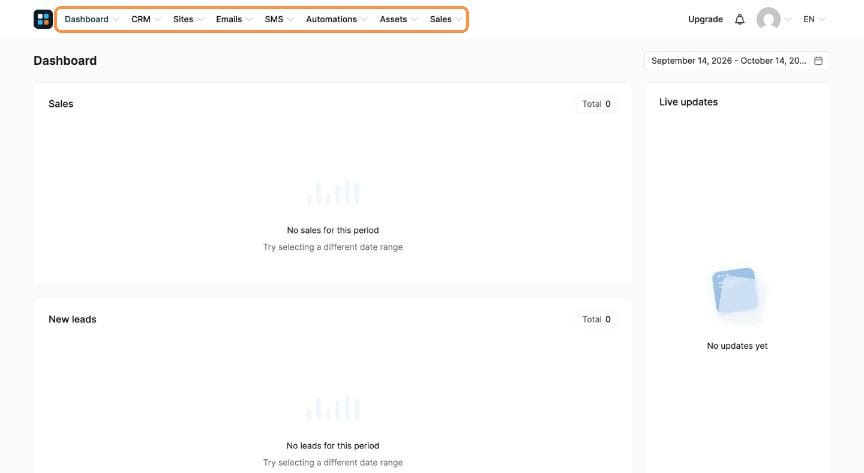
The top menu: where everything lives
Every tool in RadOS sits in the top menu bar. Click (or hover over) any item to open its sub-menu.
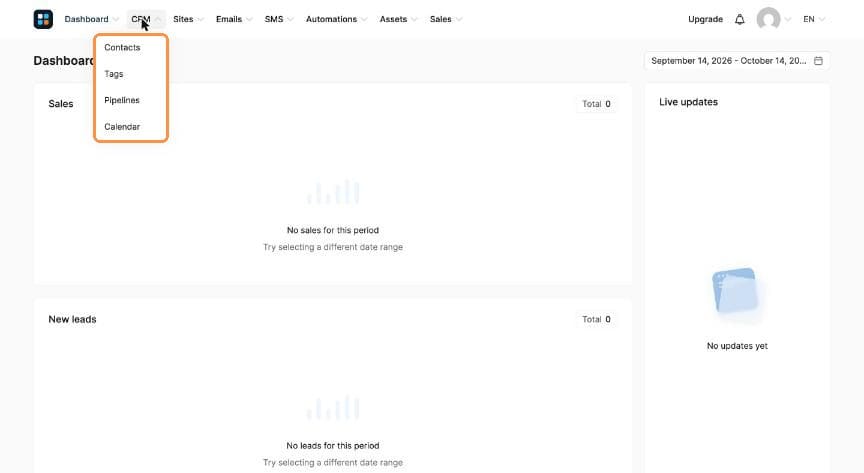
- CRM: your people. Contacts (everyone on your list), Tags (labels that organise them), Pipelines (track deals and clients) and Calendar (bookings).
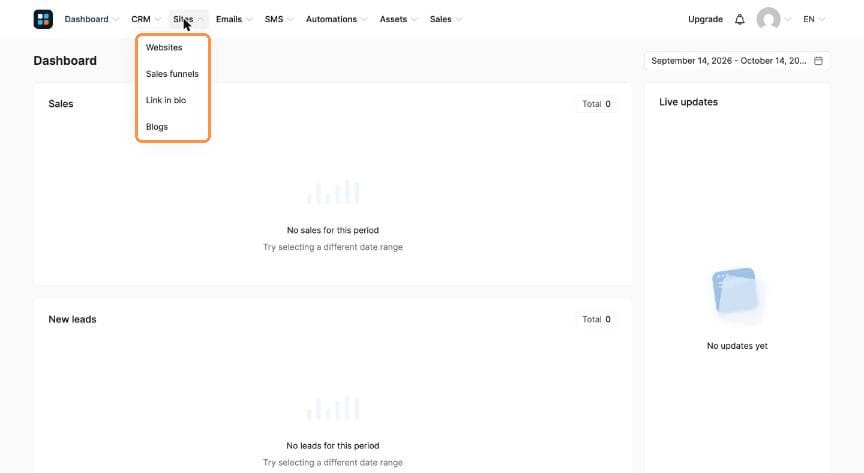
CRM → Contacts, Tags, Pipelines, Calendar - Sites: your pages. Websites, Sales funnels, Link in bio and Blogs.
Sites → Websites, Sales funnels, Link in bio, Blogs - Emails: Newsletters (one-off broadcasts), Campaigns (automated sequences) and Statistics (opens and clicks).
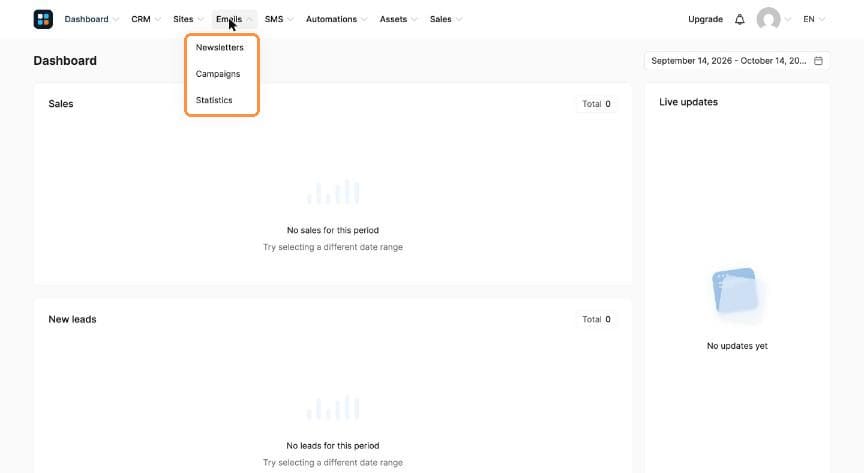
Emails → Newsletters, Campaigns, Statistics - SMS: SMS Templates and their Statistics.
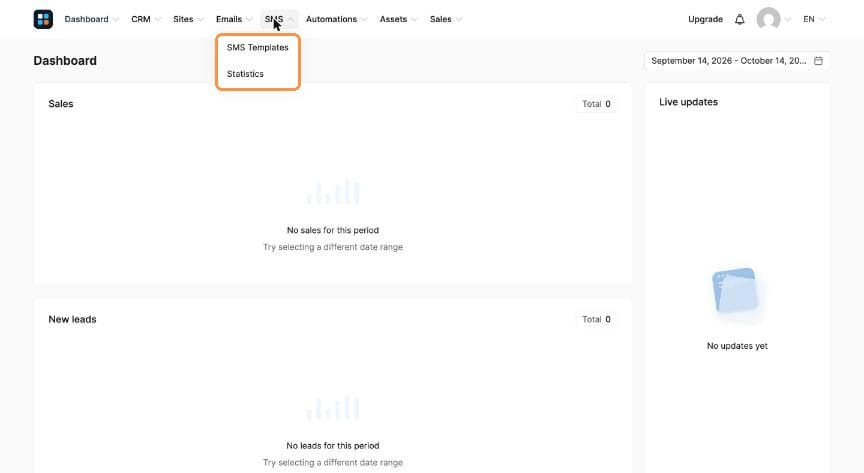
SMS → SMS Templates, Statistics - Automations: Rules (simple "when this happens, do that") and Workflows (multi-step sequences).
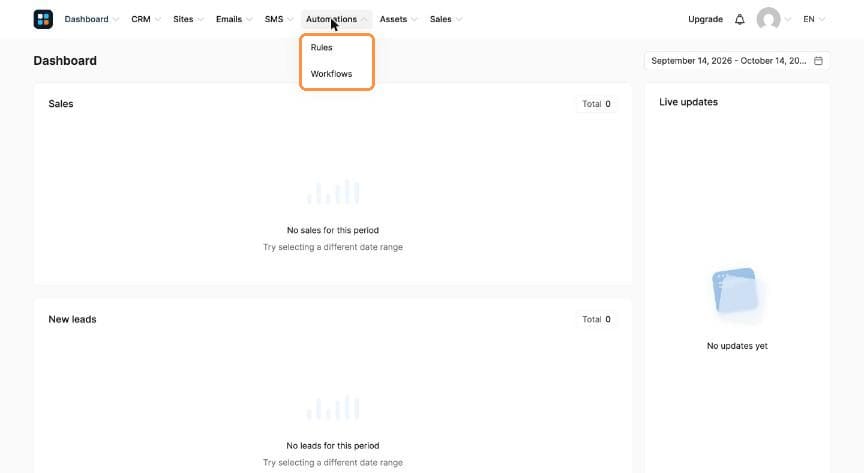
Automations → Rules, Workflows - Assets: what you sell and deliver. Physical products, Coupons, Courses, Communities and Files.
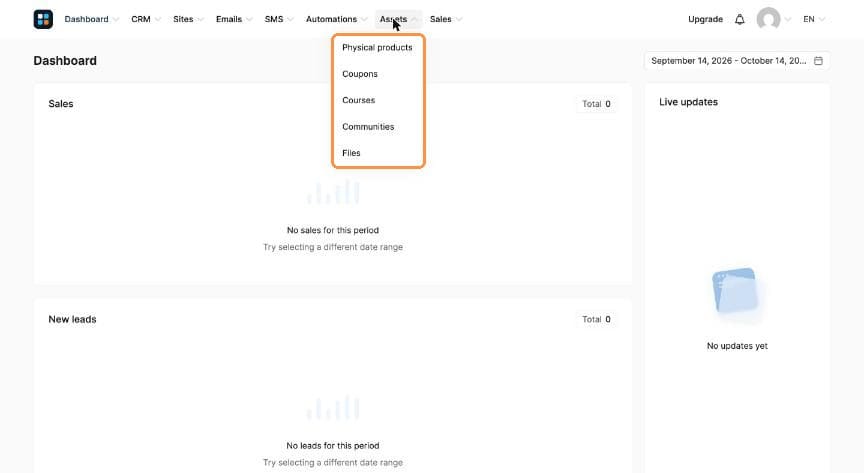
Assets → Physical products, Coupons, Courses, Communities, Files - Sales: your money. Orders, Transactions and Subscriptions.
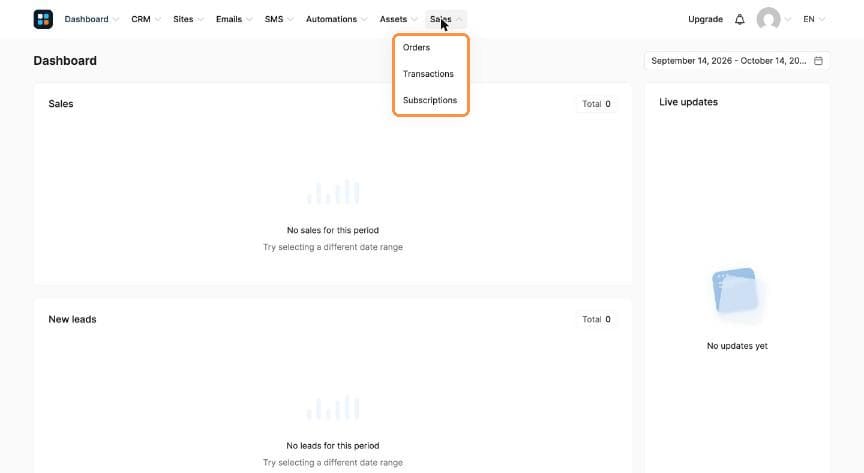
Sales → Orders, Transactions, Subscriptions
Your account settings
- Click your profile picture in the top right, then Settings.
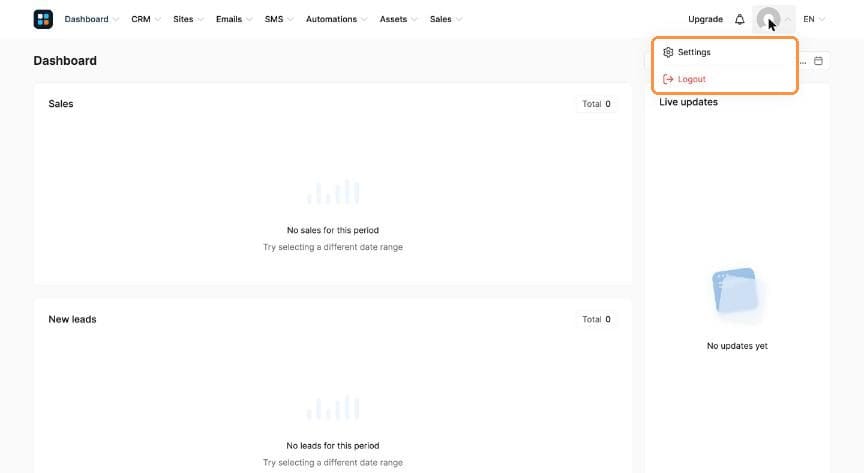
Profile picture → Settings - The left column lists every settings area: Profile, My plan, Payment gateways, Emails, Custom domains, Integrations, Workspace members and more. Fill in your Profile first: this information appears on your invoices.
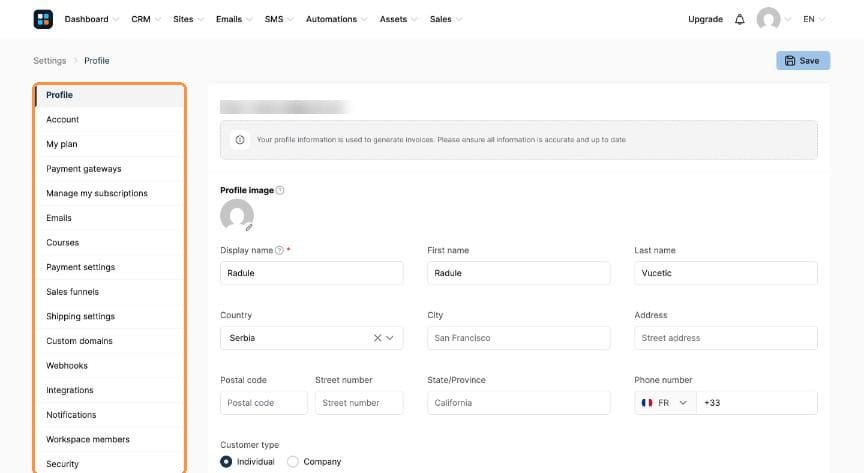
The Settings menu
Managing your contacts
Every lead and customer lands in your Contacts list. Tags keep that list organised. RadOS doesn't use separate lists at all, just tags. In this lesson you'll add a contact by hand, see how importing works, and filter and bulk-edit your list.
Part 1: Add a contact by hand
- Go to CRM → Contacts. You'll see everyone on your list with the date they registered and their tags. Click Add contacts in the top right.
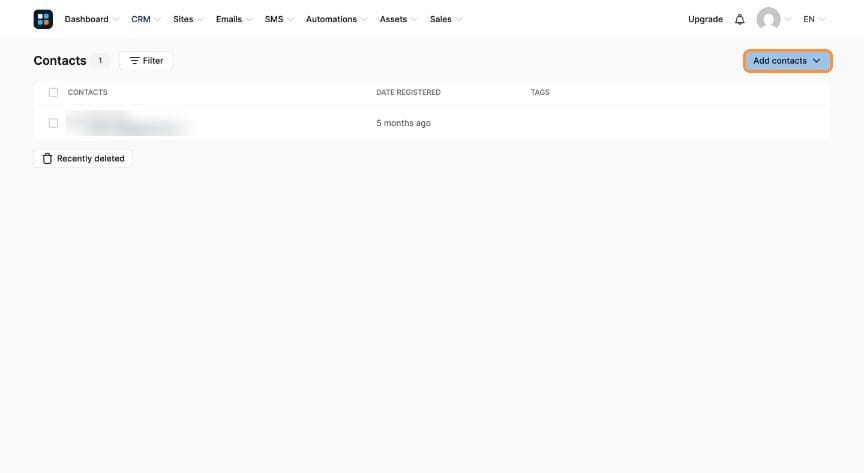
CRM → Contacts - Choose Create contact (one person) or Import contacts (a whole list from a CSV file).
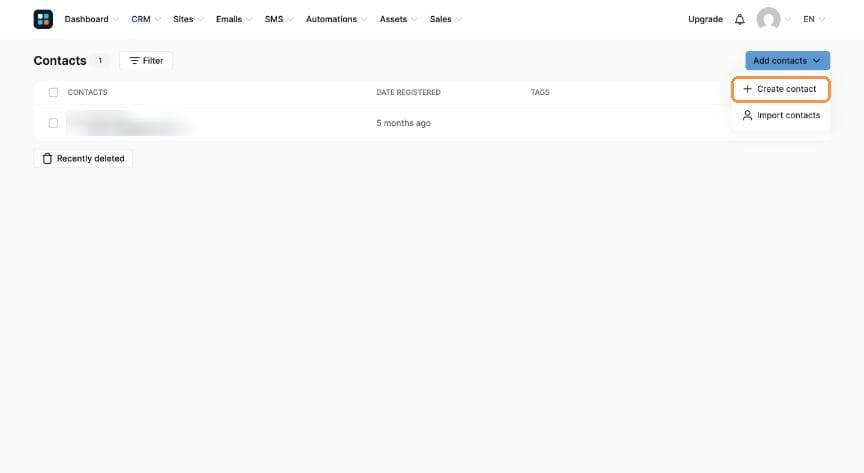
Add contacts → Create contact - Fill in the Email (required) and First name / Last name. In the Tags box, pick one or more tags. Further down you'll find Address and Custom fields. Click Save.
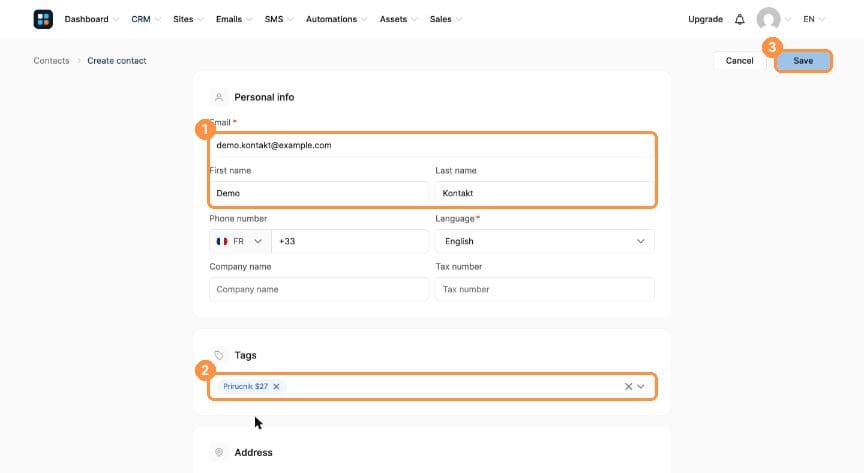
(1) Email and name, (2) Tags, (3) Save
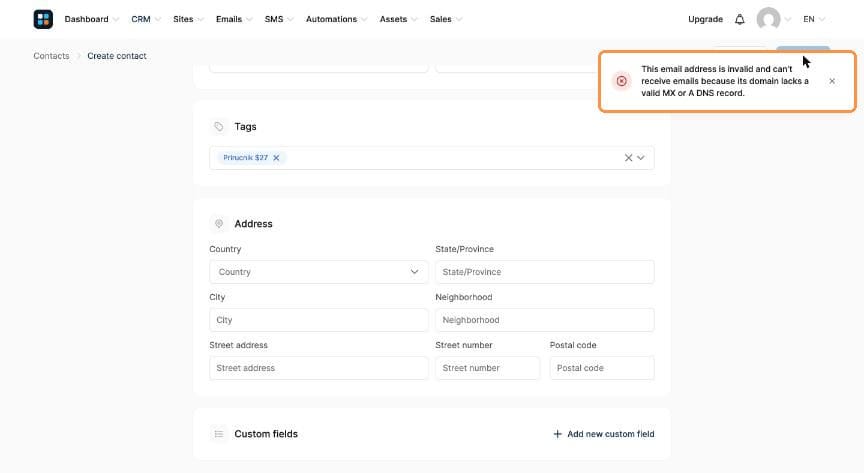
- A green confirmation appears and the contact shows up in your list with its tags.
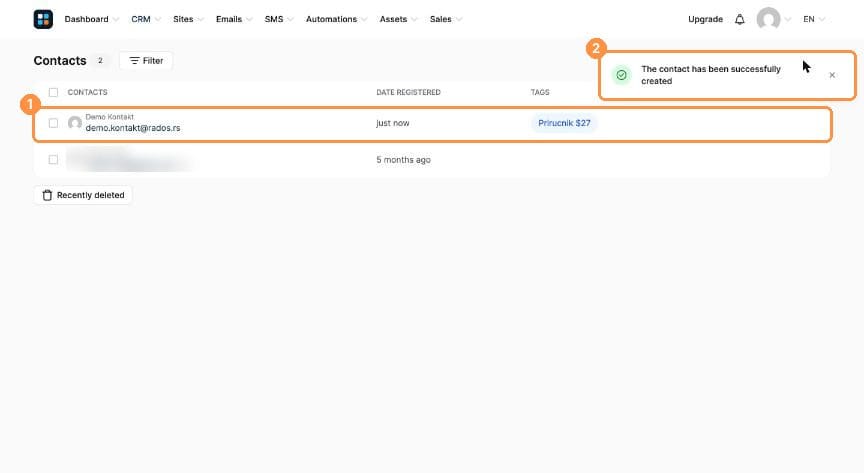
(1) The new contact, (2) the confirmation - Click any contact to open their profile. On the left you'll see their Tags (click + to add one, × to remove it, or Tag history to see changes) and contact data. The tabs on the right show their Subscriptions, Payments, Emails, Campaigns, Courses, Automation tasks and more.
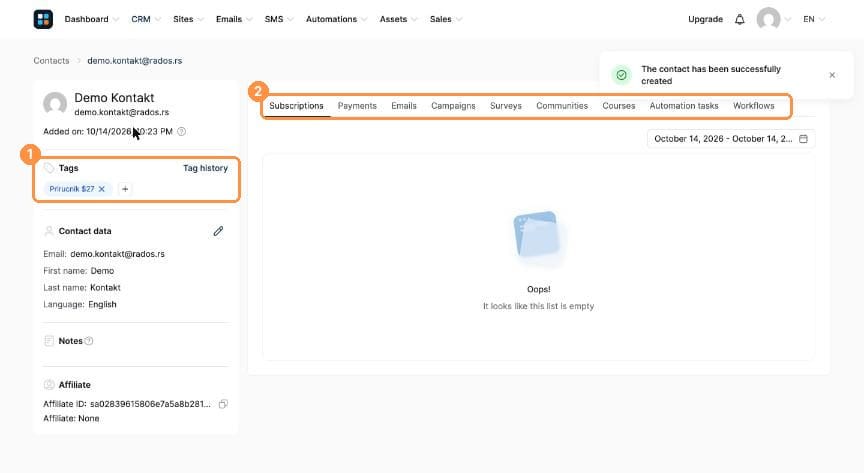
(1) Tags, (2) the contact's activity tabs
Part 2: Import a list
- Go to Add contacts → Import contacts. Drag in a CSV file (or click to upload). The first row must contain the column names. Need a template? Use Download our sample CSV file.
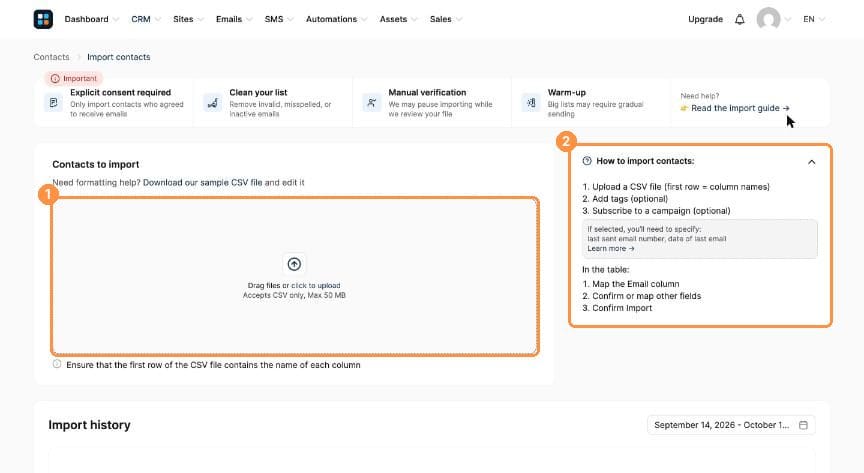
(1) Upload area, (2) the import steps - Follow the three steps on the right: upload the file, add tags (optional) and subscribe to a campaign (optional). Then, in the table, map the Email column, confirm the other fields and click to import.
Part 3: Filter and bulk-edit
- Click Filter → Add condition → Tag, keep Tagged with and choose a tag. The list instantly shows only those contacts. Use Save filter to reuse it later.
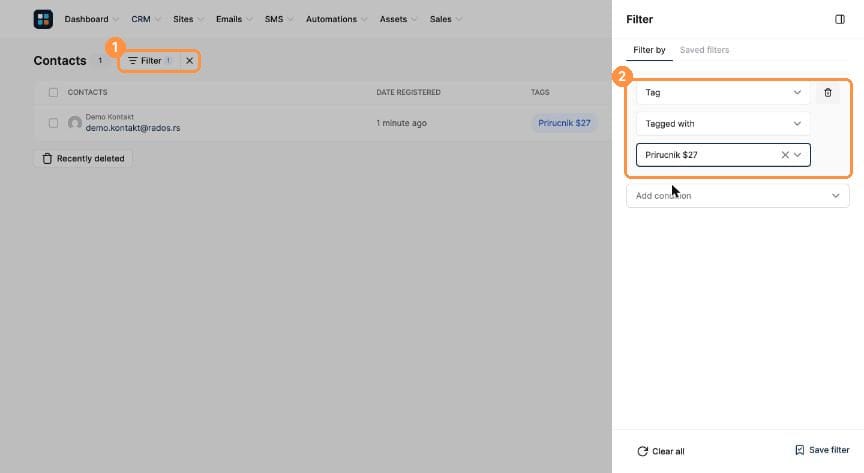
(1) Filter button, (2) Tag → Tagged with → your tag - Tick one contact, or the top checkbox to select everyone in the view. A bar appears at the bottom with Add tag, Delete tag, More and Delete.
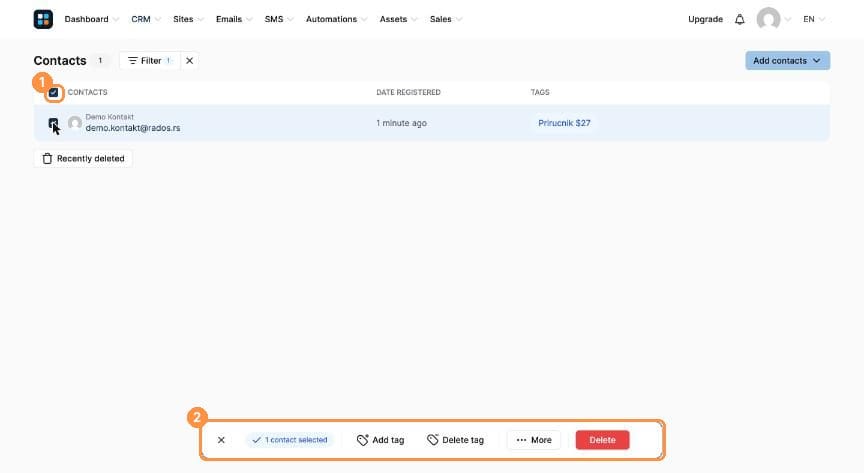
(1) Select contacts, (2) the bulk-action bar - More lets you subscribe or unsubscribe the selection from a campaign, change their marketing-email status, or Export them.
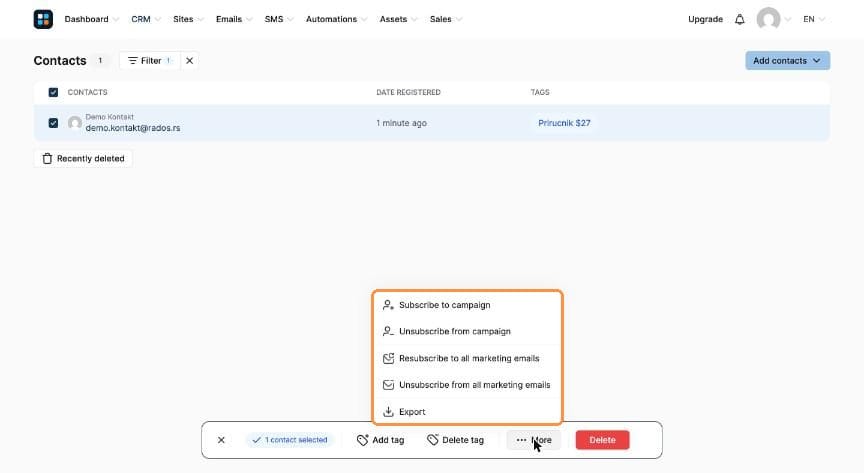
More → bulk options
Building a lead-generating funnel
Your first funnel should have one job: turn visitors into leads. In this lesson you'll build an opt-in page and a thank-you page, and set up an automation that tags every new lead automatically.
Part 1: Create the funnel
- Go to Sites → Sales funnels and click + Create. Give the funnel a name, keep your default domain, choose Build an audience ("Collect email addresses and build your email list") and click Create.
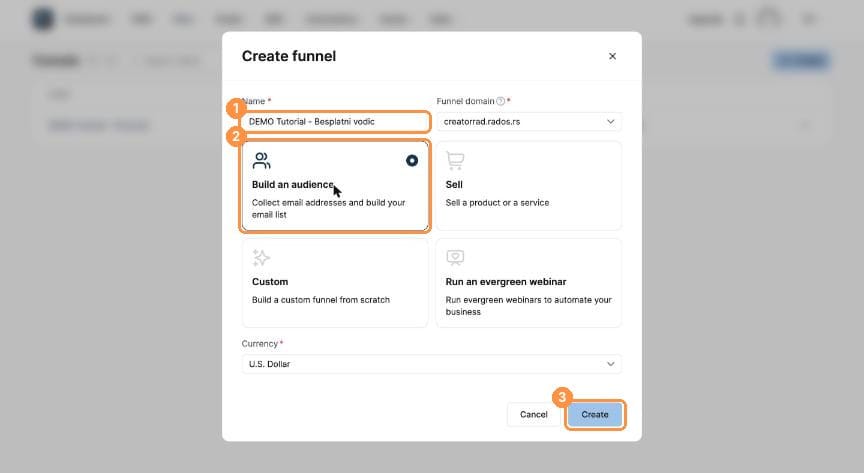
(1) Name, (2) Build an audience, (3) Create - Open the funnel. It comes with two steps: Opt-in page and Thank You / Download Page. With the Opt-in page selected, hover over a template and click Use template.
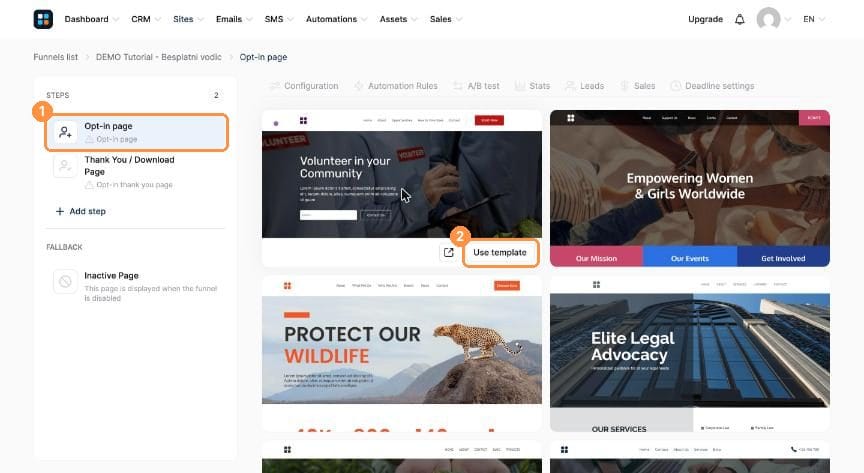
(1) Opt-in page step, (2) Use template - The Configuration tab shows the page Name and its URL Path (the end of the web address). Change the path to something readable if you like, e.g. free-guide.
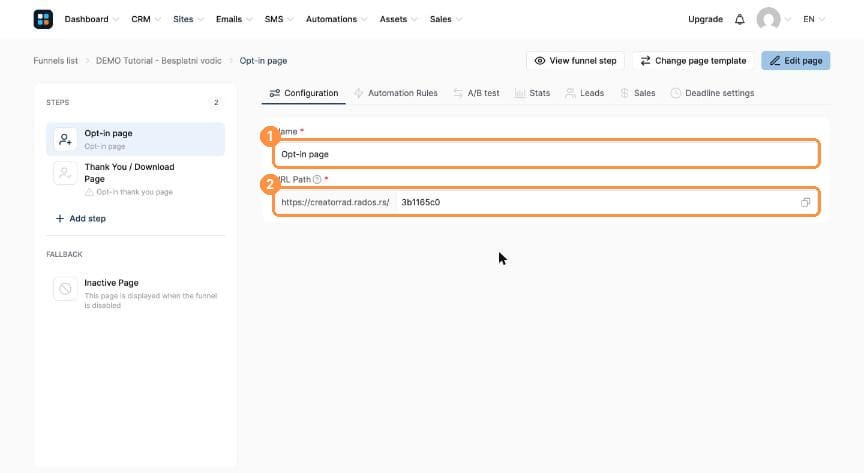
(1) Name, (2) URL Path
Part 2: Check the form in the editor
- Click Edit page. Opt-in templates already include an email field and a button. Click any text to replace it with your own offer, then Save.
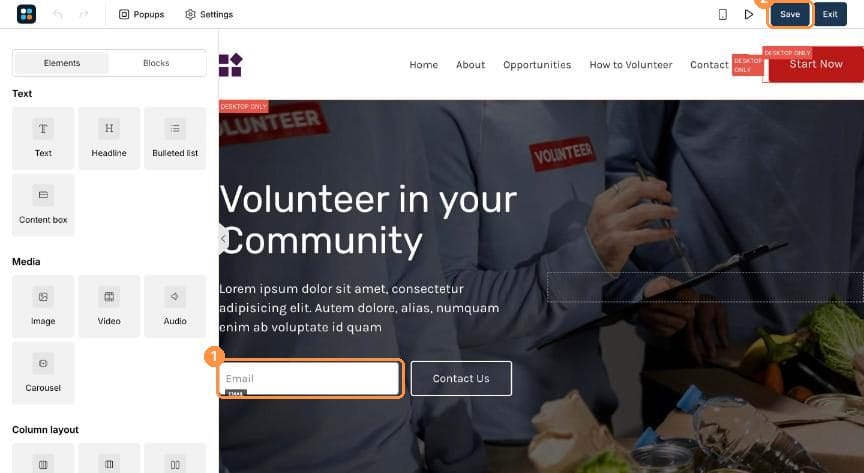
(1) The email field, (2) Save - Need a form on a page that doesn't have one? Scroll the Elements panel to Form and drag in Form, Form input, Button or Checkbox.
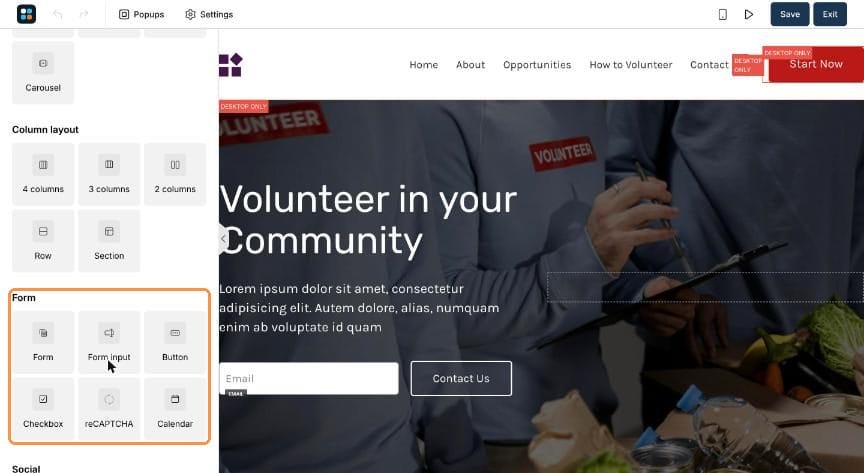
Elements → Form - Click a field to see its settings. Make sure one field has Input type: Email.
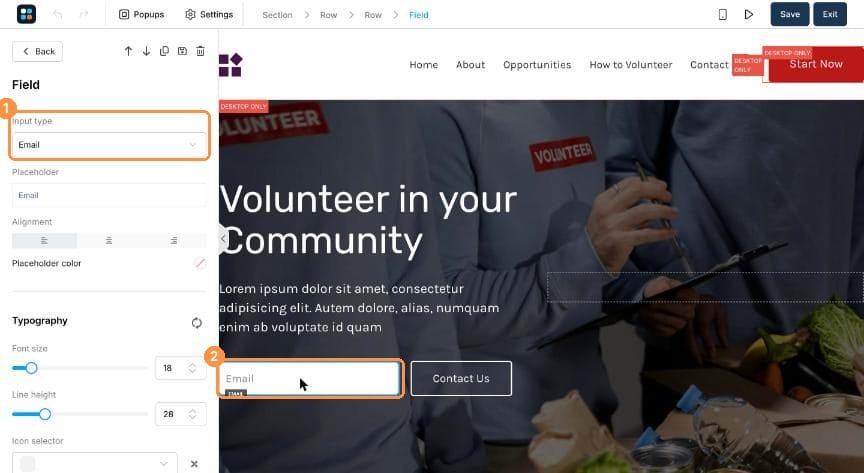
(1) Input type: Email, (2) the selected field
Part 3: Tag every new lead automatically
- Back in the funnel, open the Automation Rules tab and click Add rule. A rule has two halves: a Trigger (when this happens) and an Action (do this).
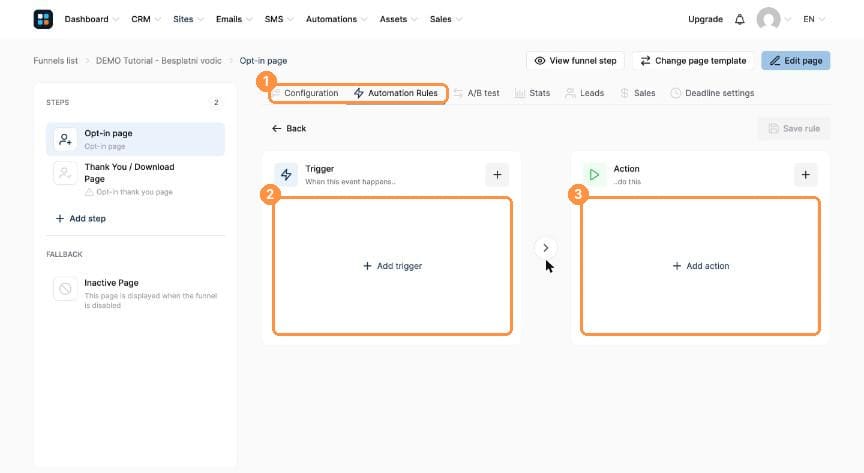
(1) Automation Rules tab, (2) Add trigger, (3) Add action - Click Add trigger → Funnel step form subscribed. The funnel and step fill in automatically.
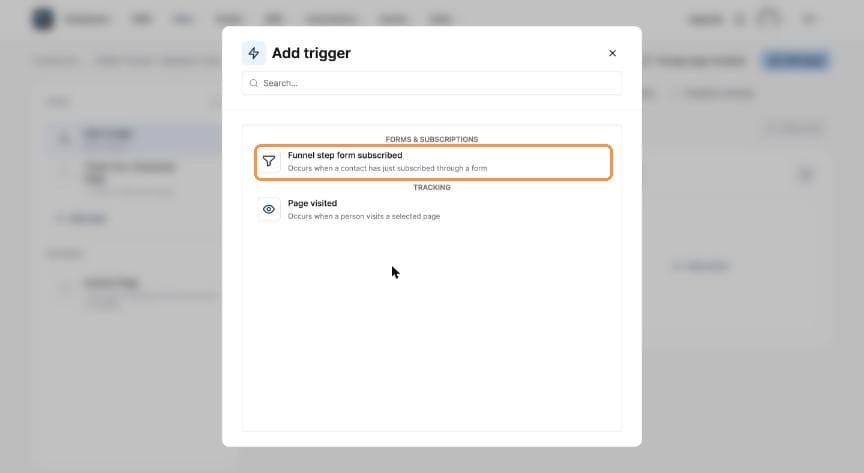
Trigger: Funnel step form subscribed - Click Add action → Add a tag. (Other options here include Subscribe to campaign, Send email and Add to a pipeline stage.)
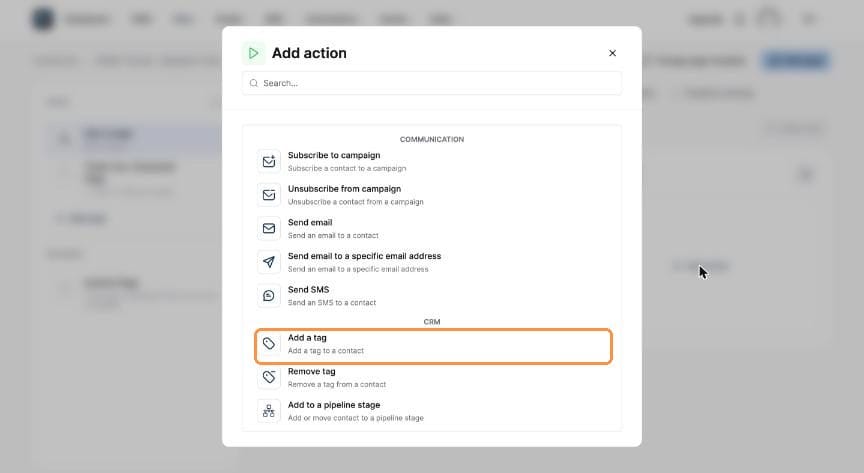
Action: Add a tag - Choose a tag, or type a new name to create one, then click Save rule.
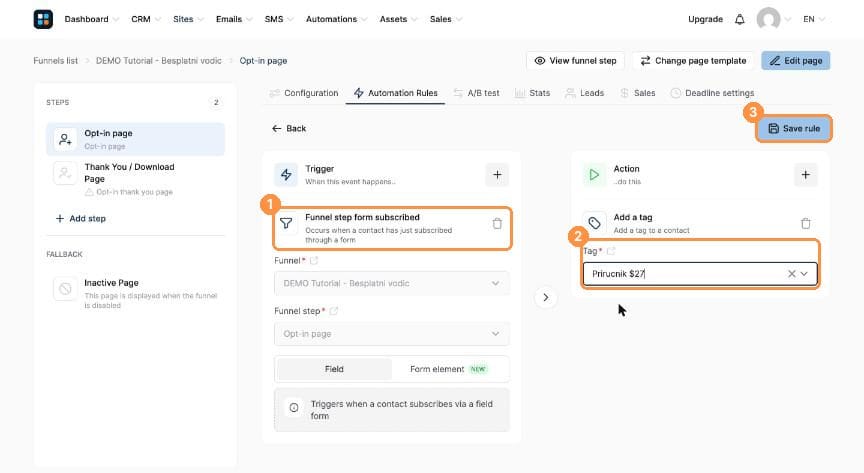
(1) Trigger, (2) tag, (3) Save rule - The rule is now Active. From now on, everyone who opts in is tagged automatically.
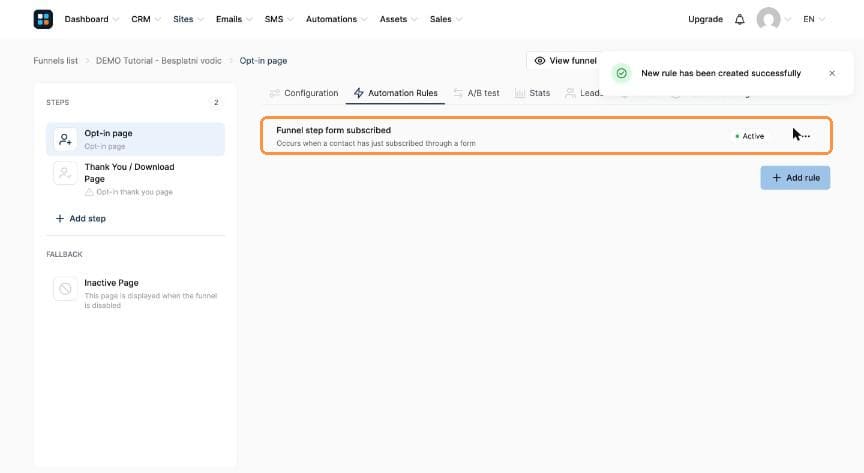
The active rule
Part 4: Thank-you page and stats
- Click Thank You / Download Page and pick a template. New leads land here right after signing up, so it's the perfect place for a download button.
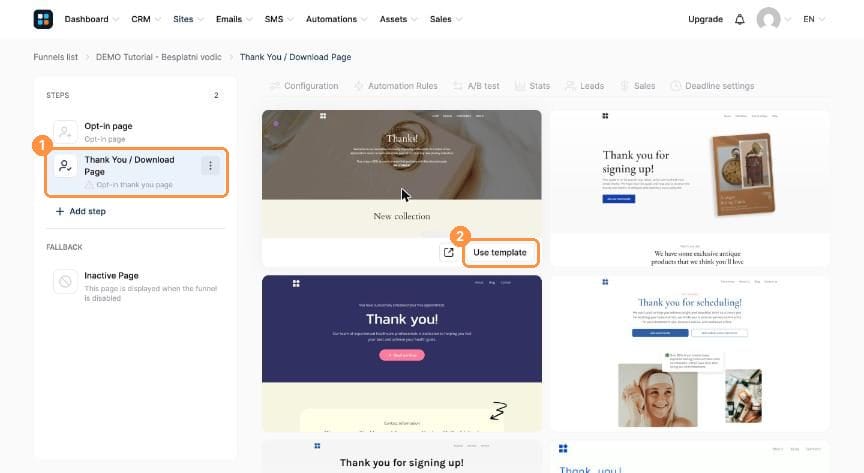
(1) Thank-you step, (2) Use template - Once traffic starts coming in, the Stats tab shows page views, opt-ins and conversion rate for each step.
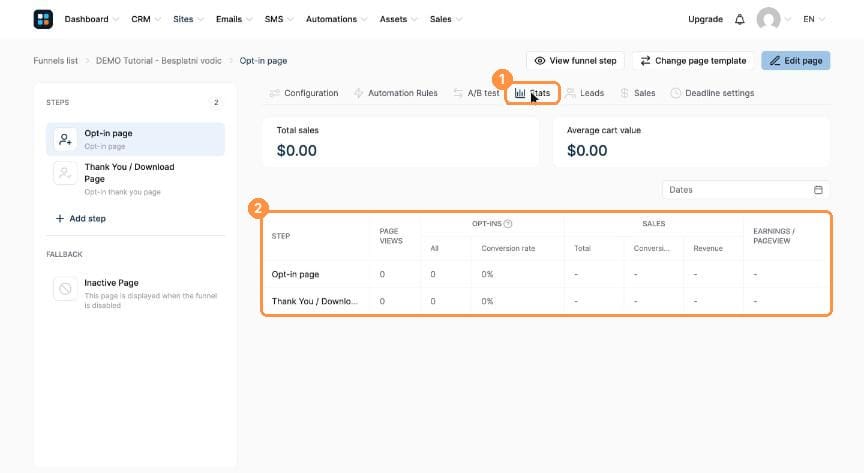
(1) Stats tab, (2) views, opt-ins and conversion rate
The other tabs on a funnel step
- A/B test: run two versions of the page and see which converts better.
- Leads: everyone who opted in through this funnel.
- Sales: every sale made through this funnel.
- Deadline settings: a time-limited offer that redirects visitors once it expires.
Building a funnel to sell products
Once you have an offer, the Sell funnel turns visitors into paying customers. Lesson 18 shows how to create the funnel and the main product step by step. This lesson adds the tools that raise your revenue per customer: a sales limit, an order bump and an upsell.
Before you start
Create a Sell funnel with a digital product and a price plan on its Order Form. The click-by-click walkthrough is in Lesson 18.
Part 1: Limit how many can be sold (optional)
- On the Order Form step, open Sales limit. Enter the maximum number of sales and choose the funnel step visitors are sent to once the limit is reached (for example a "Sold out" page). Useful for early-bird offers or limited spots.
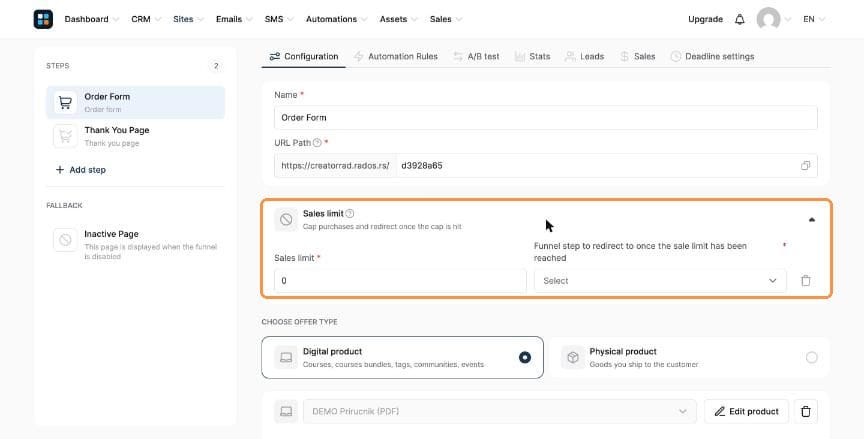
Sales limit and the redirect step
Part 2: Add an order bump
An order bump is a small extra offer with a checkbox right on the order form, for example a €7 checklist added to a €27 guide.
- Scroll to the bottom of the Order Form settings. Below Coupons, click + Add order bump.
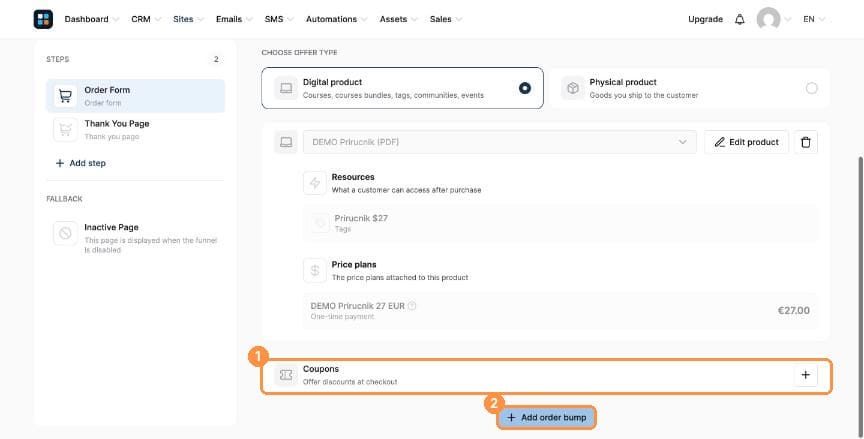
(1) Coupons, (2) + Add order bump - Under the new Order bump section, choose Digital product (or Physical product).
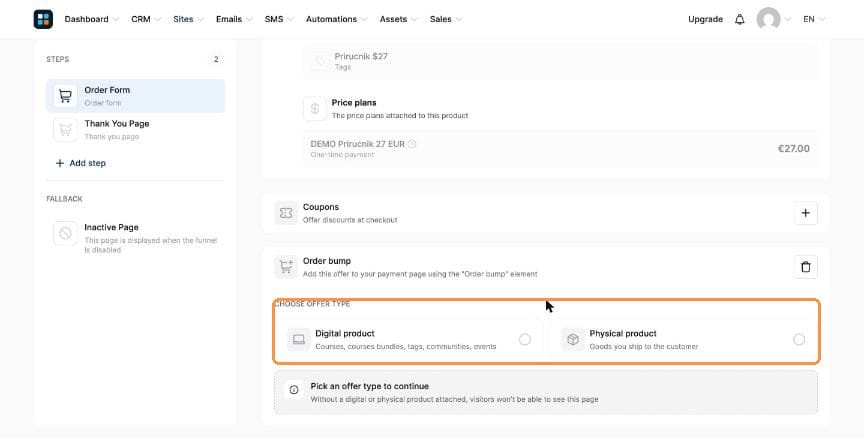
Order bump → choose the offer type - Create the bump product with + Create new product, the same way as your main product. Then click + next to Resources (what the buyer gets) and + next to Price plans (the bump price).
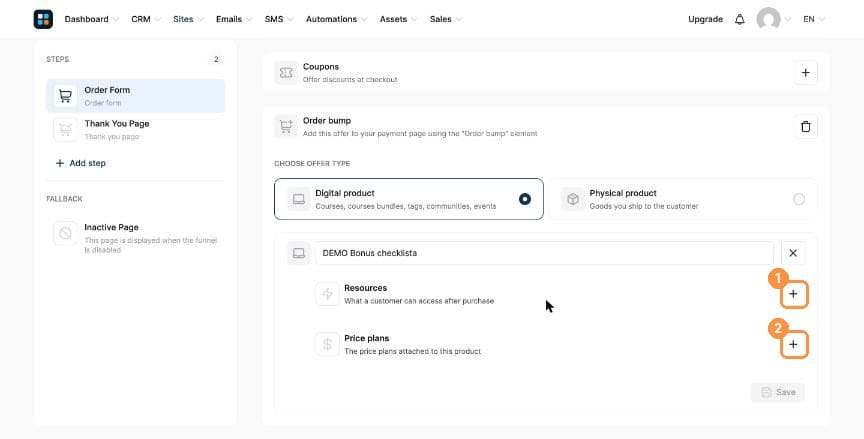
(1) Add a resource, (2) add a price plan - When both are filled in, click Save.
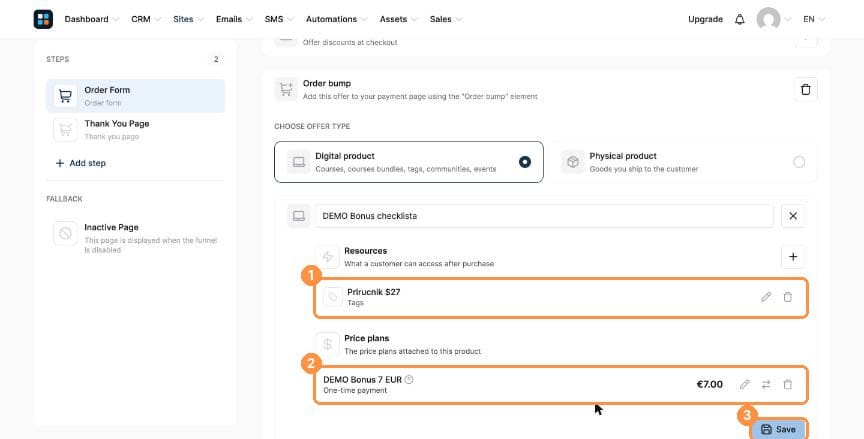
(1) Resource, (2) €7 price plan, (3) Save - "Changes saved" confirms it. The bump product is now locked in; use Edit product to change it later.
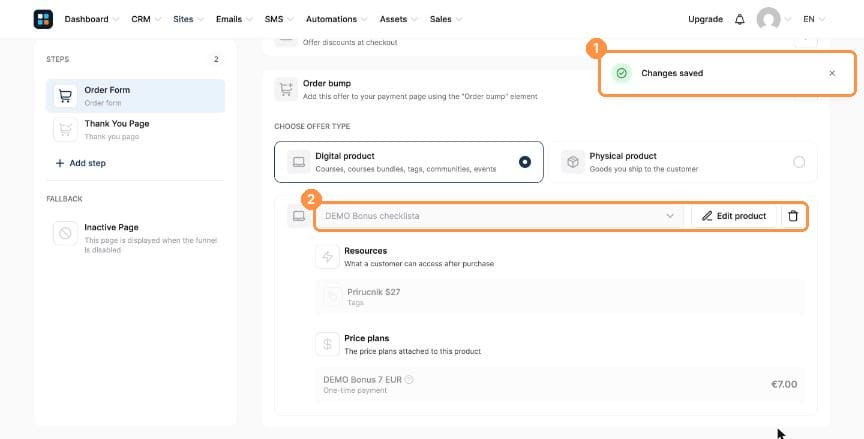
(1) Confirmation, (2) the saved bump - Open Edit page and drag the Order bump element (in the Payment section of the elements panel) into the order summary. Without this element the bump won't appear on the page.
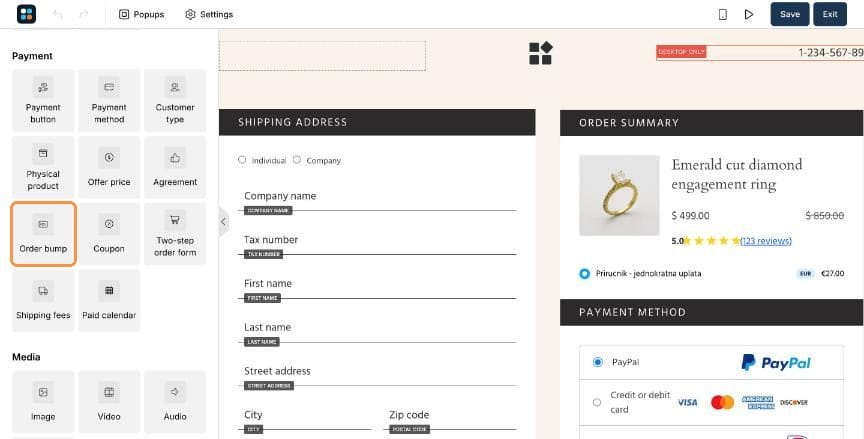
Elements → Payment → Order bump
Part 3: Add an upsell
An upsell is a one-click offer shown right after payment, before the thank-you page.
- In the left panel, click + Add step and give the step a name.
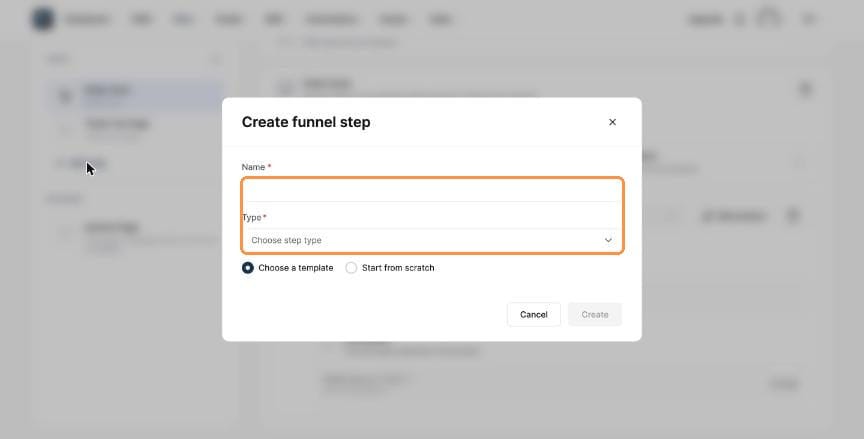
Name the new step - Open Type. You'll see every step type (opt-in pages, sales pages, order forms and more). Type Upsell to find it quickly.
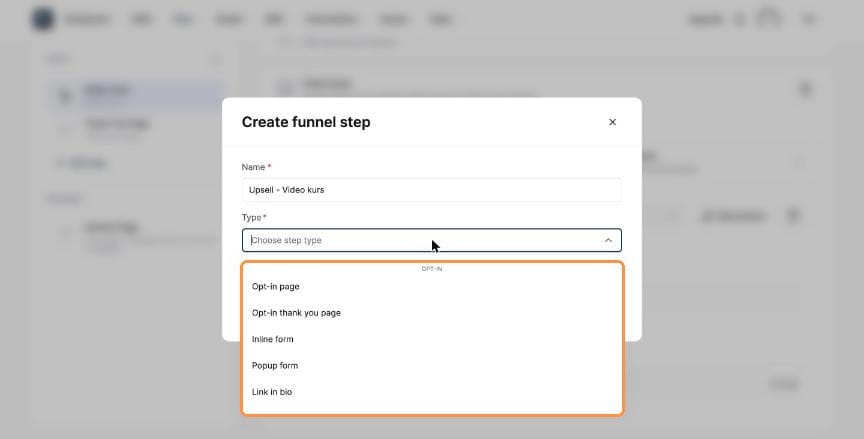
The step type list - Select Upsell, keep Choose a template and click Create.
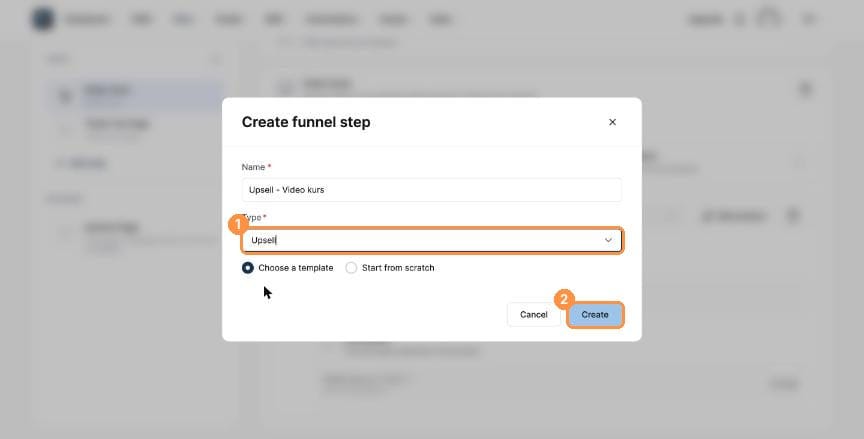
(1) Type: Upsell, (2) Create - The new step appears in the list. Hover over a template and click Use template.
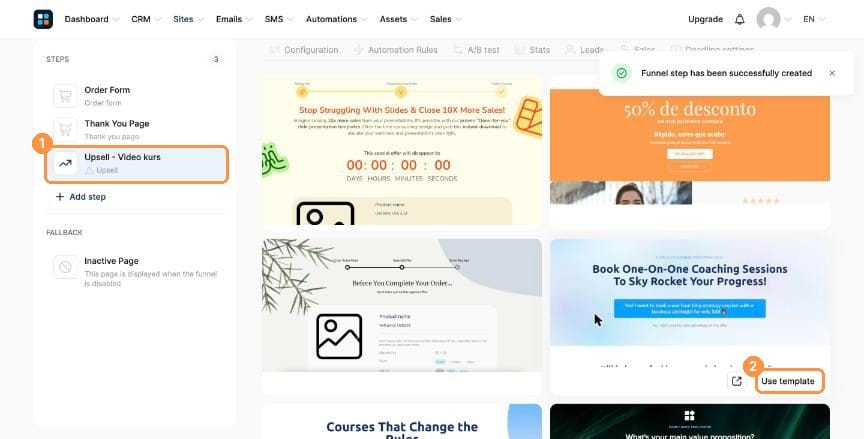
(1) The new upsell step, (2) Use template - Under Choose offer type, attach the upsell product and price exactly as you did on the order form.
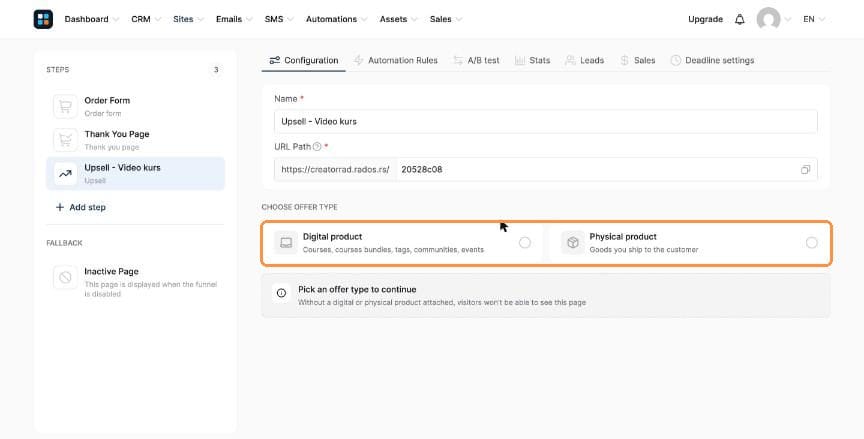
Attach the upsell offer - New steps are added at the bottom. Drag the upsell so it sits directly below the Order Form and above the Thank You Page.
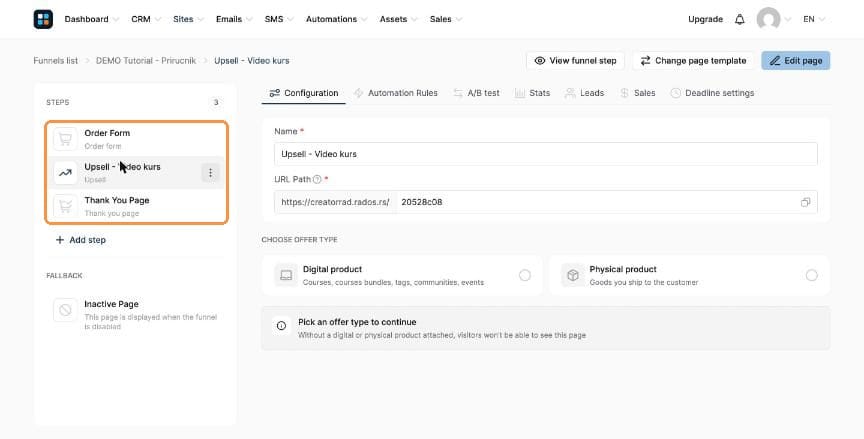
Order Form → Upsell → Thank You Page - In the upsell's editor, keep both buttons: Accept ("YES! I want this!") and Decline ("No thanks"), so customers can choose either path.
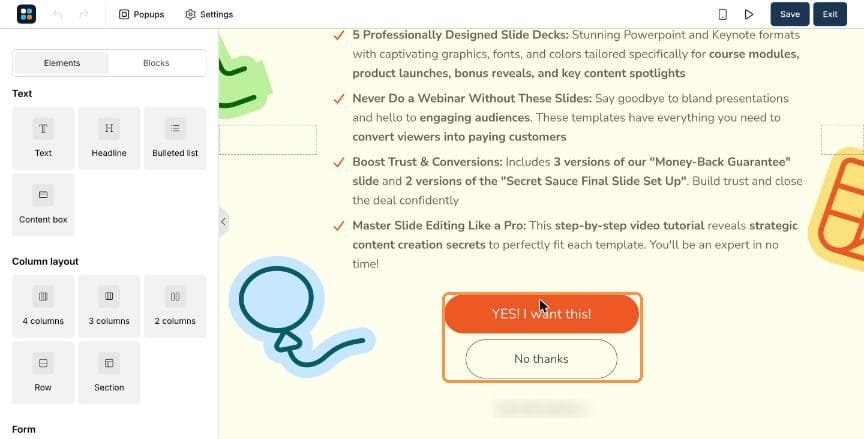
Accept and Decline buttons
Sending & managing your emails
Two tools cover everything: Newsletters for one-off emails to part of your list, and Campaigns for automated sequences, like a welcome series that starts when someone signs up.
Before you start: a sender address on your own domain
- Both tools live under the Emails menu.
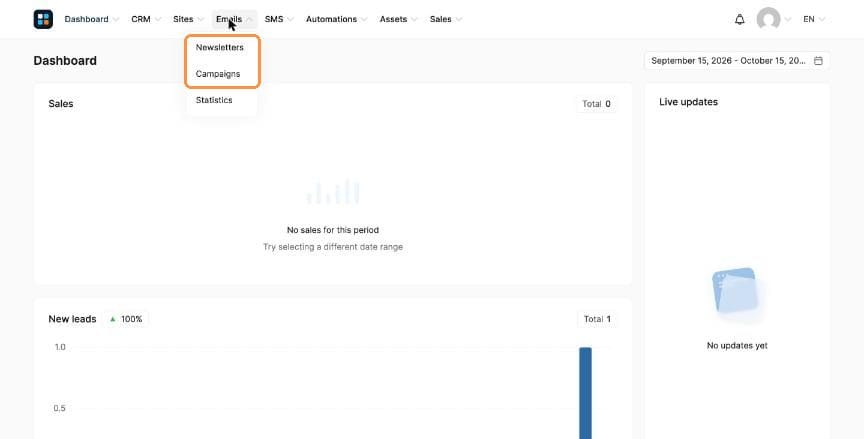
Emails → Newsletters, Campaigns - RadOS only sends from an address on a domain you own (for example info@yourbrand.com), not from Gmail or Yahoo. Go to Profile picture → Settings → Emails: click Setup domain authentication, enter your domain and add the DNS records it shows at your domain provider. Then click Click here to confirm your email address, add your address and click the confirmation link that arrives in that inbox. Both need to show Verified.
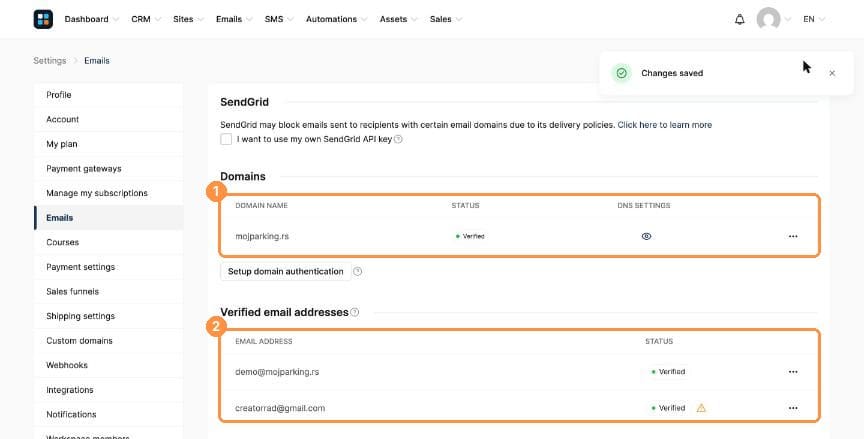
(1) Verified domain, (2) Verified sender address
Part 1: Send a newsletter
- Go to Emails → Newsletters and click + Create.
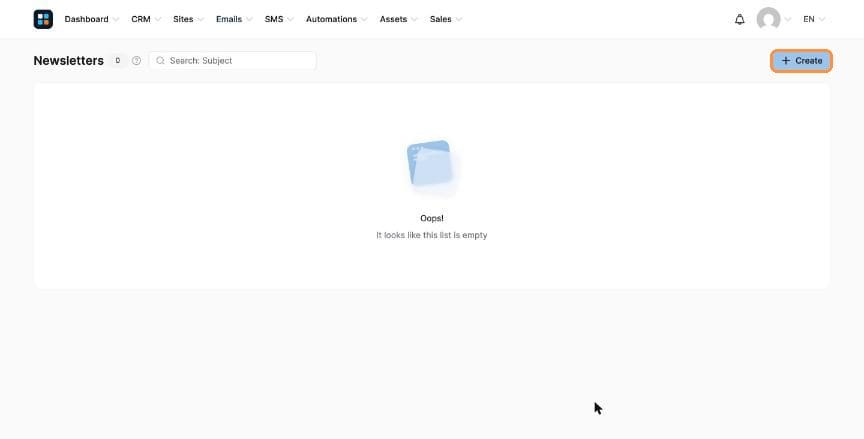
+ Create - Enter the Subject, check the Sender name, pick your Sender email address and choose an editor: Classic for simple, personal-looking emails, Visual for drag-and-drop layouts with images and buttons. Click Create.
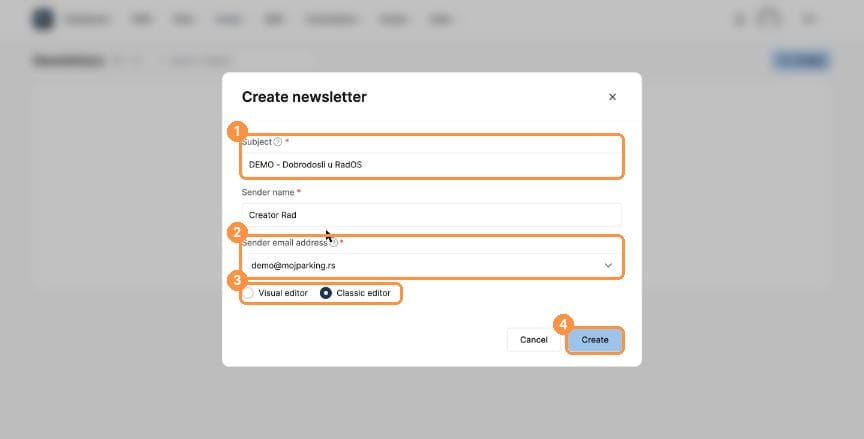
(1) Subject, (2) Sender address, (3) Editor, (4) Create - Add a short Preview text (shown next to the subject in the inbox), write the email in Body, and on the Recipients tab choose who gets it under Include these tags. Use Exclude these tags to leave people out.
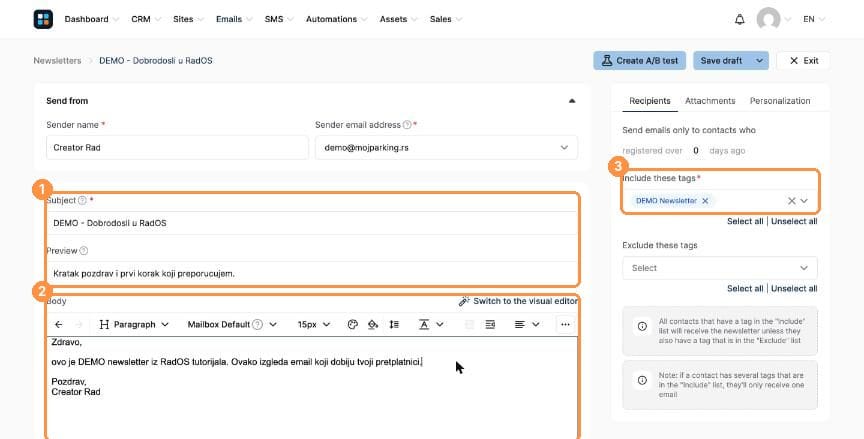
(1) Subject and preview, (2) Body, (3) Tags to include - The Personalization tab lists codes like
{first_name}. Put one in the text and every contact sees their own name.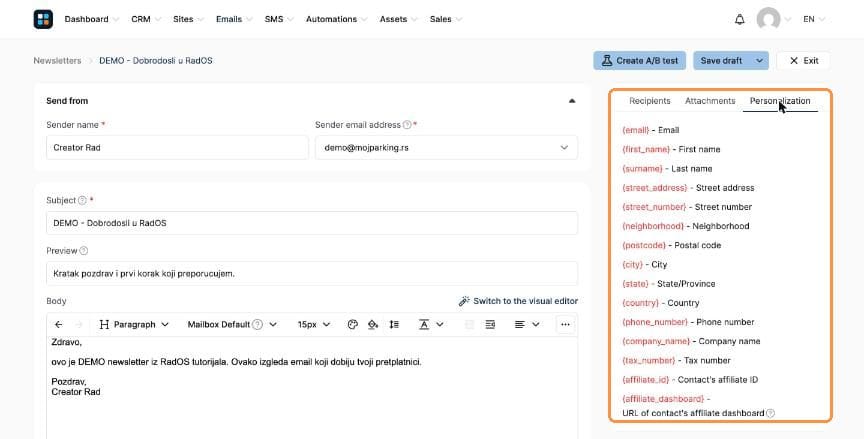
Personalization codes - Open the arrow next to Save draft: Save and test sends a test to you, Save and send sends now, Save and schedule picks a date and time.
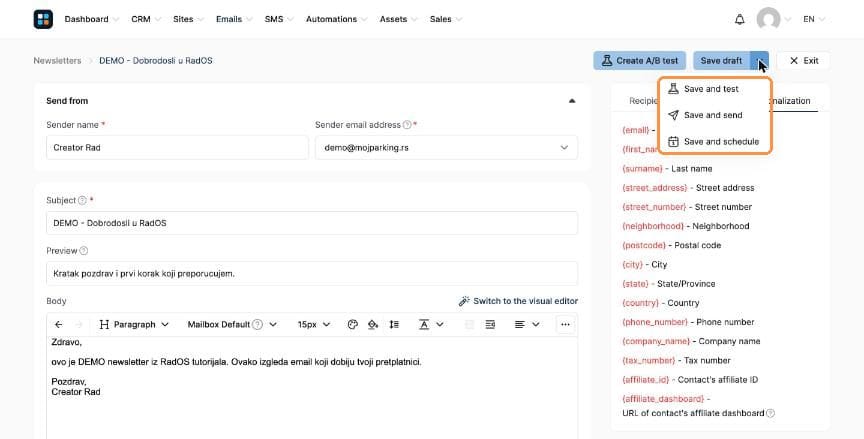
Save and test / send / schedule - Confirm, and the newsletter goes out. The list shows how many emails were sent, opens and clicks.
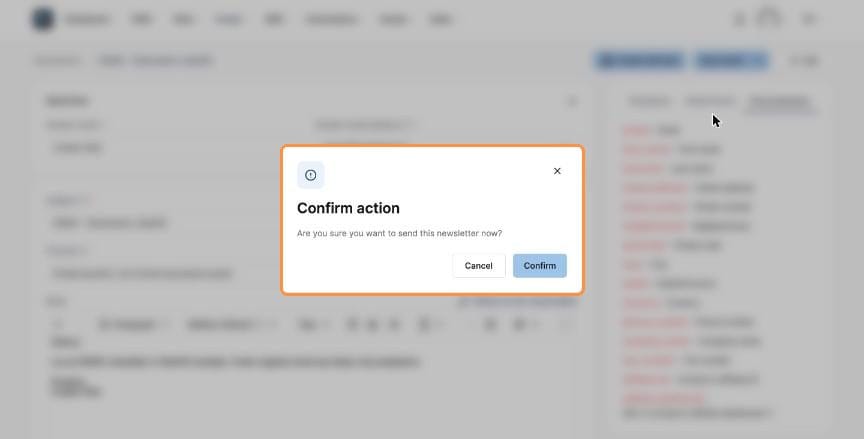
Confirm 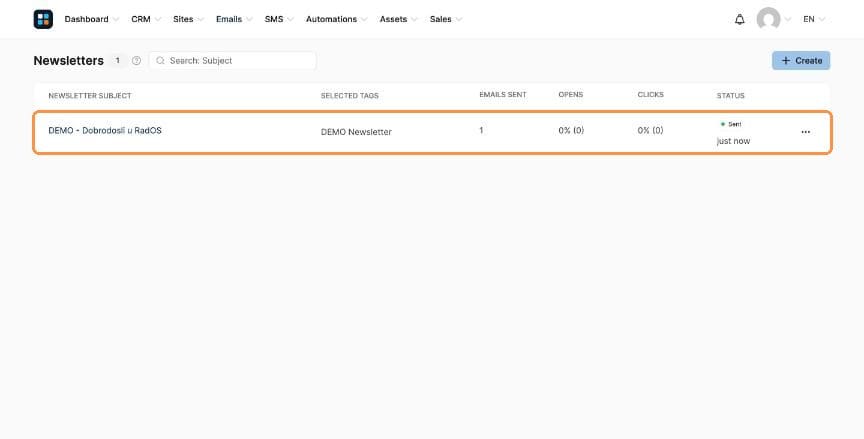
Sent
Part 2: Build an email campaign (sequence)
- Go to Emails → Campaigns, click + Create, enter a Name, choose the Sender email address and click Create.
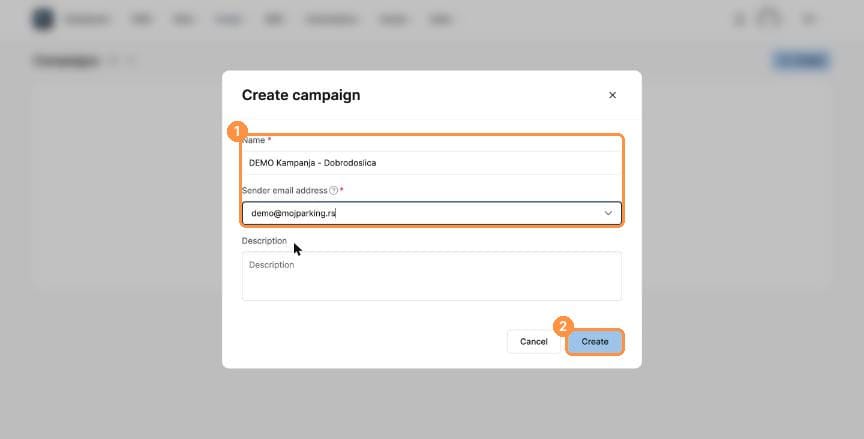
(1) Name and sender, (2) Create - Click the campaign name to open it.
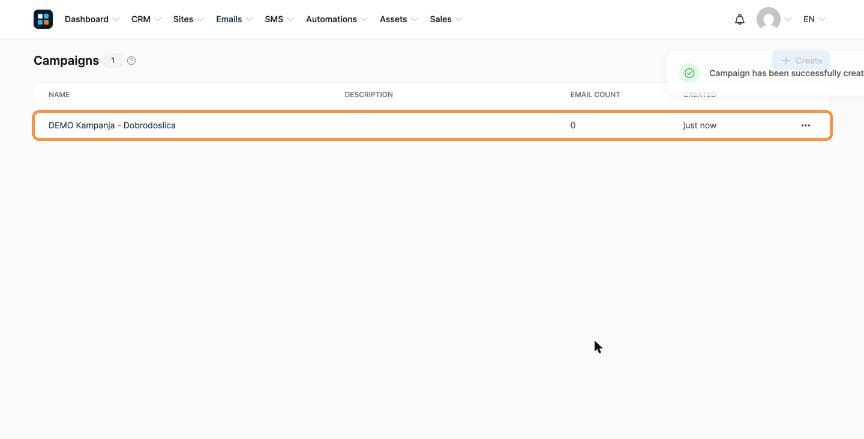
Your campaign - Click + Create to add the first email (a "campaign step"): subject, sender and editor, then Create.
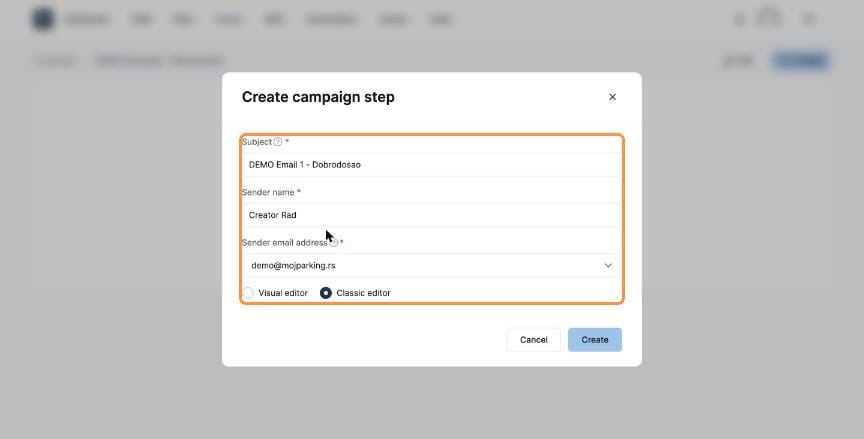
Subject, sender and editor - Write the email.
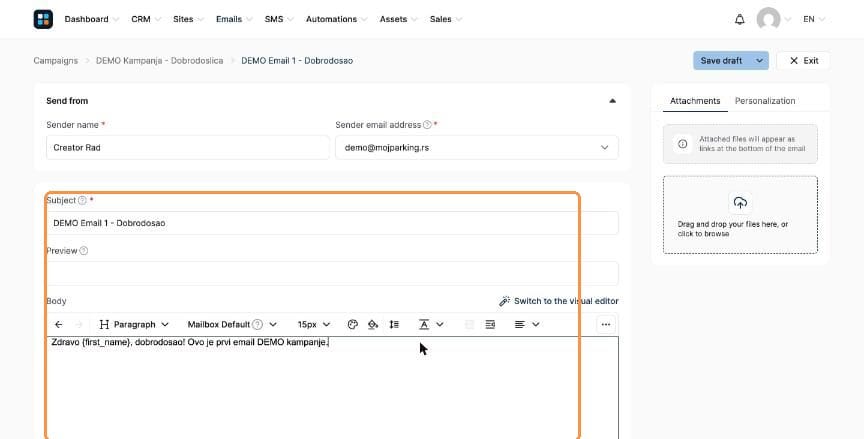
The email - Open the arrow next to Save draft and choose Save and publish.
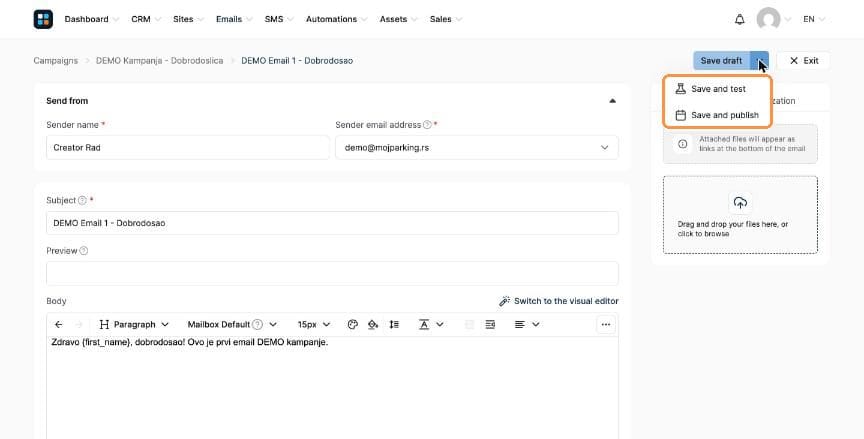
Save and publish - Choose after which email this one is sent (empty for the first email) and the delay, for example 2 days after the previous one. You can also limit the time of day and days of the week. Click Activate.
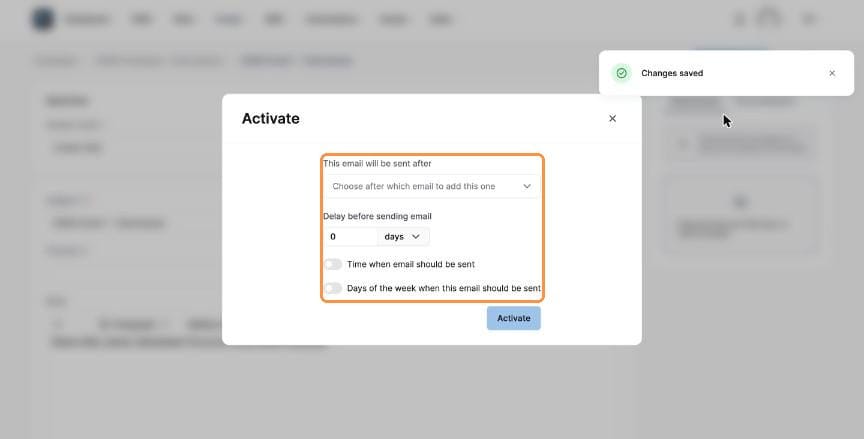
Order and delay - Repeat for every email in the sequence. Each one must show Active.
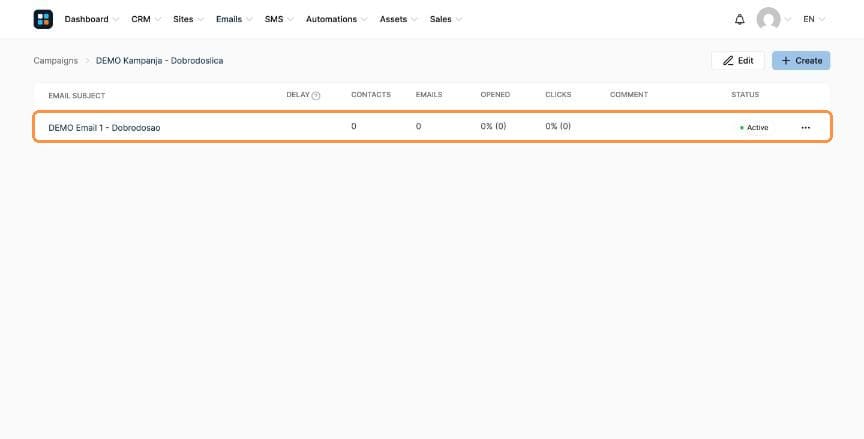
Active
Automating your business
One simple logic runs the whole system: when something happens, RadOS does something, with no manual work. Use Rules for simple "if this, then that" automations and Workflows for multi-step sequences with waits and branches.
Part 1: Automation rules
- Go to Automations → Rules. Every rule is listed with its Trigger, Action, Status and creation date, and you can filter by trigger, action or status. Rules you create inside a funnel step appear here too. Click + Create.
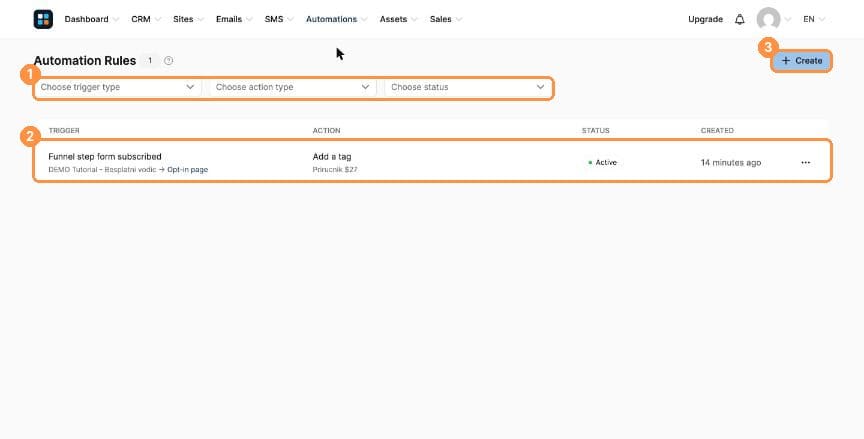
(1) Filters, (2) your rules, (3) + Create - A rule has two halves: the Trigger (when this event happens) and the Action (do this). Click Add trigger.
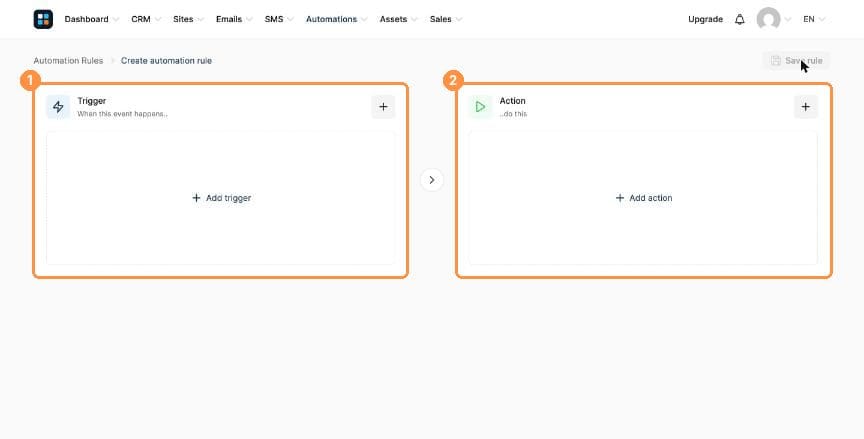
(1) Trigger, (2) Action - Choose a trigger. The list is grouped: Contact (tag added/removed), Forms & subscriptions (funnel, website, blog and link-in-bio forms), Courses (enrolled, module/lecture/course completed), Sales, Email (campaign completed, email opened, link clicked) and more (webinar registration, meeting scheduled, enrolled in community, page visited).
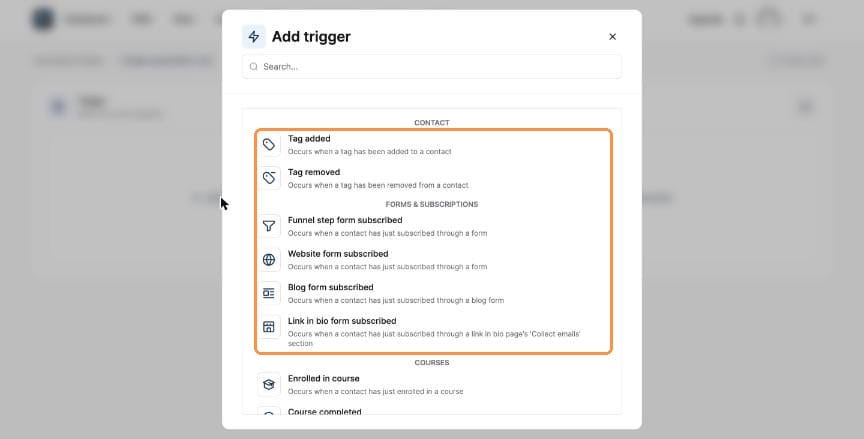
Contact and form triggers 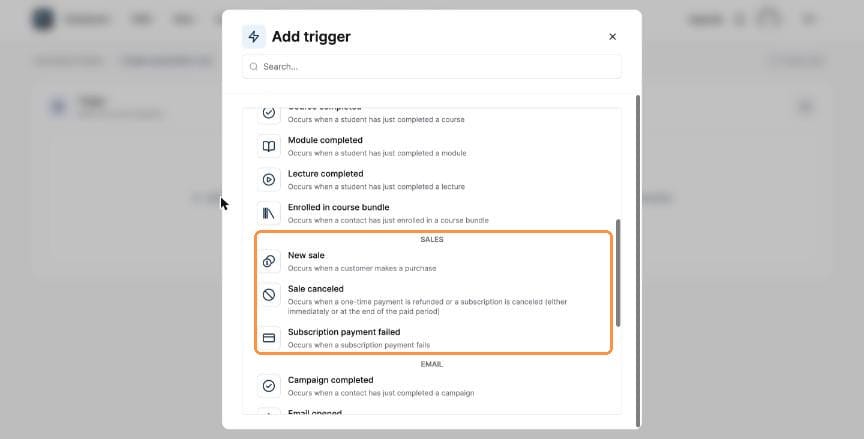
Sales triggers - For example, pick New sale, then choose the Funnel and the Funnel step (the order form).
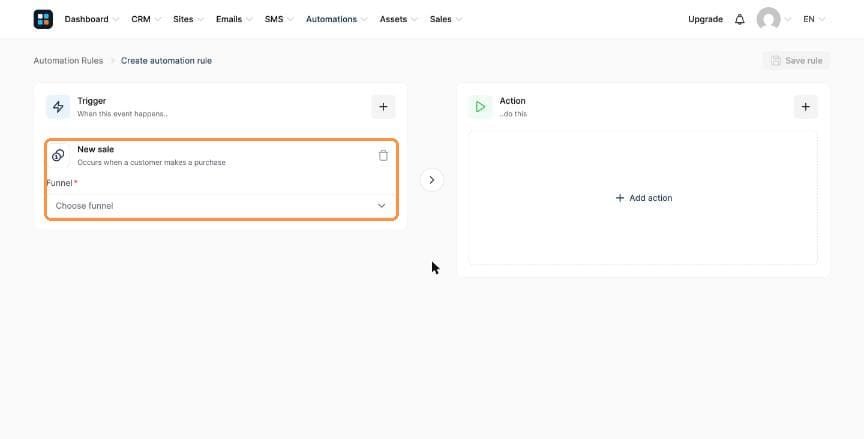
New sale → choose the funnel - Click Add action and choose what should happen: Subscribe to campaign, Send email, Send email to a specific email address (e.g. a sale notification to yourself), Send SMS, Add a tag, Remove tag, Add to a pipeline stage, Enroll in course, Grant access to a community, Send webhook and more.
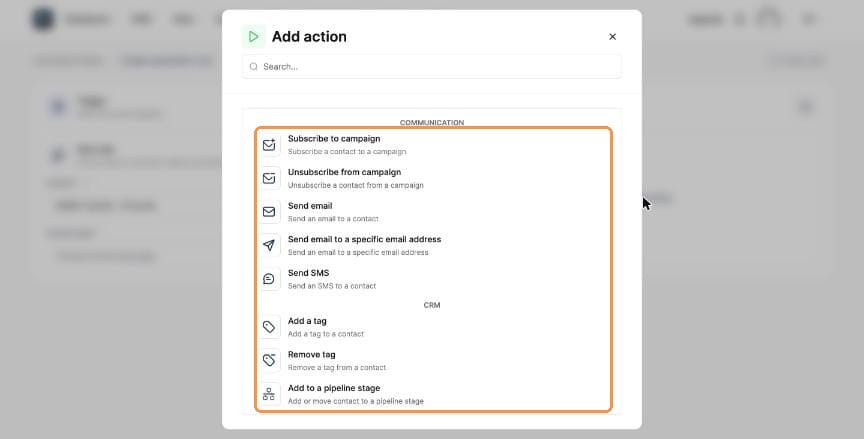
The action list - Fill in the action (here: the tag to add) and click Save rule. Need several actions for one trigger? Click the + next to Action to stack more.
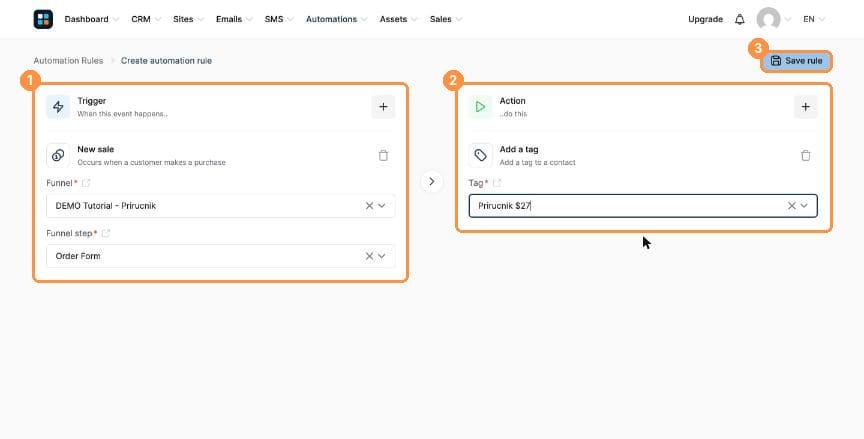
(1) Trigger, (2) action, (3) Save rule
Part 2: Workflows (multi-step automations)
- Go to Automations → Workflows and click + Create.
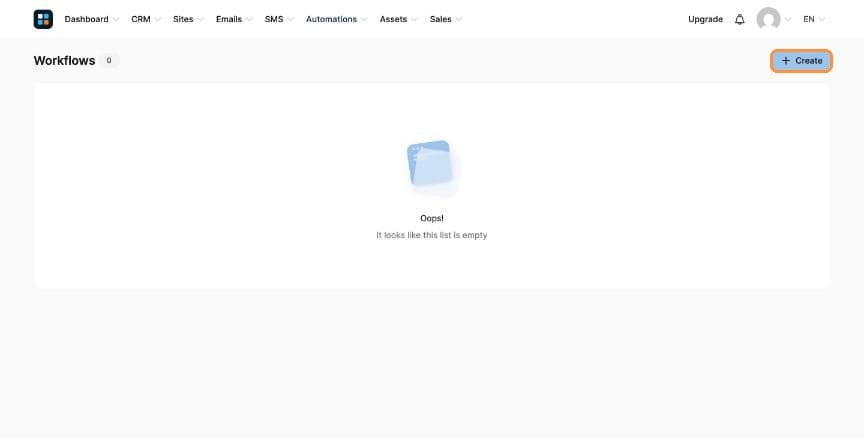
Automations → Workflows → + Create - Give it a name and click Create. Click the workflow's name to open the builder.
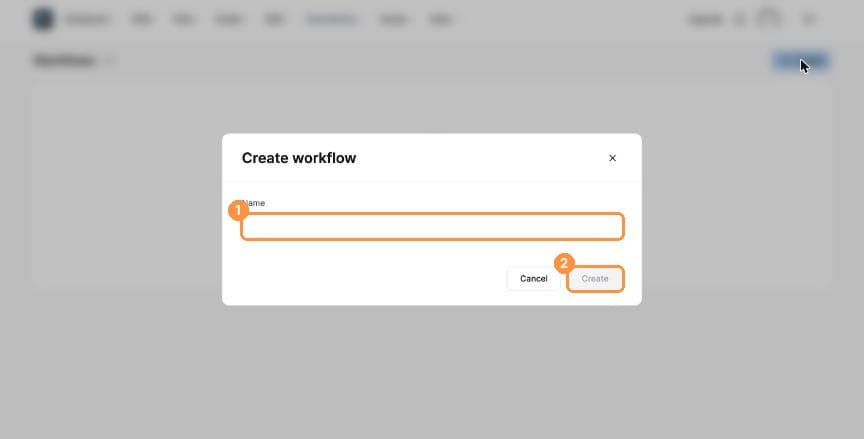
(1) Name, (2) Create - The builder starts with Add a trigger, which is what kicks off the workflow.
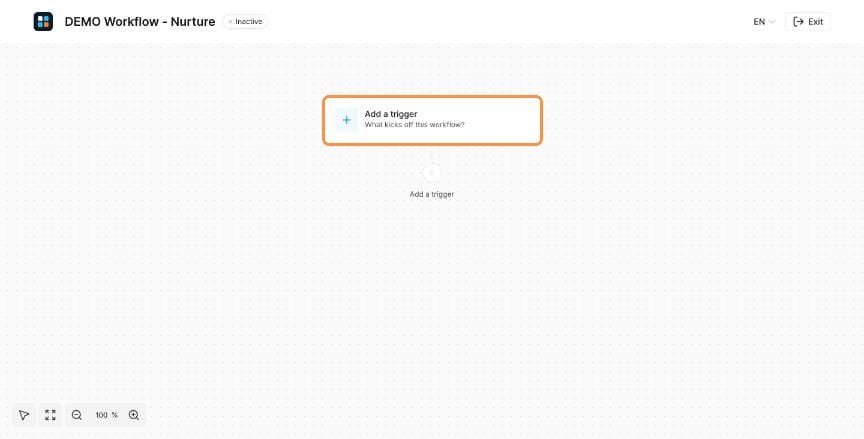
The empty builder - Pick a trigger (for example Tag added), choose its details and click Create.
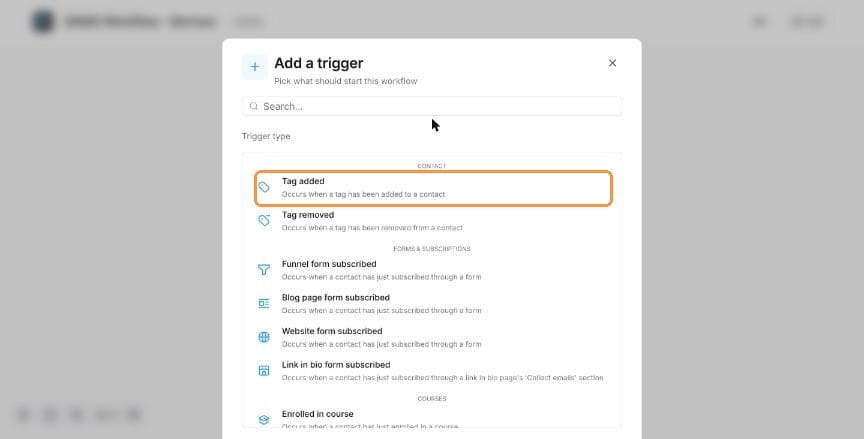
Trigger: Tag added 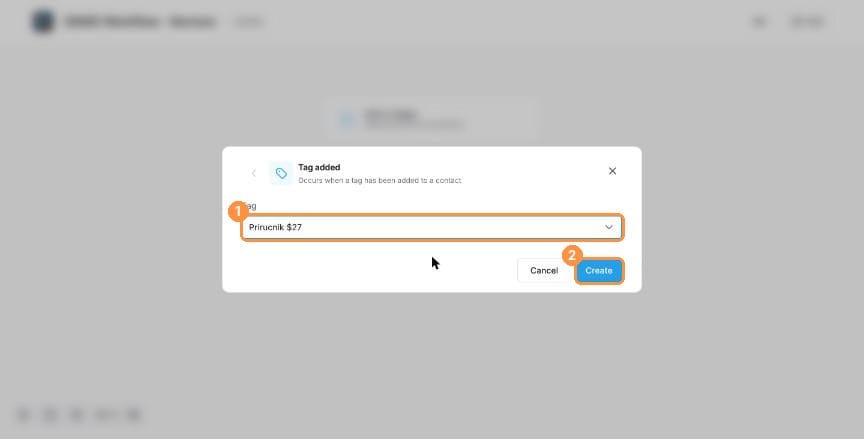
(1) Choose the tag, (2) Create - The trigger appears at the top ("When this happens"). You can add alternative triggers with OR. Click the + below it to add the next step.
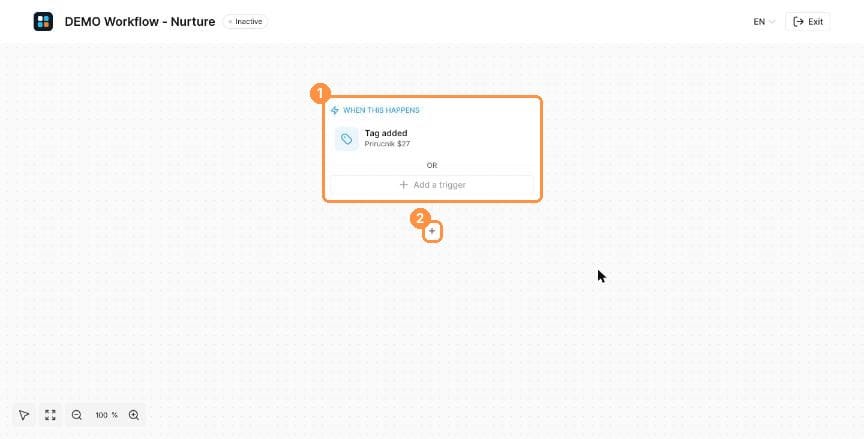
(1) The trigger, (2) + add a step - Each step is one of three types: Action (do something, e.g. send an email or subscribe to a campaign), Decision (split the path based on conditions) or Delay (wait before continuing).
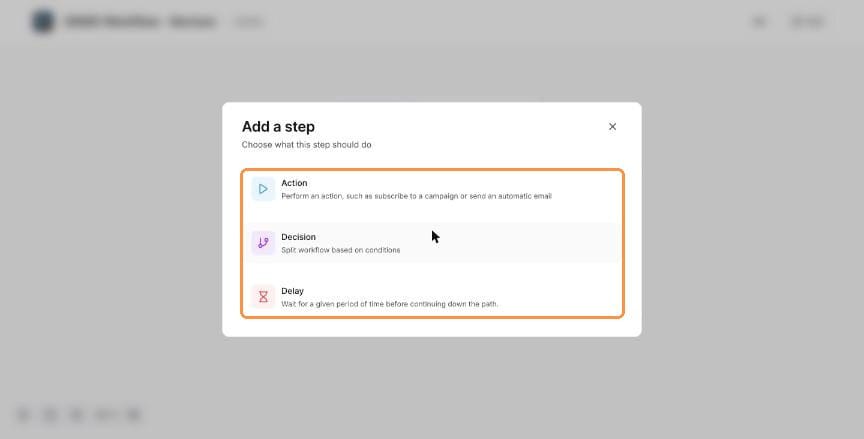
Action · Decision · Delay - Add a Delay: choose the unit (e.g. Days) and amount (e.g. 3) and click Save. It appears in the path.
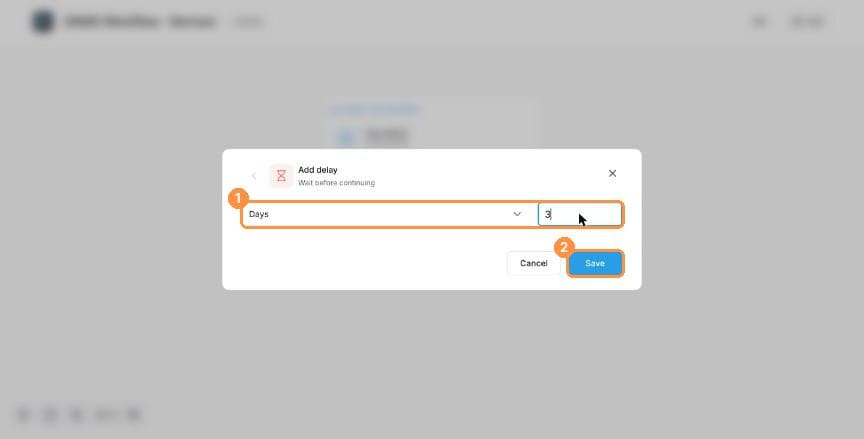
(1) 3 days, (2) Save 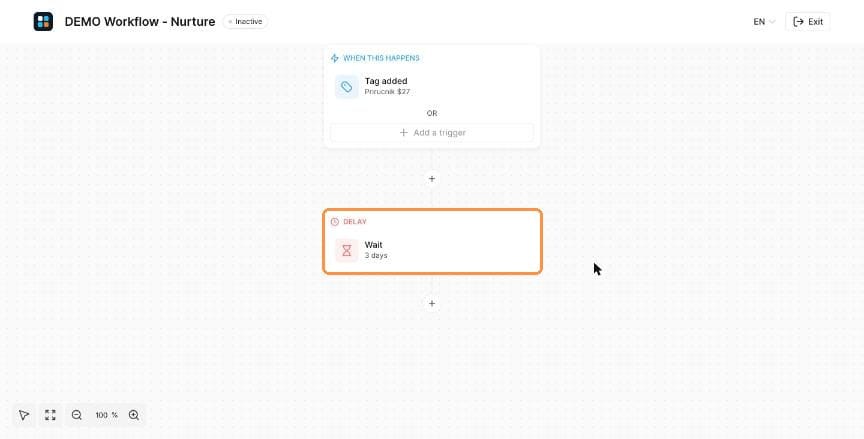
The delay in the path - Add a Decision to branch. Conditions can check Contact fields, Tag, Email clicked, Email opened, Created at or Activity, and you can combine several (all must match) or add another group (OR).
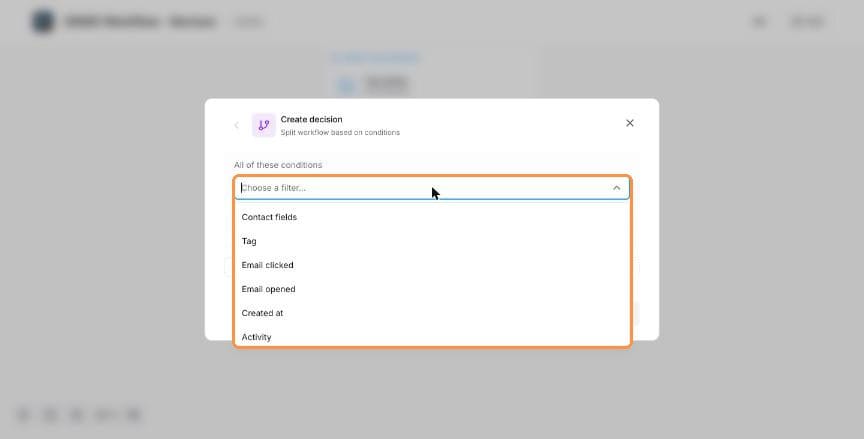
Decision conditions - When the workflow is built, activate it. New workflows start as Inactive.
Creating & selling online courses
Host your content, control how fast students move through it, and get paid for access automatically. In this lesson you'll create a course, add a module and a lecture, activate everything, and attach the course to an order form.
Part 1: Create the course
- Go to Assets → Courses. The tabs at the top also give you Bundles, Students and Assignments. Click + Add a new course.
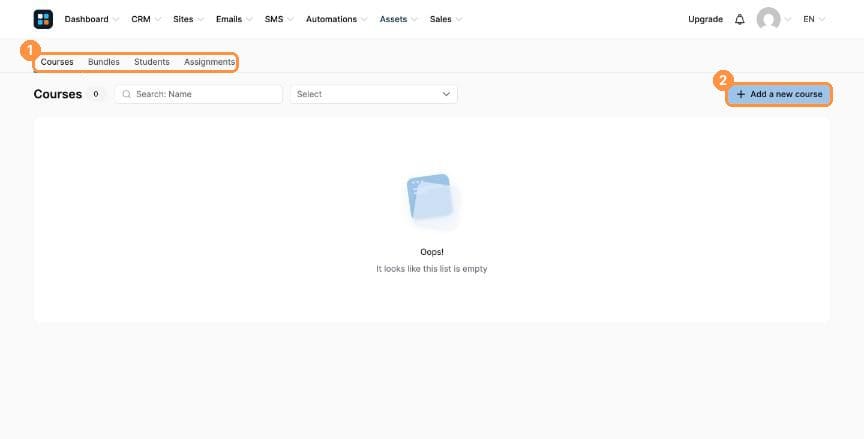
(1) Courses tabs, (2) + Add a new course - Enter the Name, keep your Domain, set a URL Path (e.g. my-course), pick a theme and click Create.
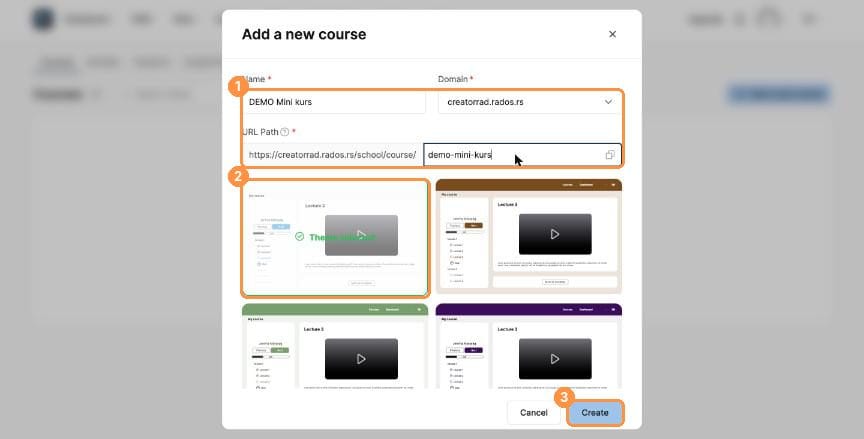
(1) Name, domain and URL path, (2) theme, (3) Create - The course appears in the list as Inactive. Click its name to open it.
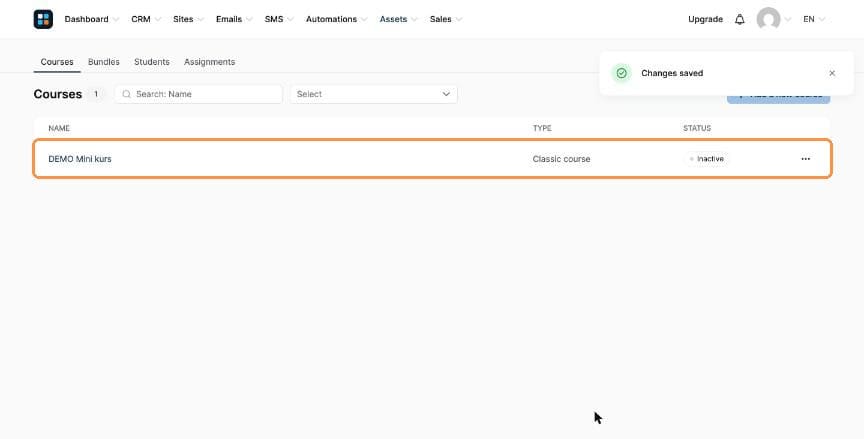
The new course
Part 2: Add modules and lectures
- Inside the course, click Add module. The buttons at the top are Add student, Students, View and customize theme and Settings.
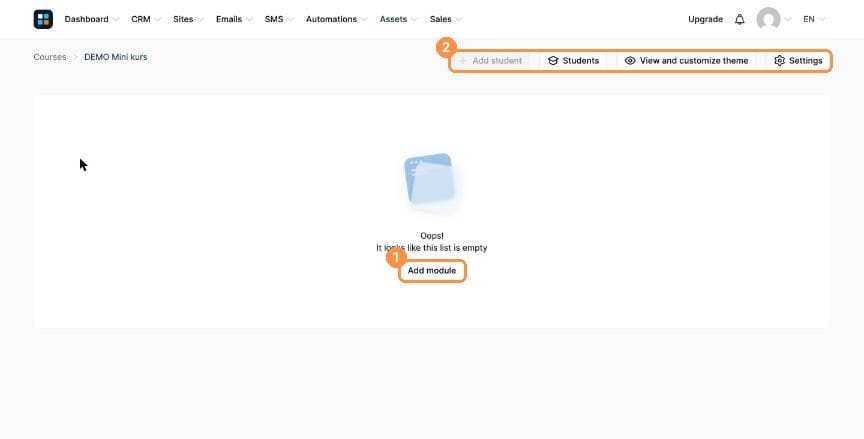
(1) Add module, (2) course tools - Name the module (e.g. "Module 1: Getting started") and click Create.
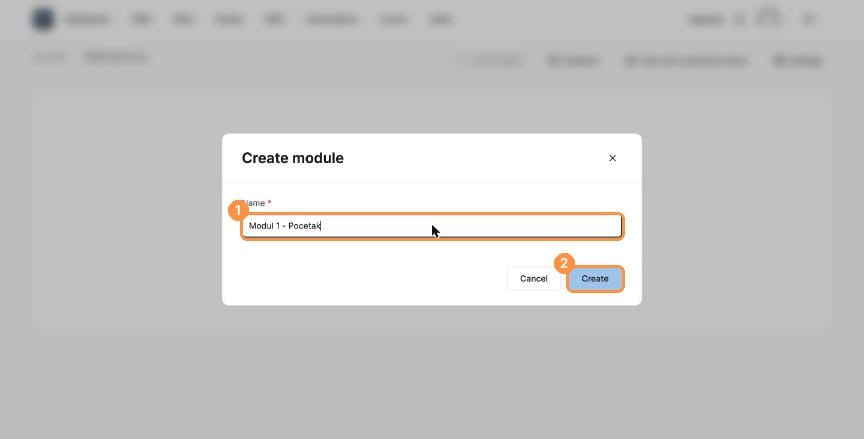
(1) Module name, (2) Create - Inside the module, click + Add lecture.
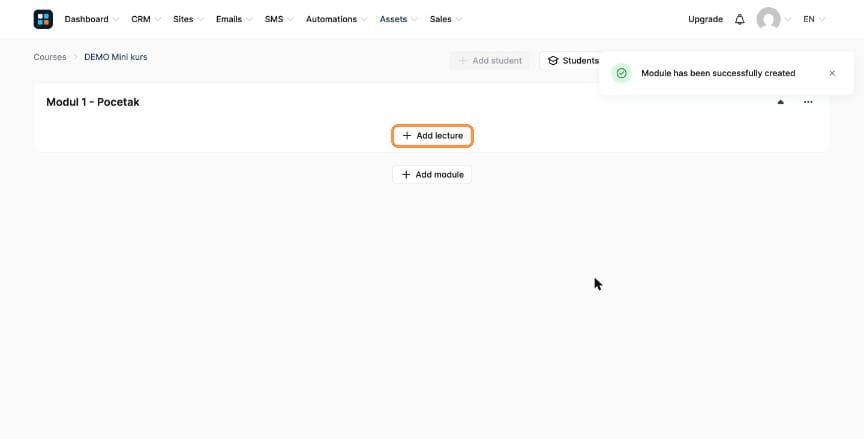
+ Add lecture - Fill in the Name and the Delay in days (0 = available immediately; used for drip access). Tick Enable comments if students can discuss the lecture, choose a template with Use template and click Create.
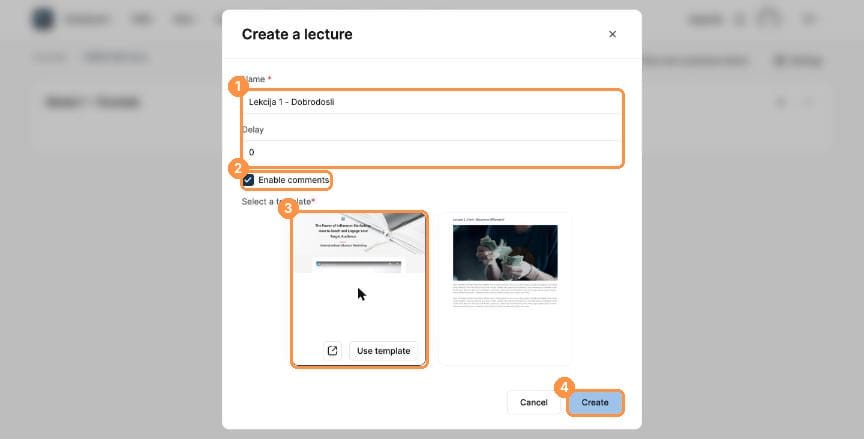
(1) Name and delay, (2) comments, (3) template, (4) Create - Open the lecture's ⋯ menu. Edit opens the page editor, where you add your video and text. From the same menu you can Activate the lecture, open its Settings, create an assignment or a drip access email, and Duplicate, Move or Delete it.
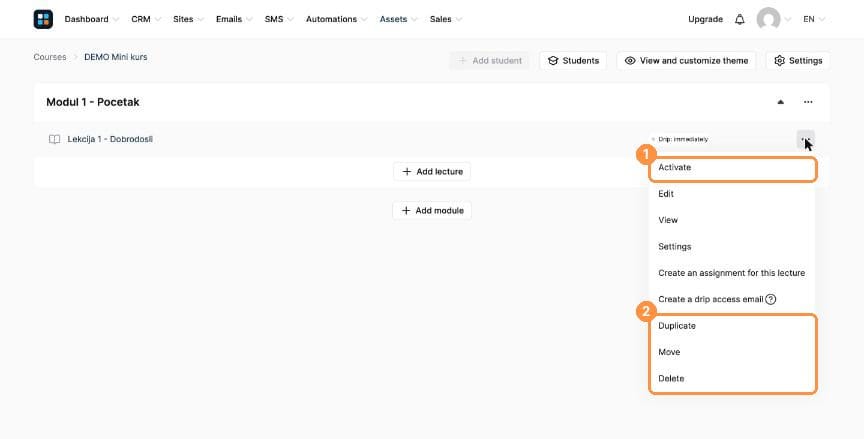
(1) Activate, (2) Duplicate, Move, Delete - Click Activate and confirm. The dot next to the lecture turns green.
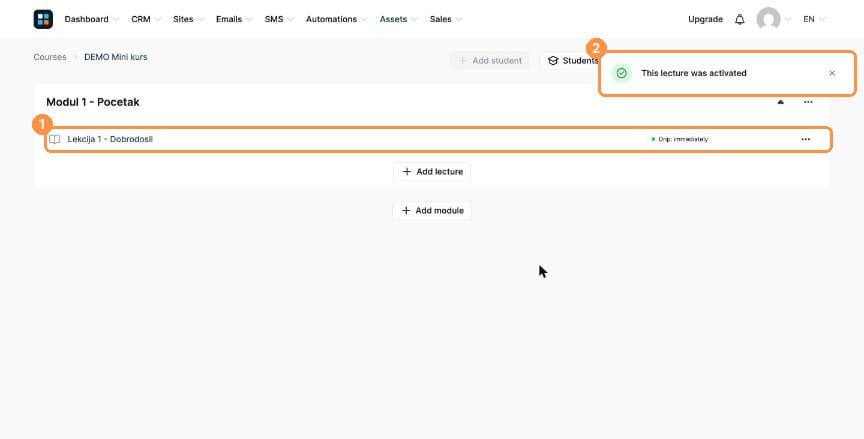
(1) The active lecture, (2) confirmation
Part 3: Settings and activation
- Settings lets you change the course title, instructor name, language, description, domain, URL path, theme, fonts and the instructor photo, logo and cover image.
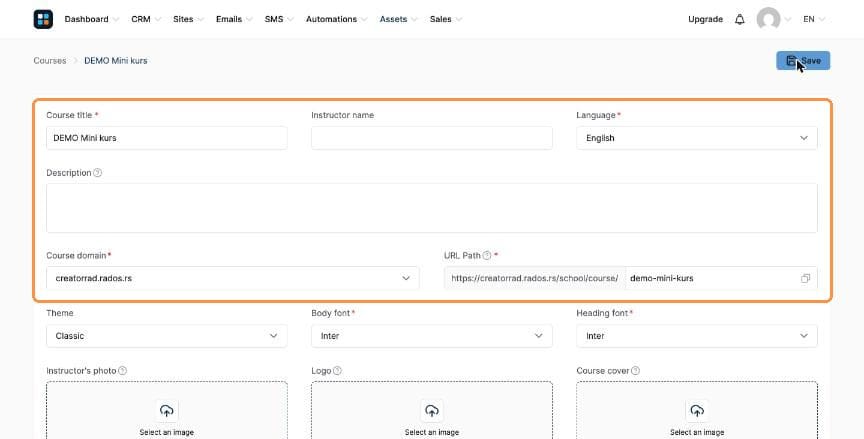
Course settings - Back in Assets → Courses, open the course's ⋯ menu and click Activate.
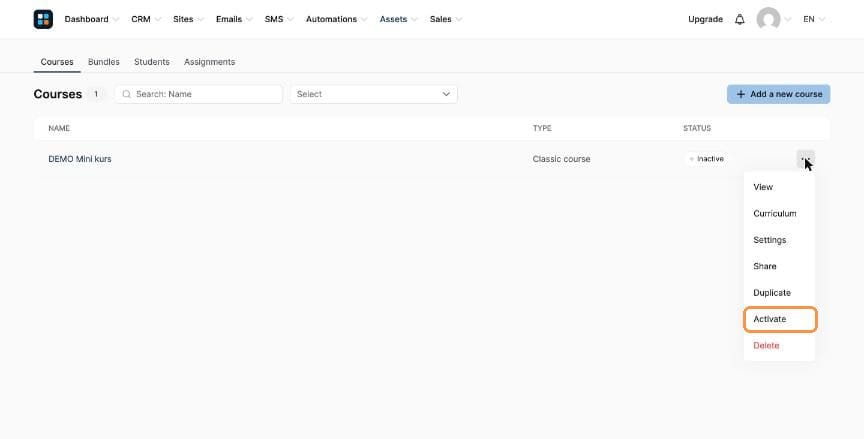
⋯ → Activate - The status changes to Active.
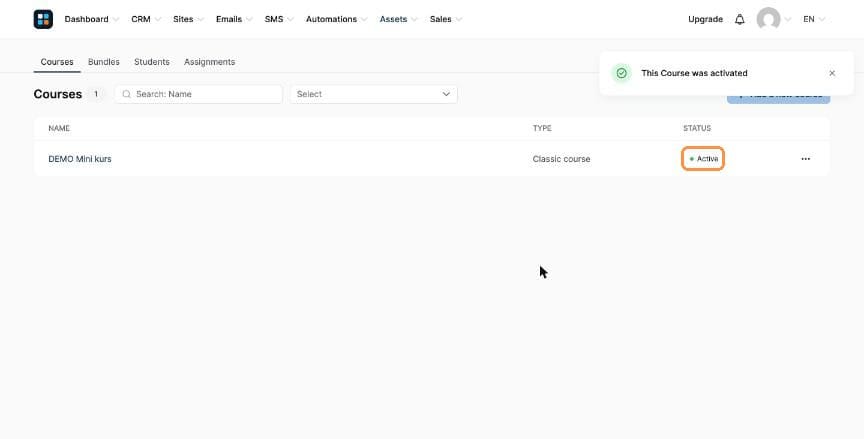
The course is active
Part 4: Sell the course
- On your order form's product (see Lesson 18), click + next to Resources, choose Courses and select your course.
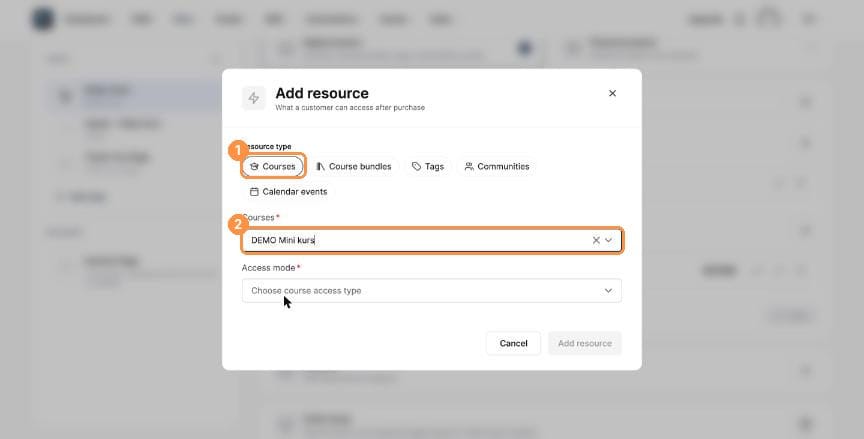
(1) Courses, (2) your course - Choose the Access mode, then click Add resource and Save.
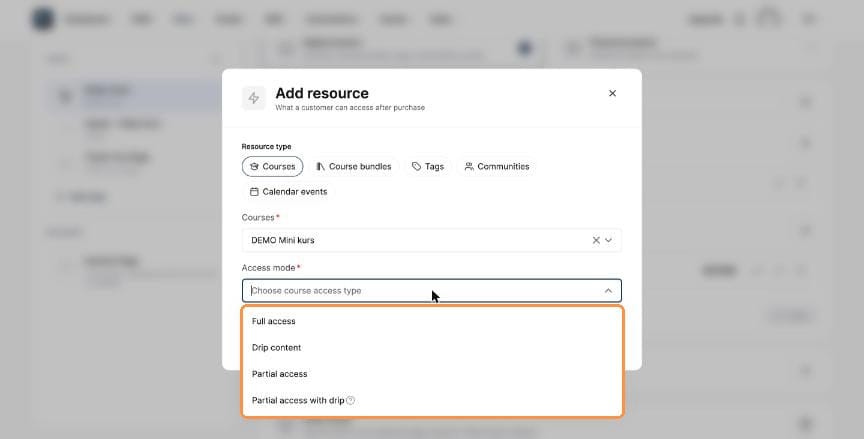
The four access modes
| Access mode | What the student gets |
|---|---|
| Full access | Everything unlocks immediately; lecture delays are ignored. |
| Drip content | Lectures unlock gradually, based on each lecture's delay. |
| Partial access | Only the modules you select. |
| Partial access with drip | Selected modules only, unlocking gradually. |
Creating & selling a community
A community gives your audience a dedicated space to post and discuss, inside RadOS alongside your funnels and courses, instead of on a social platform you don't control.
Part 1: Create the community
- Go to Assets → Communities and click + Create.
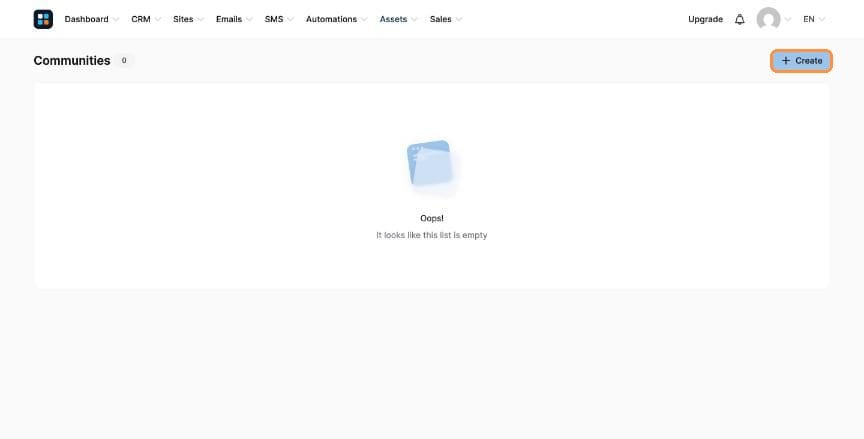
Assets → Communities → + Create - Enter the Name. Keep your Domain name; the Path fills in automatically from the name. Choose whether Automatic post approval is Enabled (posts go live instantly) or Disabled (you approve each post). Click Create.
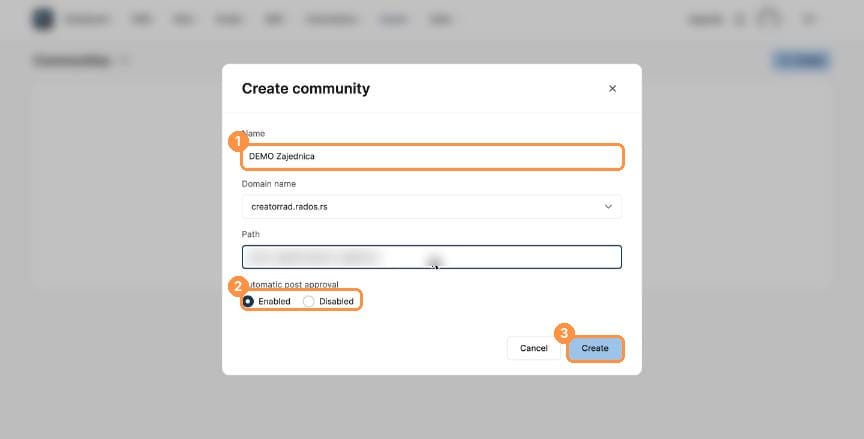
(1) Name, (2) automatic post approval, (3) Create - The community appears in the list with its home page URL. Click its name to open it.
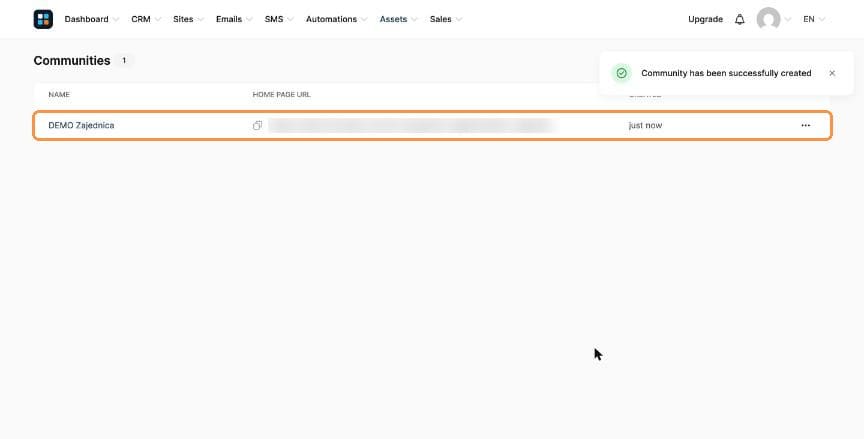
The new community
Part 2: Find your way around
- The community opens on Home, the main feed. On the left you'll find Members, Moderation alerts (posts waiting for approval), Moderation history, Settings and Scheduled posts, plus your Topics.
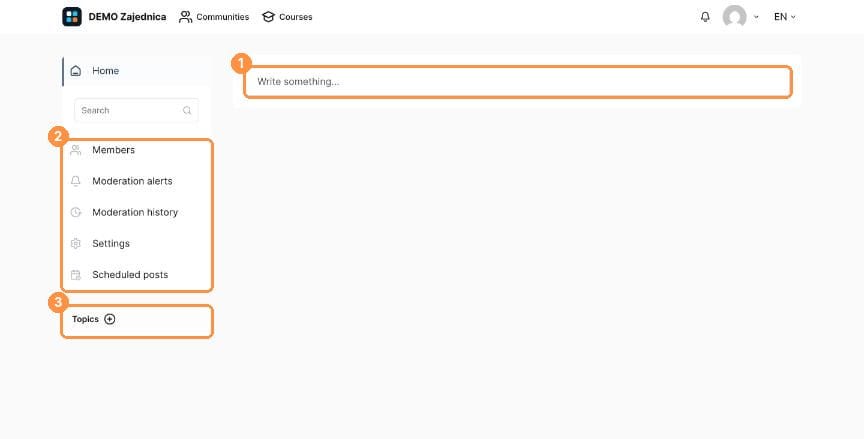
(1) Write a post, (2) community menu, (3) Topics - In Settings you can change the name, path and cover image…
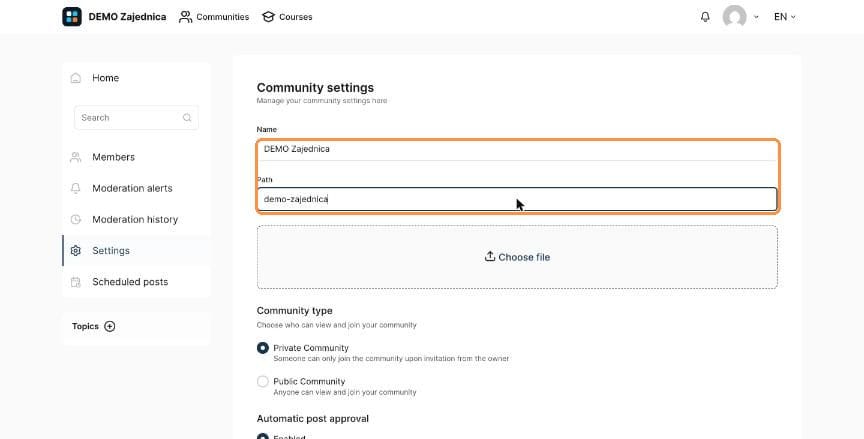
Name and path - …choose Private Community (members join by invitation) or Public Community (anyone can view and join), and switch Automatic post approval on or off. Click Save.
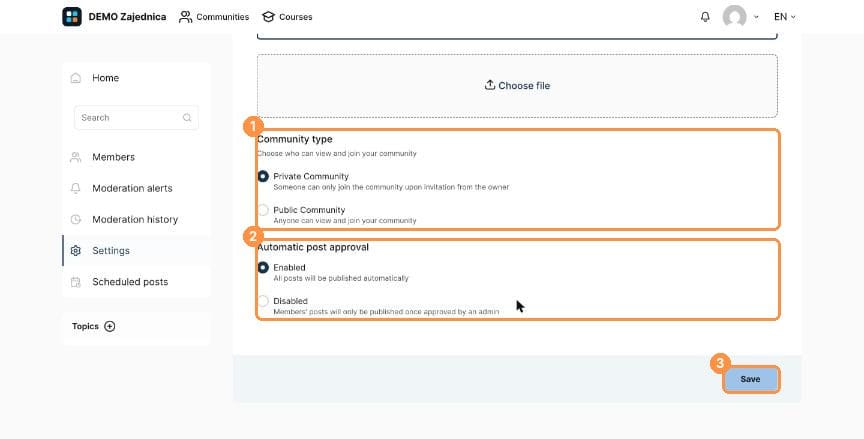
(1) Community type, (2) post approval, (3) Save
Part 3: Post and organise by topic
- Click Write something… on Home. Add a Title, pick a Topic (or type a new name to create one) and write your Content. You can attach files, video, GIFs or a voice note, or Schedule this post for later. Click Add post.
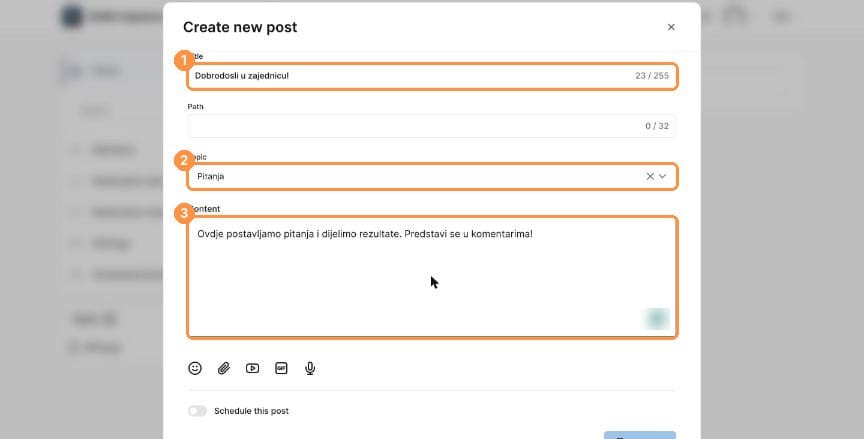
(1) Title, (2) Topic, (3) Content - The post appears in the feed with its topic. Use the pin icon to keep important posts at the top. New topics show up in the left menu.
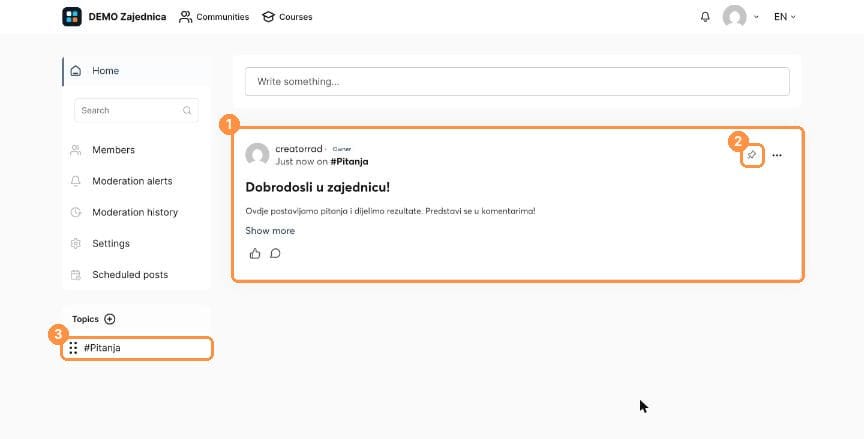
(1) Your post, (2) pin, (3) the new topic
Part 4: Sell access
- On an order form's product (see Lesson 18), click + next to Resources, choose Communities and select your community.
- Add a one-time or subscription price plan. RadOS grants access when the payment succeeds and removes it automatically if a subscription is cancelled or refunded.
- You can also give access with an automation: the action Grant access to a community (see Lesson 6).
Creating & selling physical products
Sell physical items directly through your order form, with no separate store platform. In this lesson you'll create a product with size variants and see where orders show up.
Part 1: Create the product
- Go to Assets → Physical products and click + Create.
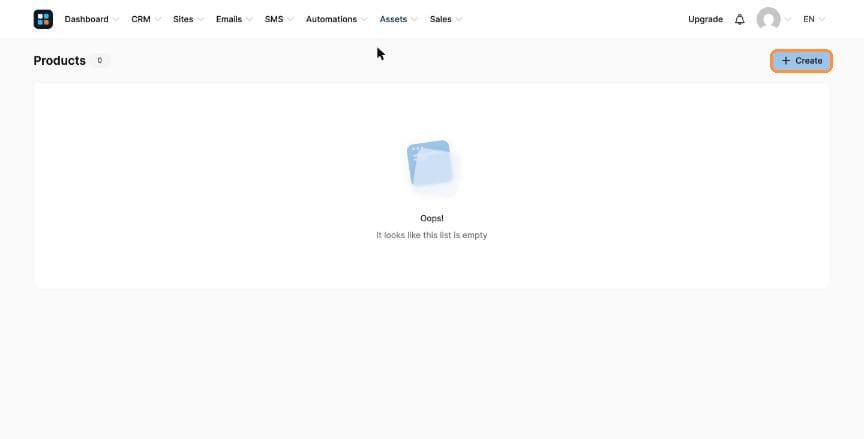
Assets → Physical products → + Create - Fill in the Name and Description, a SKU (your stock code) and Product tax, the Tax behavior (Exclusive = added on top, Inclusive = already in the price), the Currency, the Price and the Weight in grams.
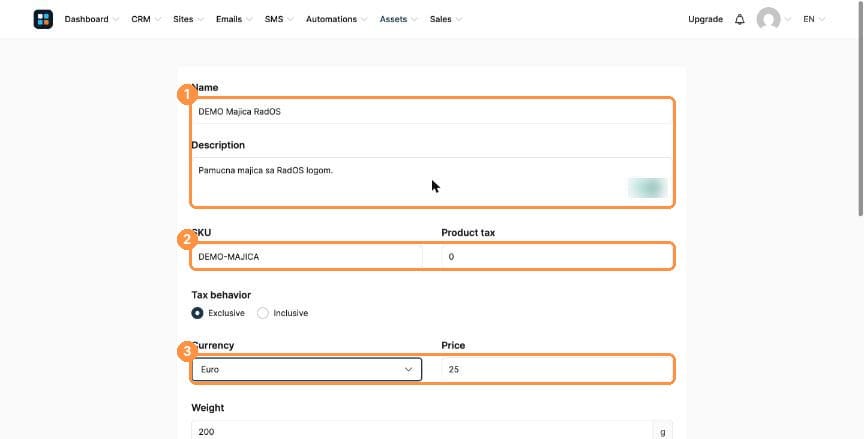
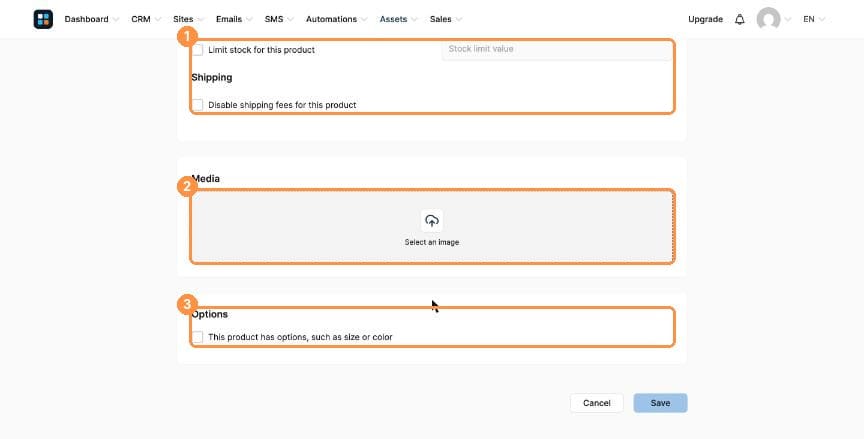
(1) Name and description, (2) SKU and tax, (3) currency and price - Below that: tick Limit stock for this product to track inventory, tick Disable shipping fees if shipping is included, upload product images under Media, and tick This product has options if it comes in sizes or colours.
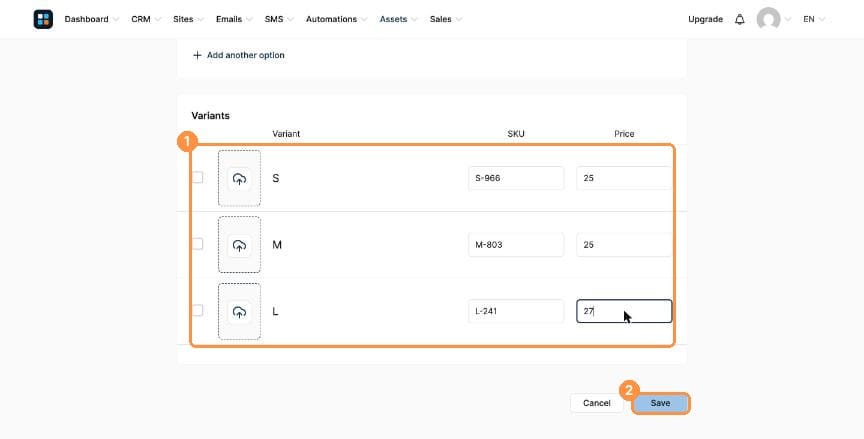
(1) Inventory and shipping, (2) Media, (3) Options - With options on, enter an Option name (e.g. Size) and its values (S, M, L). Click + Add another option for a second one, like colour. RadOS creates a variant for every combination, each with its own SKU, price and image. Click Save.
(1) Variants with their own SKU and price, (2) Save - The product appears in your list.
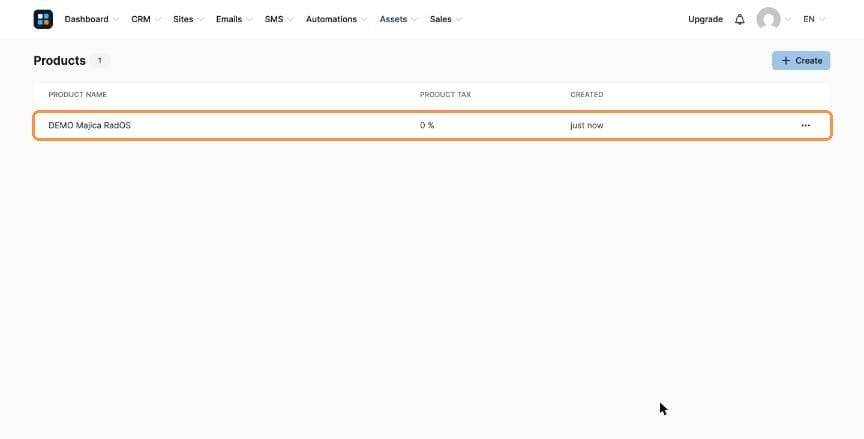
The saved product
Part 2: Sell it
- On a Sell funnel's Order Form (see Lesson 18), choose Physical product under Choose offer type and select your product. The price comes from the product itself.
- In the page editor, use the Physical product element (in the Payment section) to show the product and its options to the customer.
- You can also offer a physical product as an order bump on a digital offer (see Lesson 4).
Part 3: Fulfil orders
- Go to Sales → Orders. (Transactions and Subscriptions are in the same menu.)
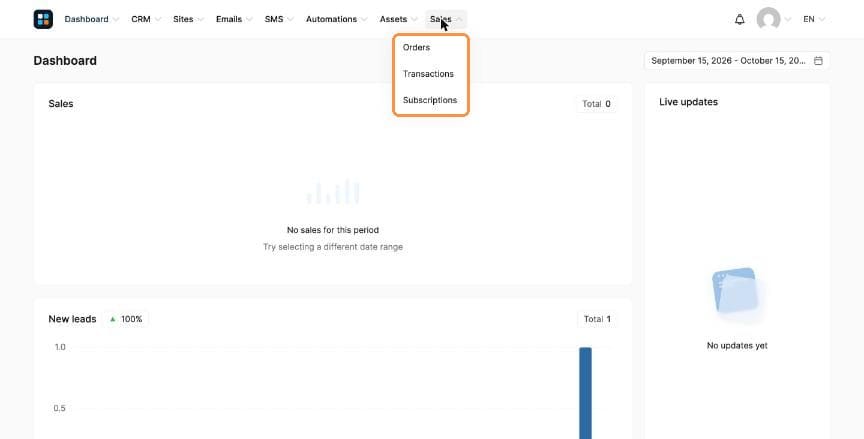
Sales → Orders - Filter by date, status or product to find an order. Once you've shipped it, mark the order as Fulfilled.
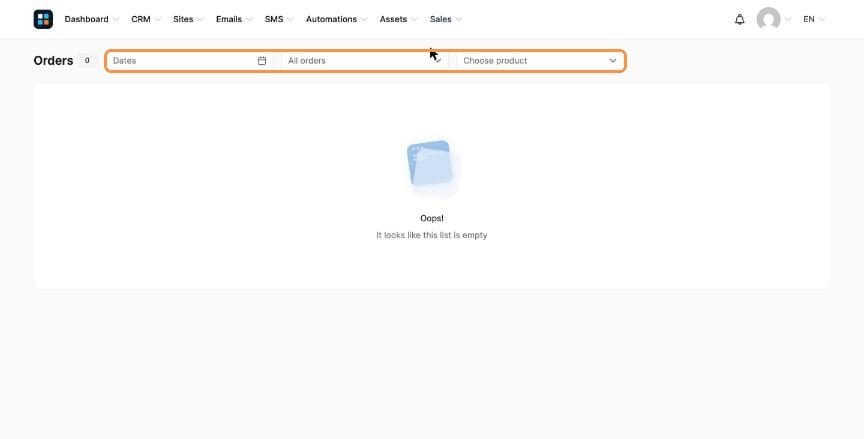
Order filters
Creating & selling digital files
Sell an ebook, a template or any downloadable file. First you upload the file to RadOS, then you deliver it in one of two ways: an instant download on the thank-you page, or an automatic email after every sale. You can use both together.
Part 1: Upload your file
- Go to Assets → Files.
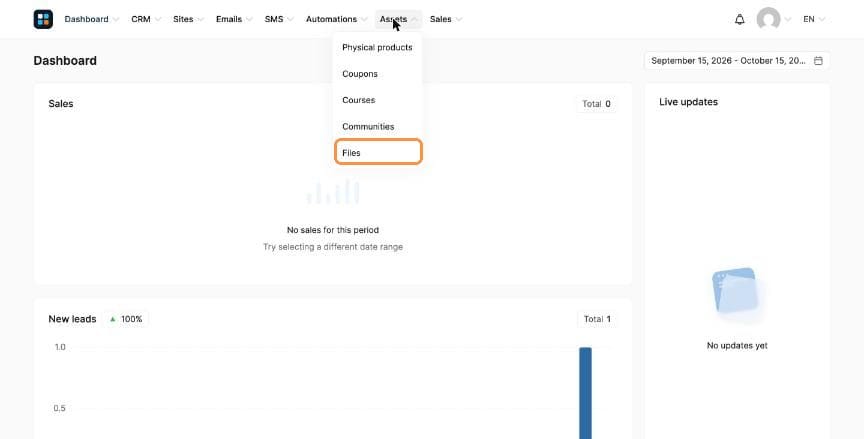
Assets → Files - Click Upload files, then drag your file into the box or click it to browse.
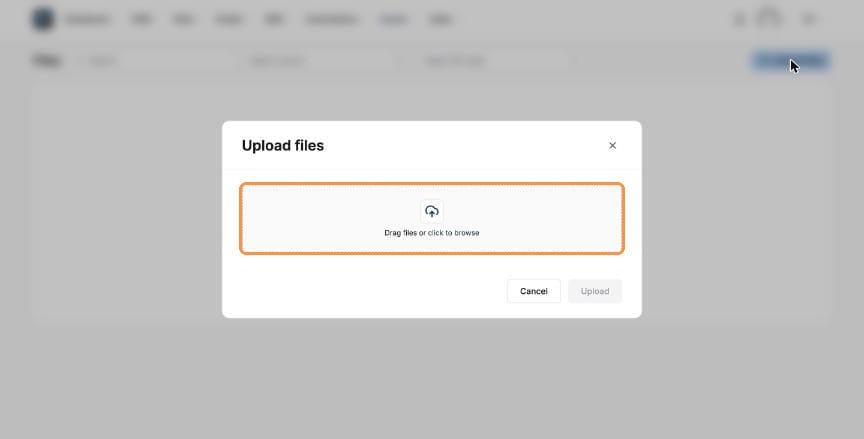
Drag files or click to browse - Your file appears in the list. Click Upload.
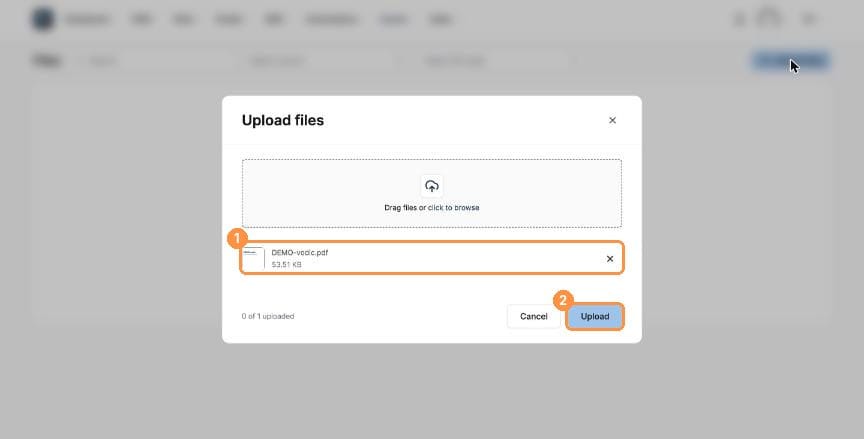
(1) Your file, (2) Upload - When the green check appears, click Done.
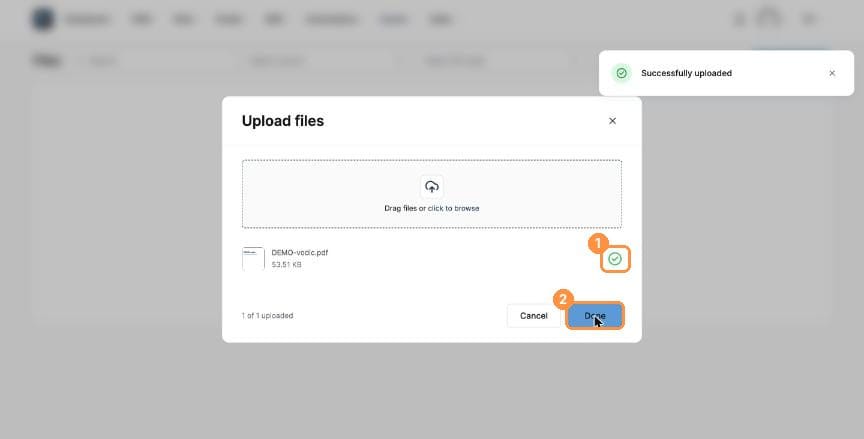
(1) Uploaded, (2) Done - The file is now in Files, ready to use anywhere in RadOS. The ⋯ menu lets you see File details, download, rename or delete it.
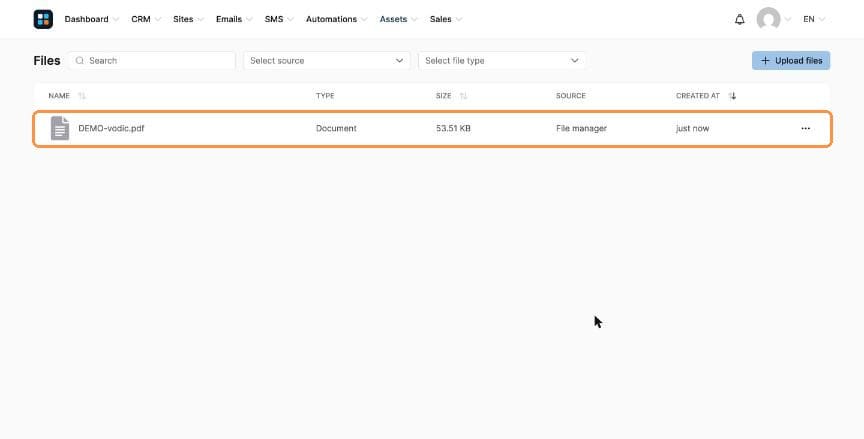
Your uploaded file 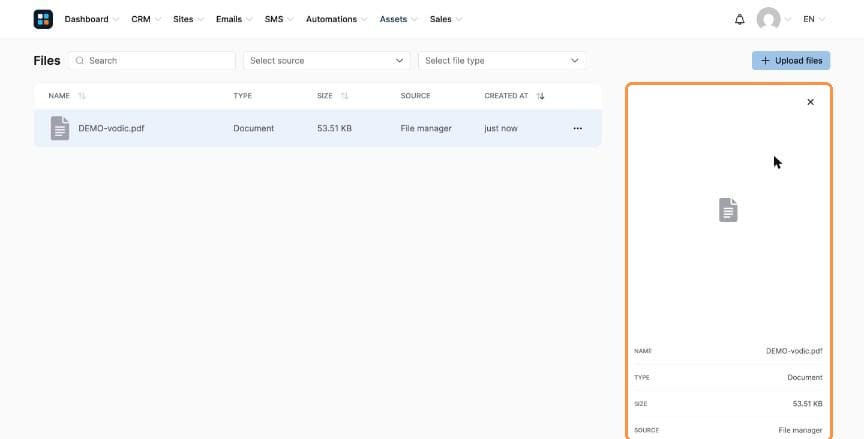
File details
Part 2: Instant download on the thank-you page
The buyer gets the file the moment they finish paying, with no waiting for an email.
- Open your Sell funnel (see Lesson 18), click the Thank You Page step and then Edit page. Click the button you want to use.
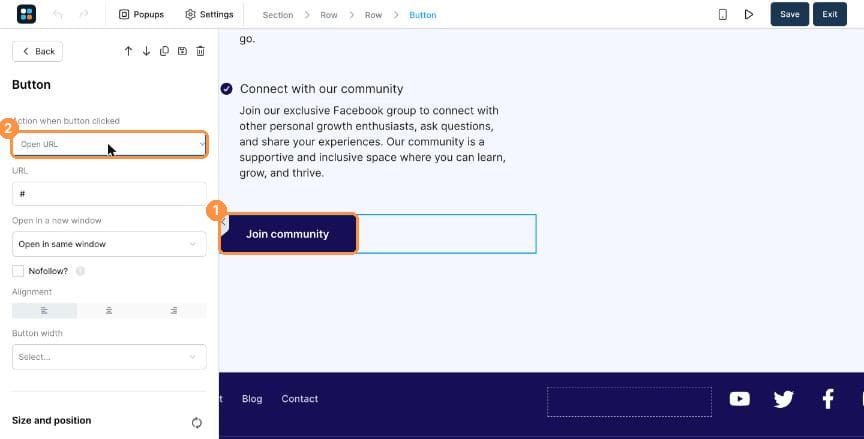
(1) The button, (2) Action when button clicked - Under Action when button clicked, choose Download file. A File field appears.
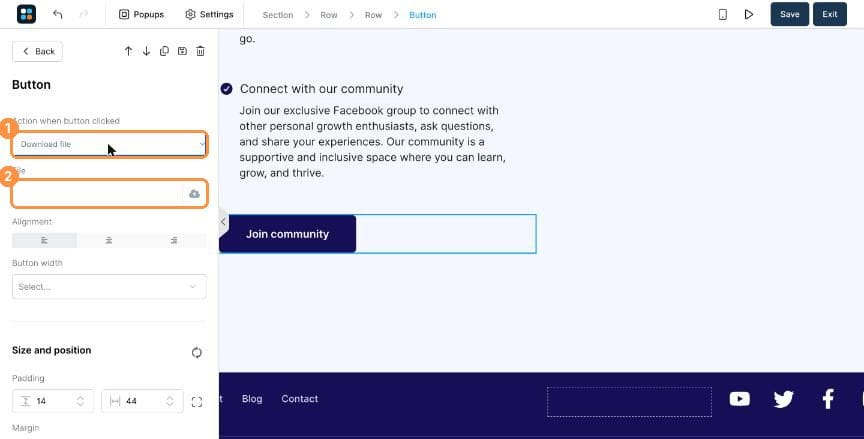
(1) Download file, (2) File - Click the upload icon next to File, open the Your files tab and find your file.
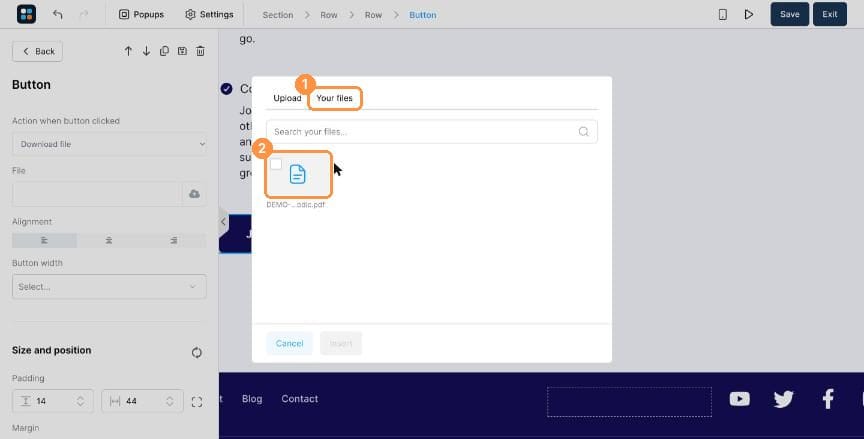
(1) Your files, (2) Your PDF - Tick the file and click Insert.
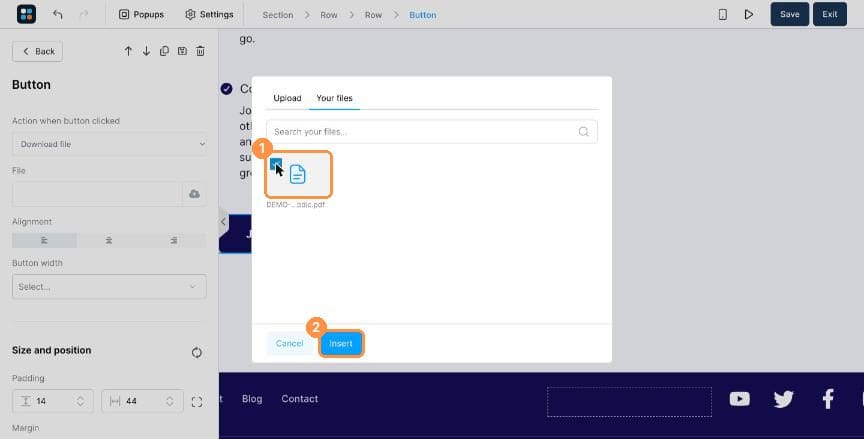
(1) Tick the file, (2) Insert - The file is attached to the button. Change the button text (for example "Download your guide") and click Save in the top right.
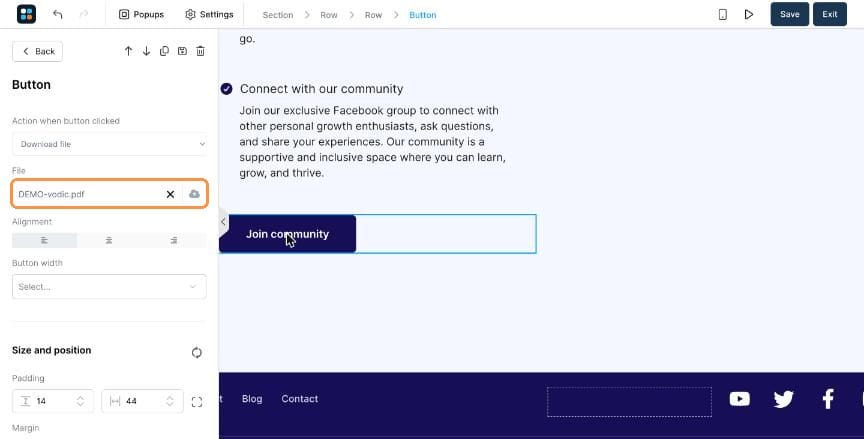
The file is attached
Part 3: Deliver by email after every sale
This is the most reliable option, because the buyer can always find the file again in their inbox.
- In the same funnel, click the Order Form step, open the Automation Rules tab, click Add rule and then Add trigger.
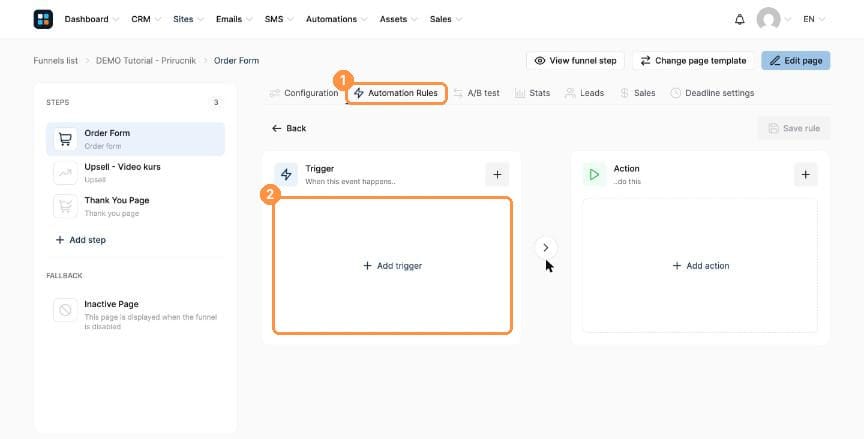
(1) Automation Rules, (2) Add trigger - Choose New sale.
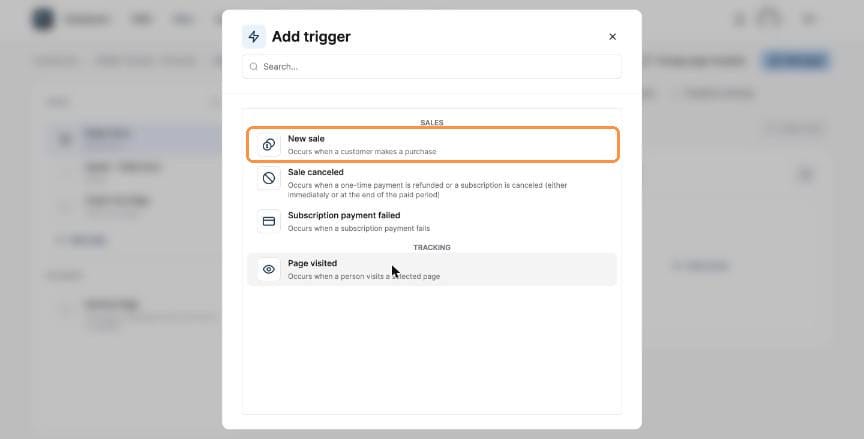
New sale - The funnel and step fill in automatically. Now click Add action.
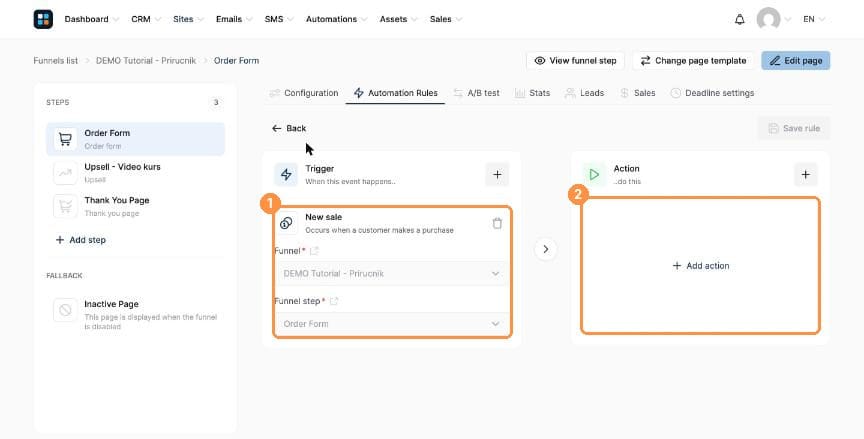
(1) Trigger, (2) Add action - Choose Send email.
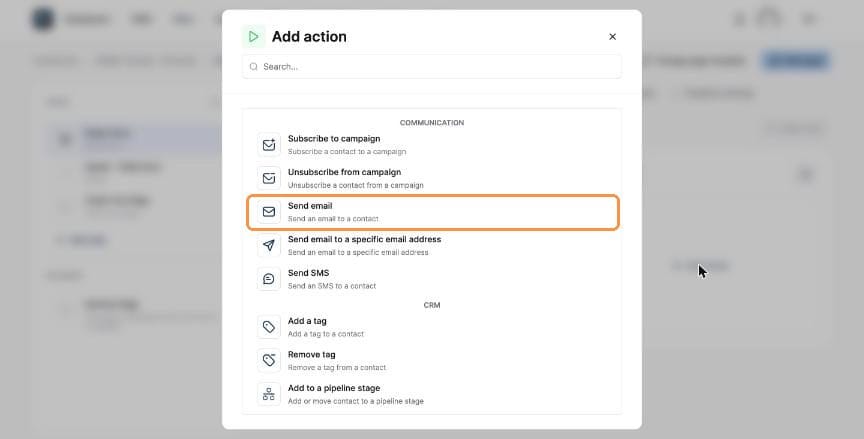
Send email - Click the + next to Email to write a new email. Give it a subject such as "Your guide is ready", then in the email editor add a button or link to your file (you can also attach the file). Click Save rule.
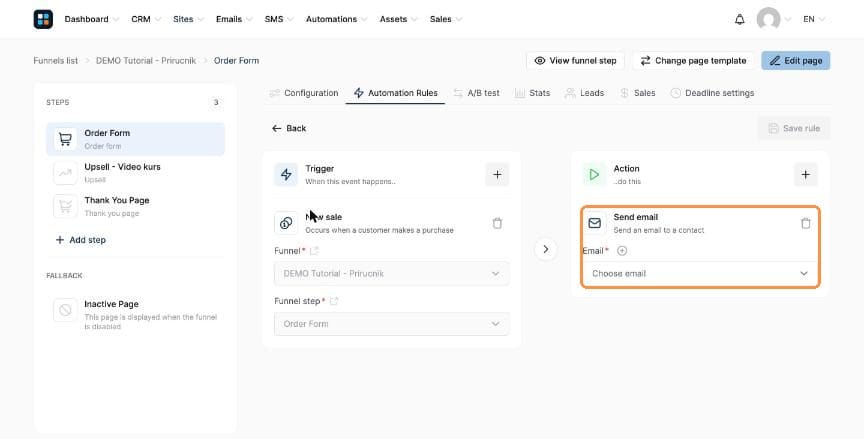
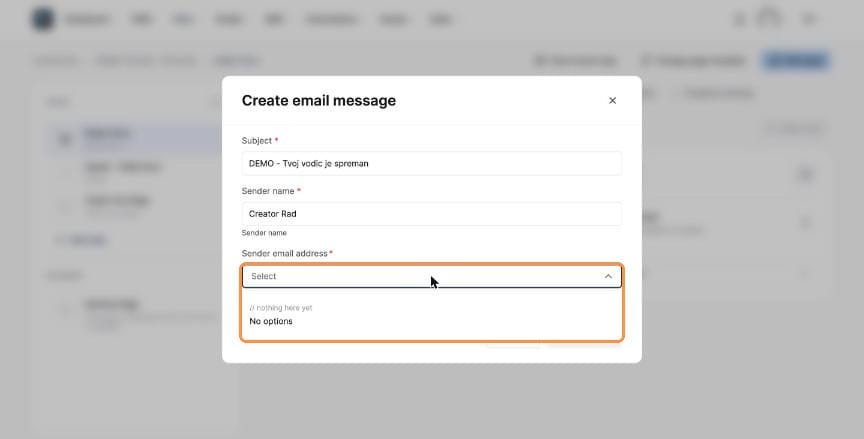
Click + to create the email
Building a blog
A blog brings in free traffic from Google before you ever send a reader into a funnel. RadOS builds the whole blog for you from a template: home page, post list, categories and search.
Part 1: Create the blog
- Go to Sites → Blogs.
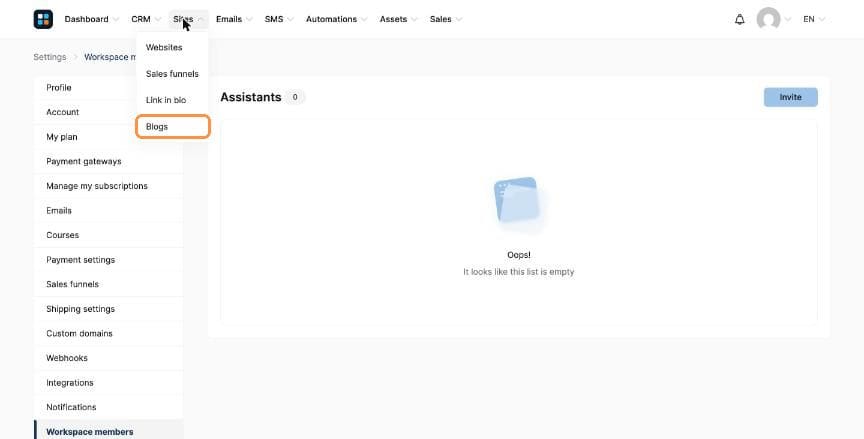
Sites → Blogs - Click + Create.
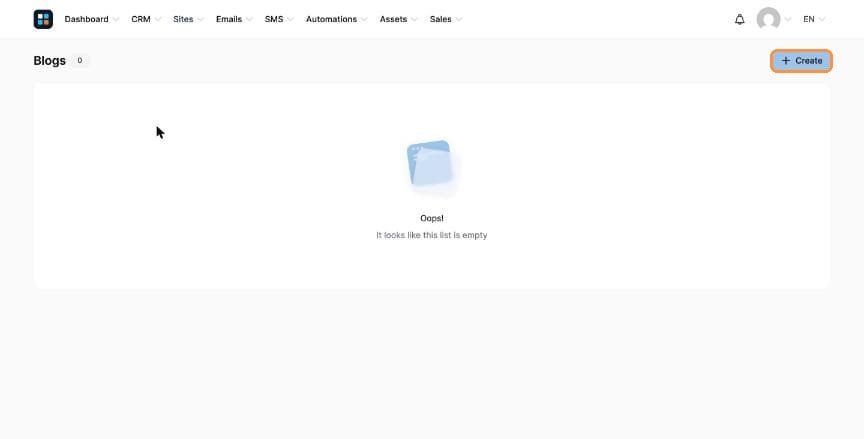
+ Create - Enter a Name, choose the Domain name, set the URL Path (for example
blog), click a template and click Create.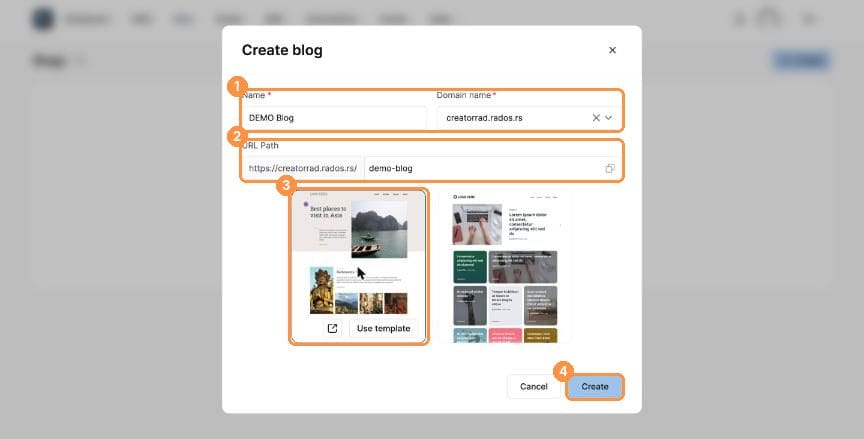
(1) Name and domain, (2) URL path, (3) Template, (4) Create - Your blog appears in the list with its home page address. Click its name to manage it.
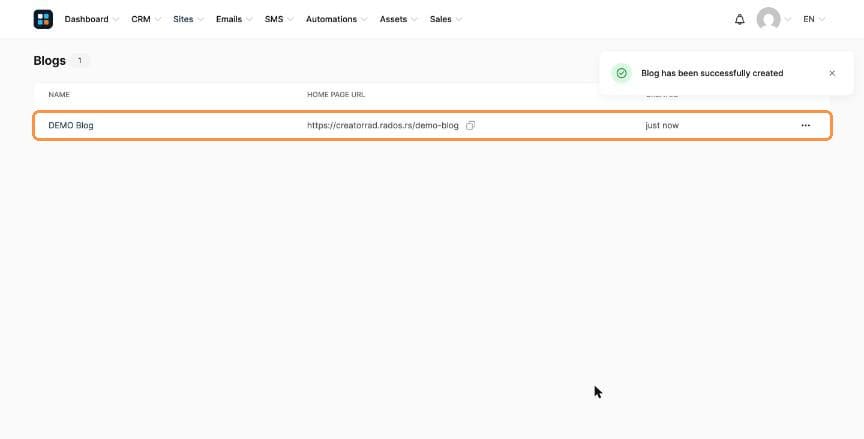
Your new blog
Part 2: Write and publish a post
- Inside the blog you'll find three tabs: Posts, Pages and Categories. The template comes with sample posts you can edit or delete. At the top: Blog layout (header and footer shared by every page), Post layout (how every article looks), View blog and Blog settings.
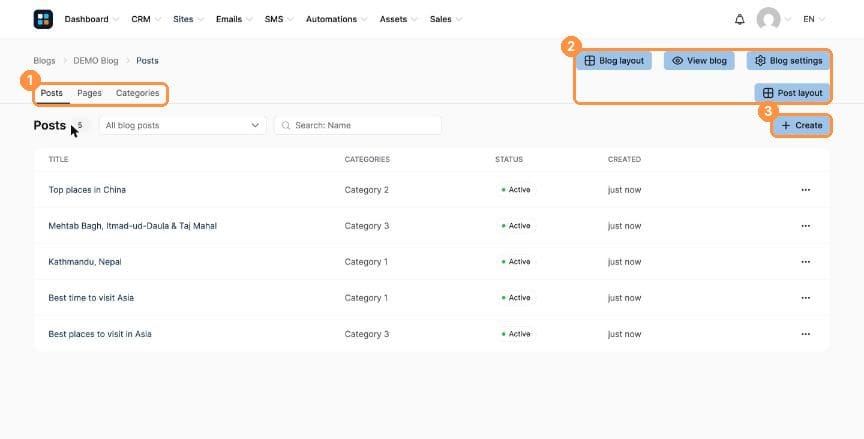
(1) Tabs, (2) Layout and settings buttons, (3) + Create - Click + Create. Enter a Title and Short description (the URL path fills in by itself), upload a featured Image and tick a Category. Click Create.
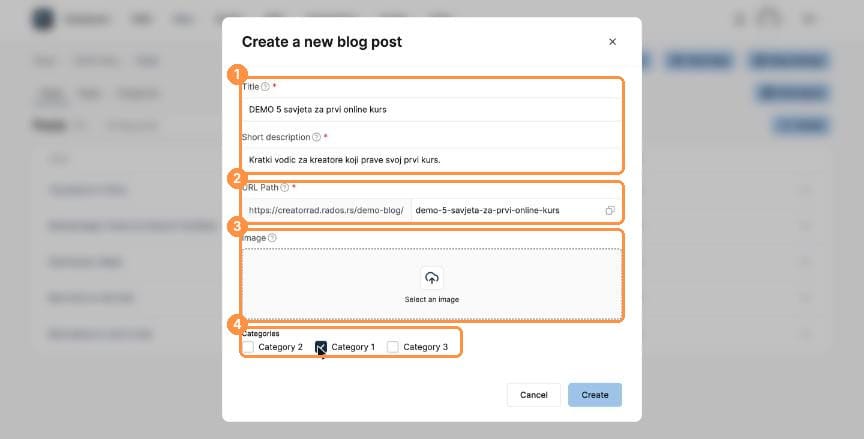
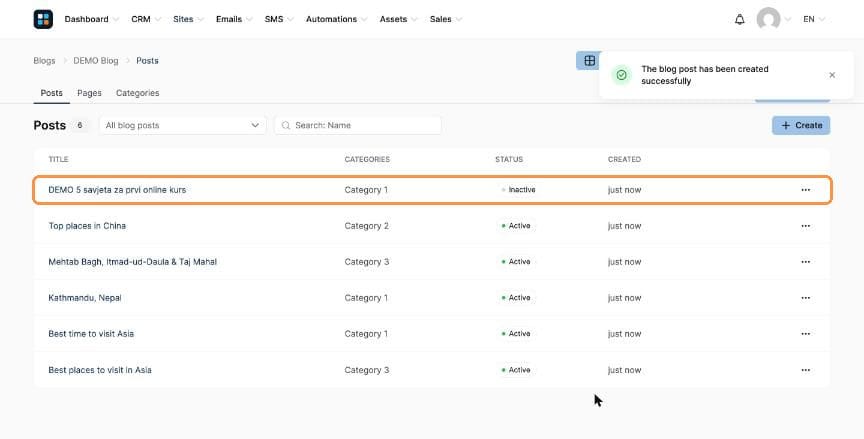
(1) Title and description, (2) URL path, (3) Image, (4) Category - New posts start as Inactive. Click the title (or ⋯ → Edit) to write the article in the page editor.
New posts start as Inactive - When it's ready, open ⋯ and choose Activate to publish now or Schedule to pick a future date and time.
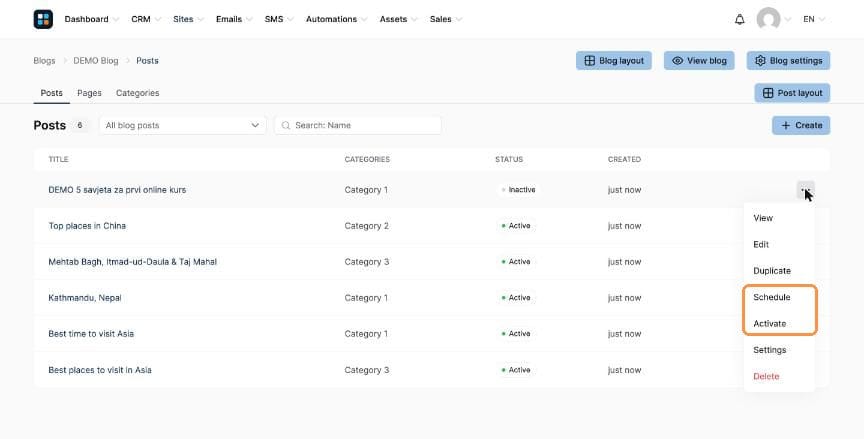
Schedule or Activate 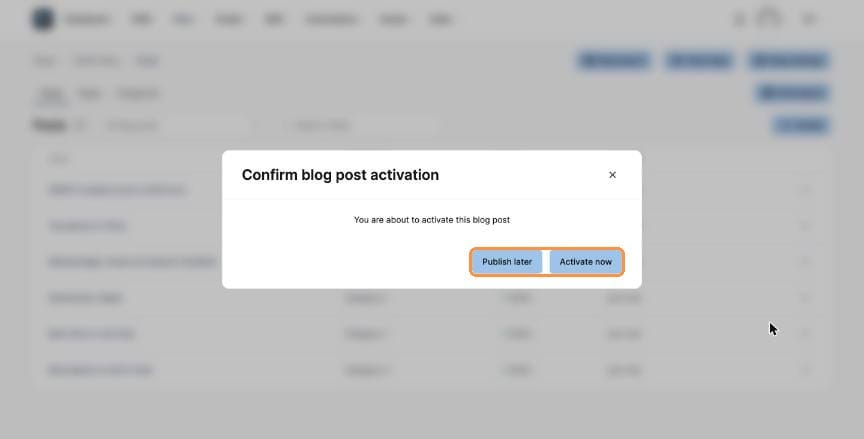
Activate now or Publish later - Open the post's address to see it live.
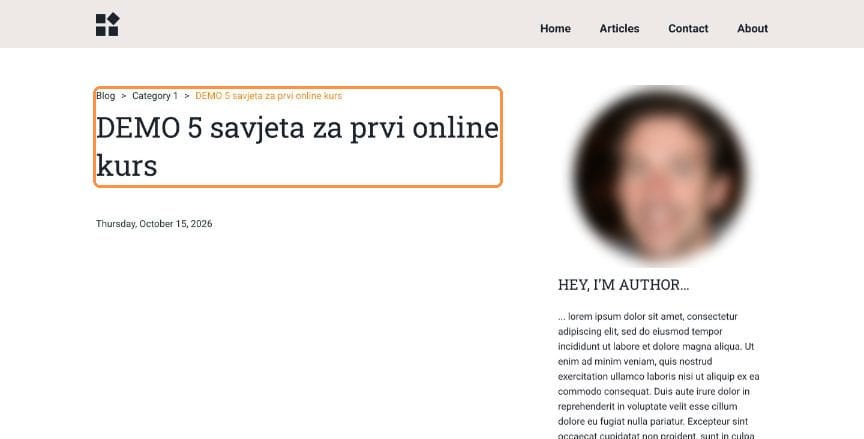
Your live post
Part 3: Organise your blog
- Categories: create, rename or delete categories. Each one has its own page and its own SEO title and description. Assign a post to a category from the post's ⋯ → Settings.
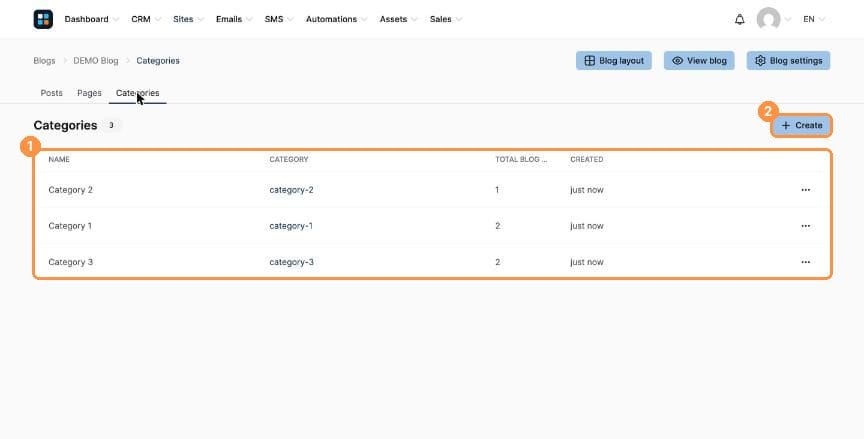
Categories - Pages: the template adds Home, Post list, Search, About and Contact. The Home page and Post list page can't be deleted, because the blog needs them.
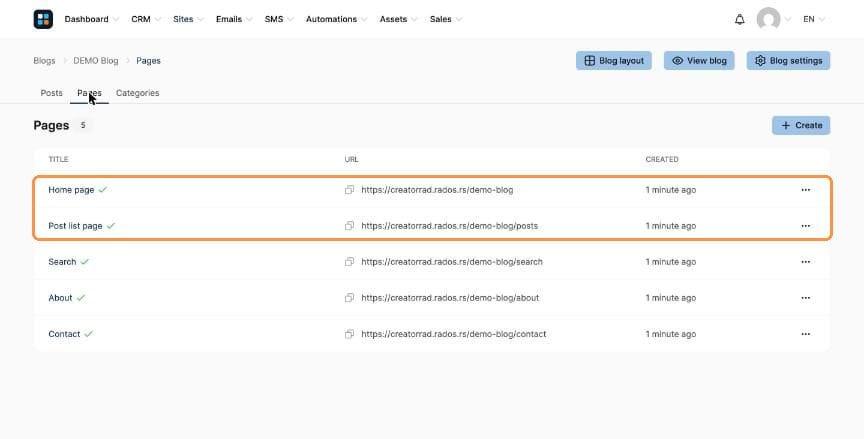
Home page and Post list page are required
Building your link in bio page
A link in bio page is one simple, shareable page that lists everything you offer: free guides, courses, digital downloads and products. Put its link in your Instagram, TikTok or YouTube bio, and visitors can sign up or buy without leaving the page.
Part 1: Create the page
- Go to Sites → Link in bio.
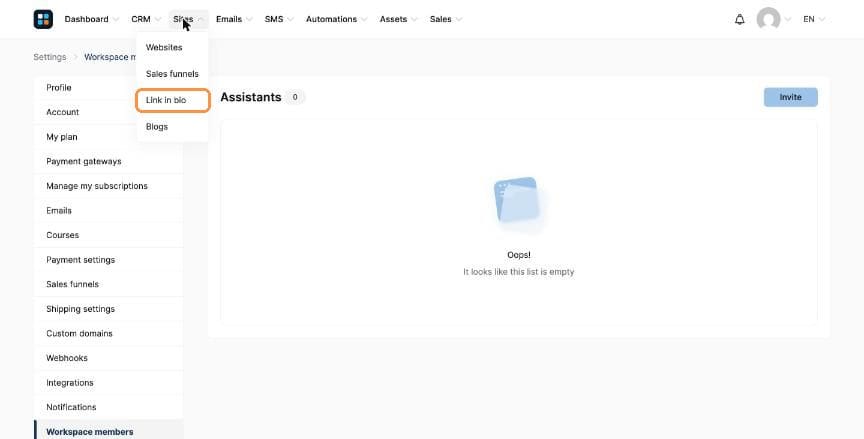
Sites → Link in bio - Click + Create.
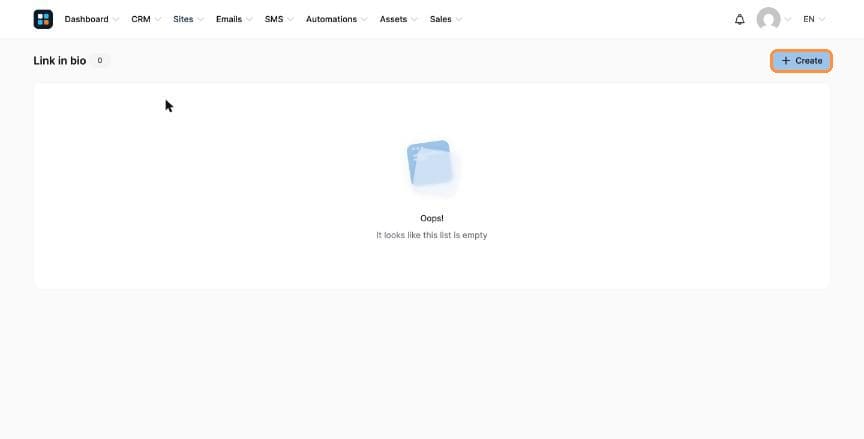
+ Create - Enter a Name, choose the Domain name, set the URL Path and the Language, then click Create.
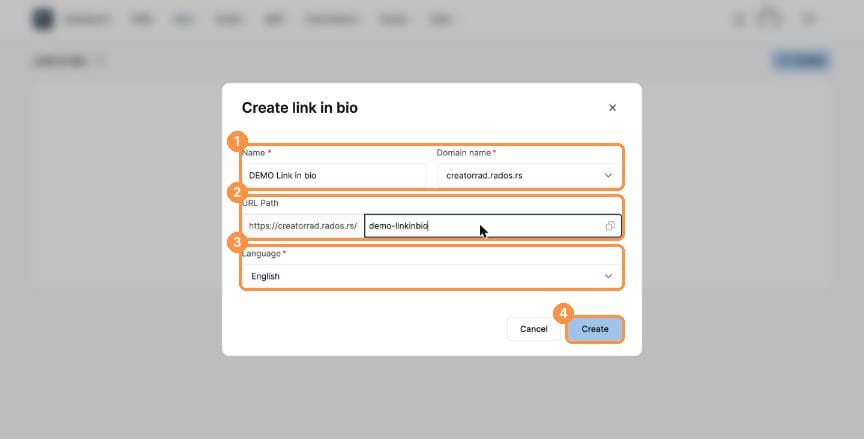
(1) Name and domain, (2) URL path, (3) Language, (4) Create - The editor opens with three tabs (Products, Design, Settings) and a live phone preview on the right.
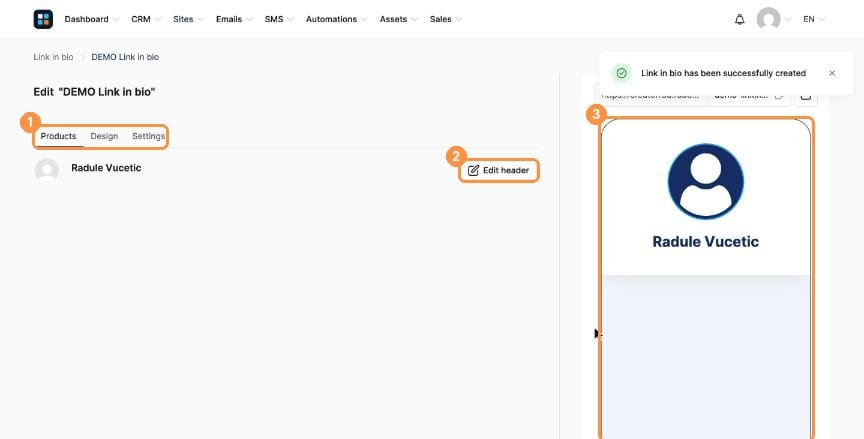
(1) Tabs, (2) Edit header, (3) Live preview
Part 2: Add your header and products
- Click Edit header. Add your photo, Display name and a short Bio, then your Social media links (Instagram, TikTok and more). Click Save.
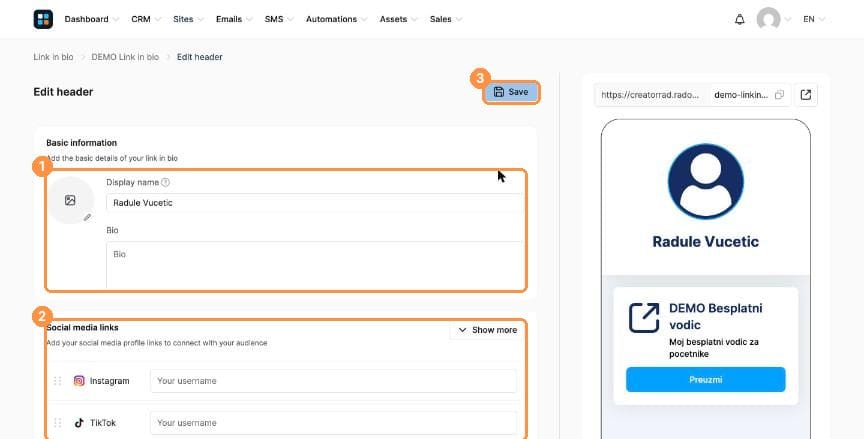
(1) Basic information, (2) Social media links, (3) Save - Back on Products, scroll down and click Add new product.
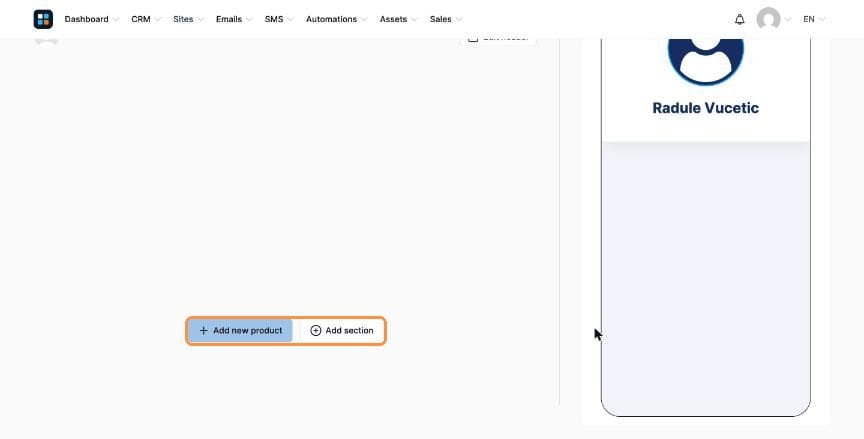
Add new product / Add section - Choose one of the five product types:
- Redirect to an external link: send visitors to any page, for example an affiliate offer or your blog.
- Collect emails: a lead magnet form that adds subscribers to your list.
- Sell a digital download: upload a file and set a price.
- Sell a course: pick one of your RadOS courses and set a price.
- Sell a physical product: uses your products from Lesson 9.
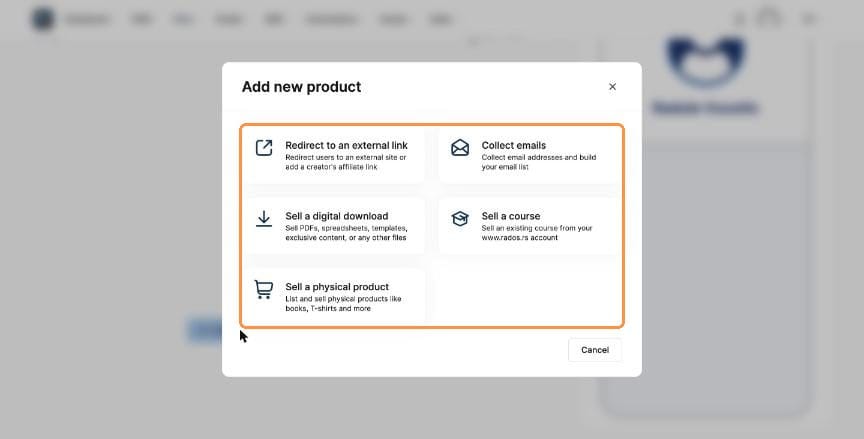
The five product types - Fill in the fields. For an external link that's an image, a Title, the Button text, a Subtitle and the URL. The preview updates as you type. Click Publish.
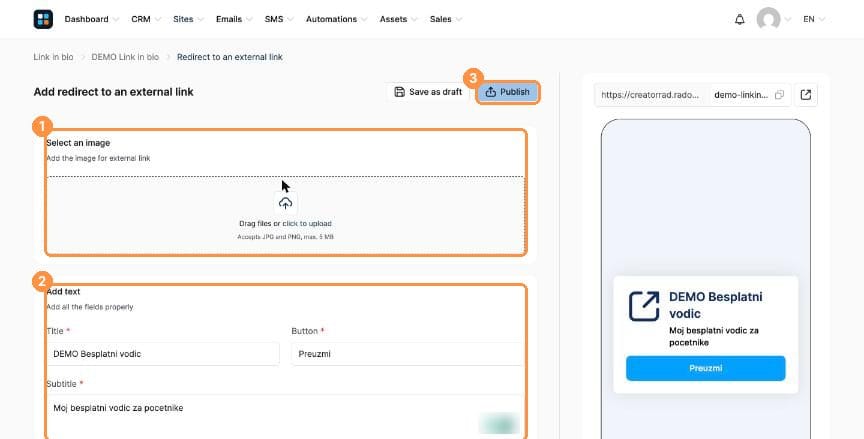
(1) Image, (2) Text, (3) Publish 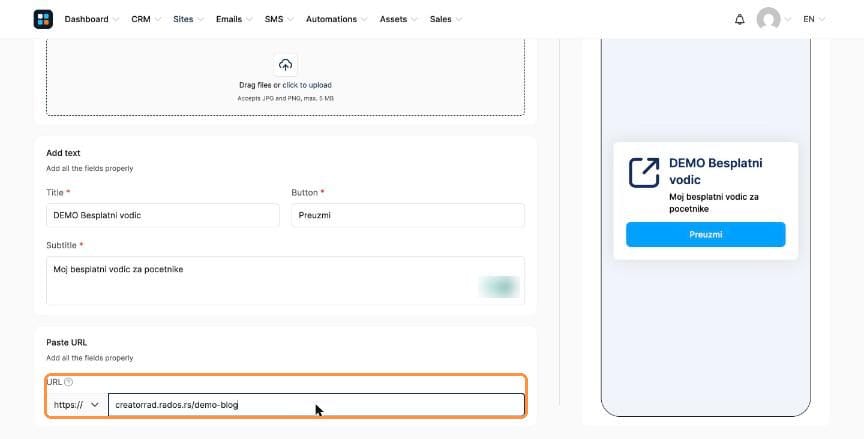
Paste the destination URL - Your header and products are listed on the Products tab.
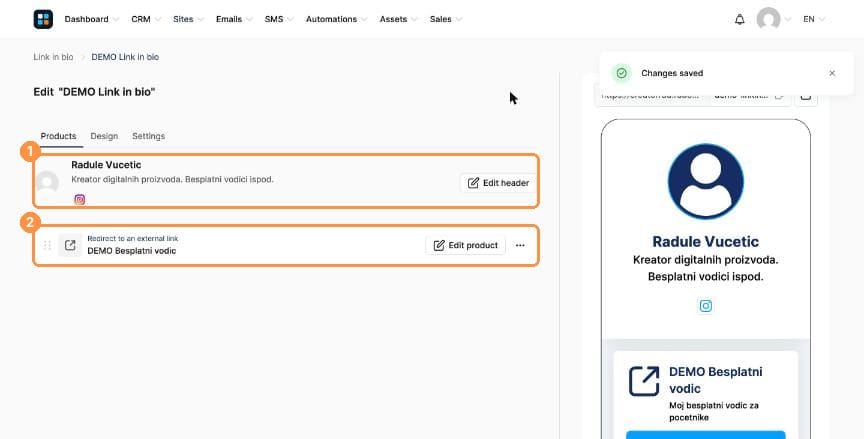
(1) Header, (2) Product
Part 3: Group products into sections
- Click Add section, give it a title (for example "Free", "Courses" or "Templates") and click Add section.
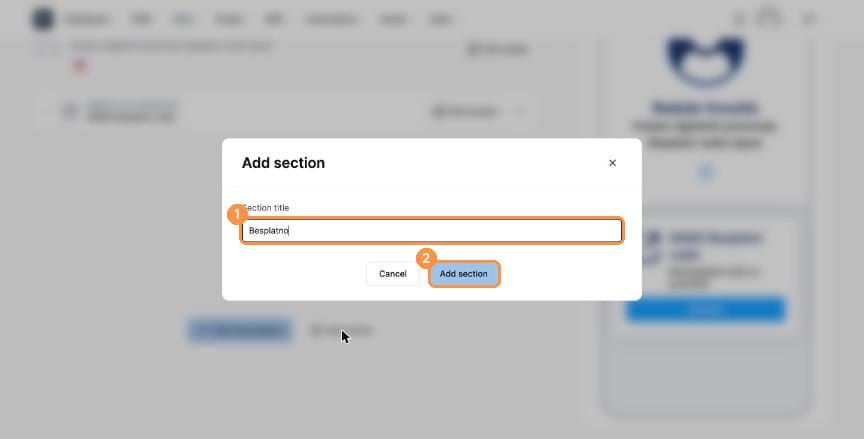
(1) Section title, (2) Add section - Drag the section (by its dotted handle) above the products that belong to it.
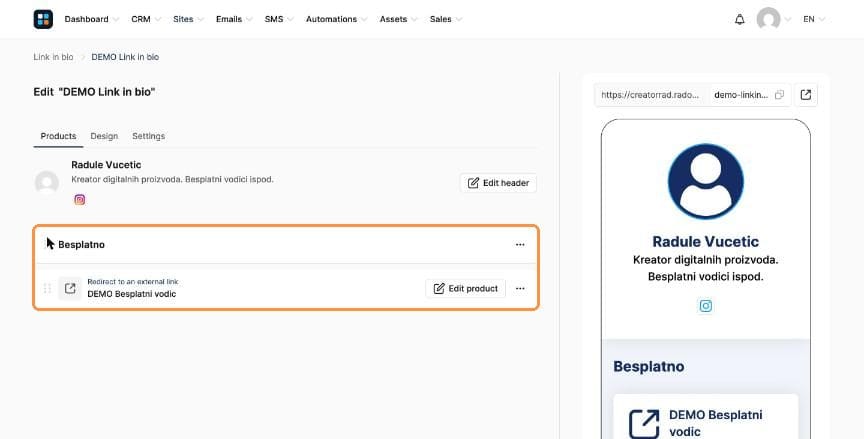
Section above its products
Part 4: Design, settings and go live
- Design: pick a theme and click Save.
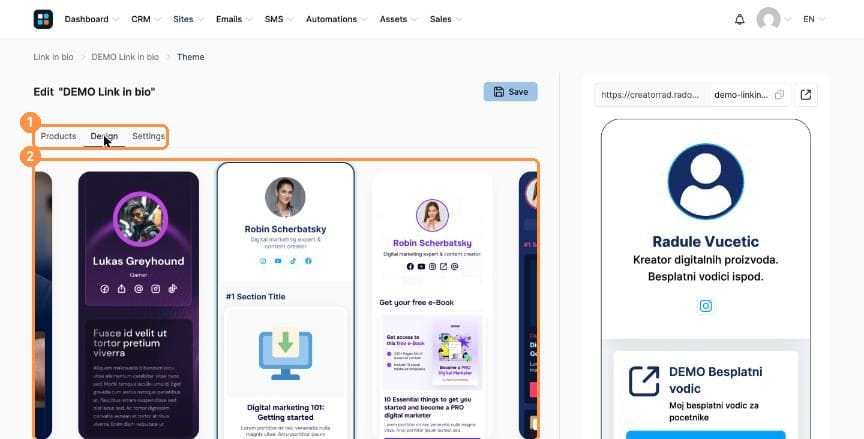
Design themes - Settings: change the name, domain, URL, language and Currency, choose accepted payment methods, and add SEO and tracking codes further down.
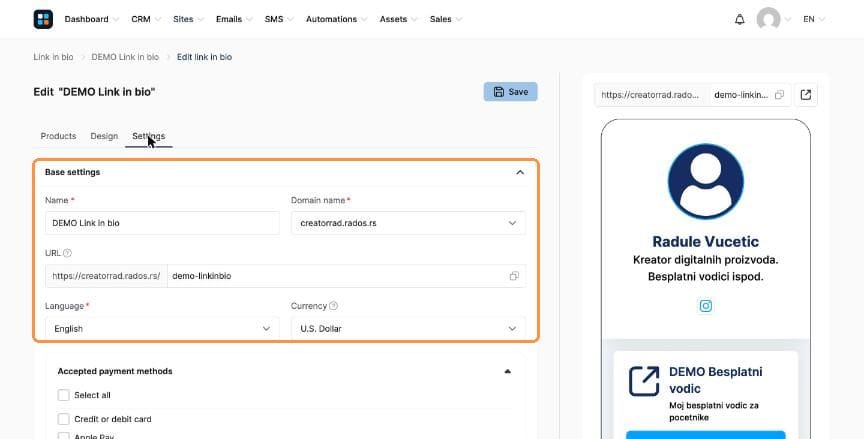
Base settings - Click the open icon next to the address above the preview to see your live page.
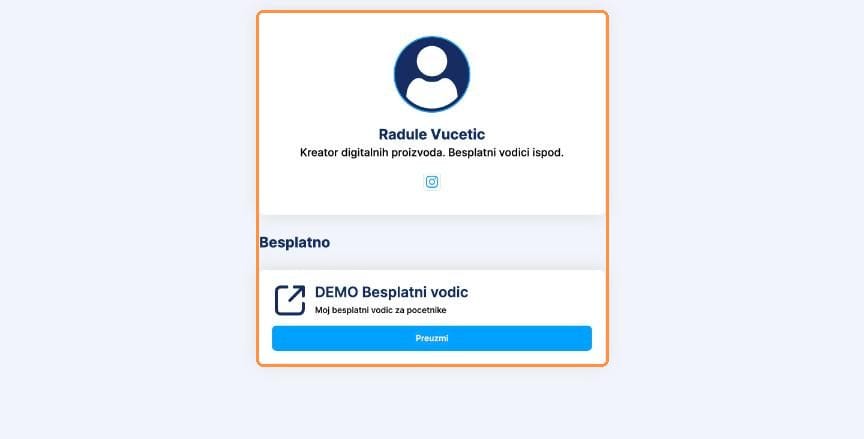
Your live page
Creating discount coupons
Run a promotion without touching your regular prices. You create the coupon once, link it to the offers it should work on, and give customers a place to type the code.
Part 1: Create the coupon
- Go to Assets → Coupons and click + Create.
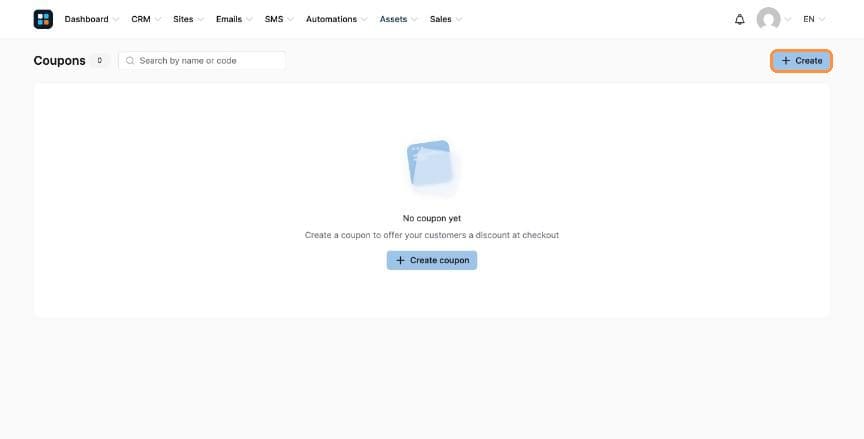
Assets → Coupons → + Create - Choose the Discount type (Percentage or Fixed amount), then enter a Coupon name (only you see it), the Coupon code customers will type, and the Discount amount. Optionally set an Expiration date and a Limit of use (leave it blank for unlimited). Click Save.
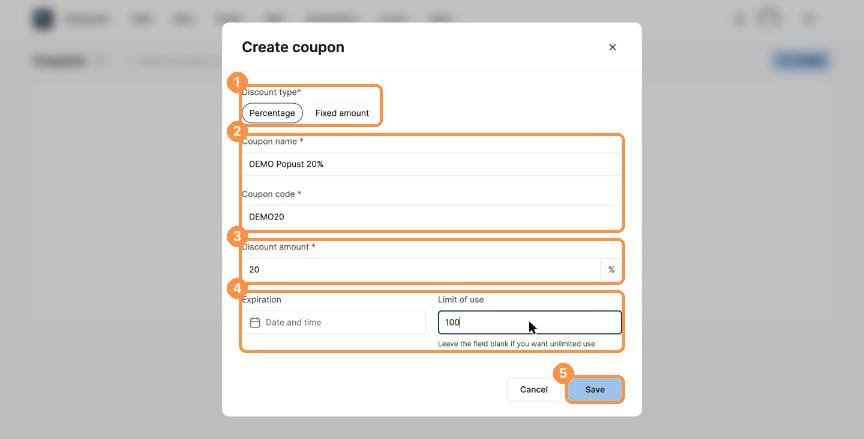
(1) Type, (2) Name and code, (3) Amount, (4) Expiry and limit, (5) Save - The coupon appears as Active, with how many times it has been used.
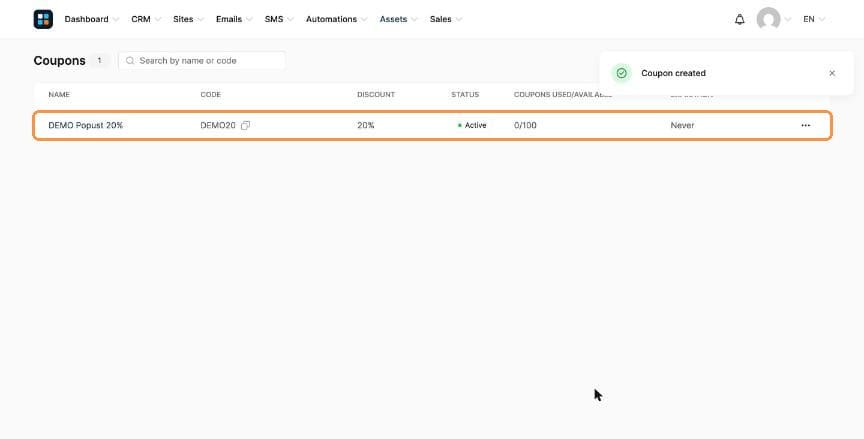
Your active coupon
Part 2: Link it to an offer
A coupon only works on the offers you attach it to.
- Open your Sell funnel, click the Order Form step and scroll down the Configuration tab to Coupons. Click +.
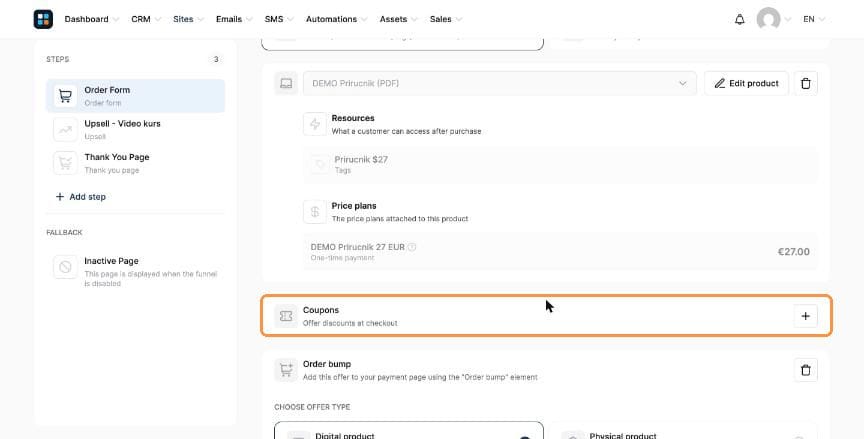
Coupons → + - Choose the discount type, then open the Coupon list.
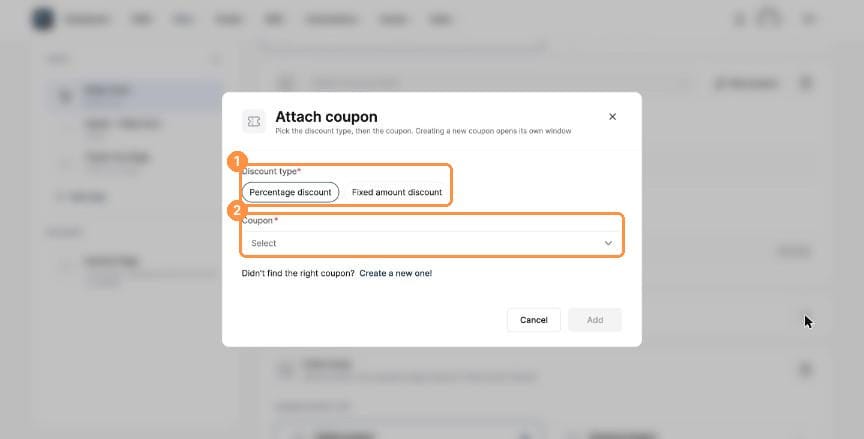
(1) Discount type, (2) Coupon - Pick your coupon and click Add.
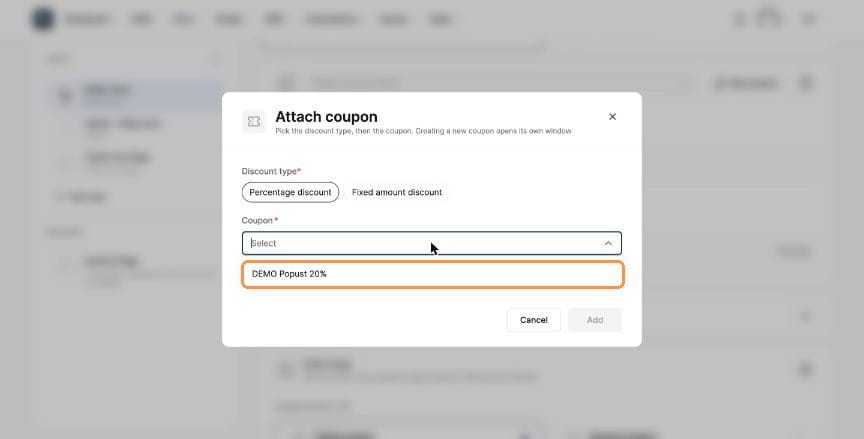
Your coupon - The coupon now shows in the table, with its code, expiry and usage.
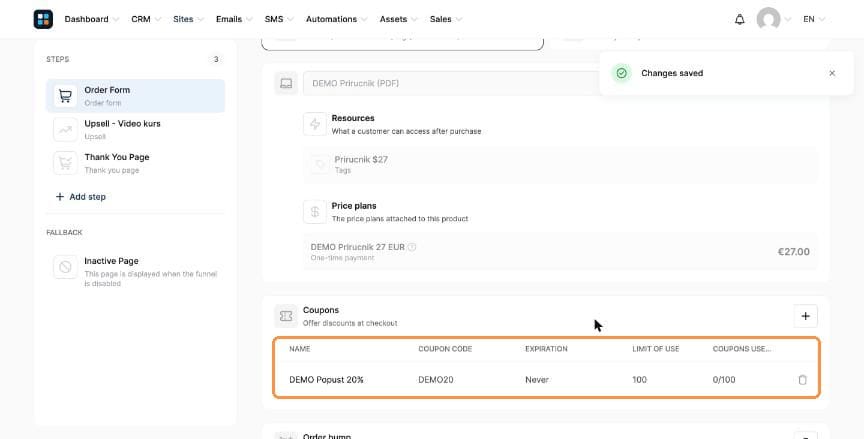
Coupon linked to this offer
Part 3: Add the coupon field to the page
- Click Edit page on the Order Form. In the Payment section of the elements panel, drag the Coupon element onto the page, above the payment button. Click Save.
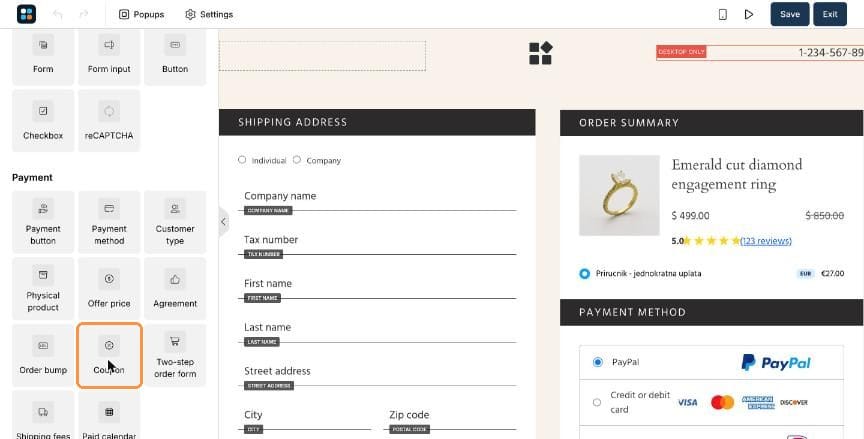
Payment → Coupon
Analyzing your email performance
Know what is working before you write your next newsletter or campaign. All the numbers live on one page.
Your email statistics
- Go to Emails → Statistics.
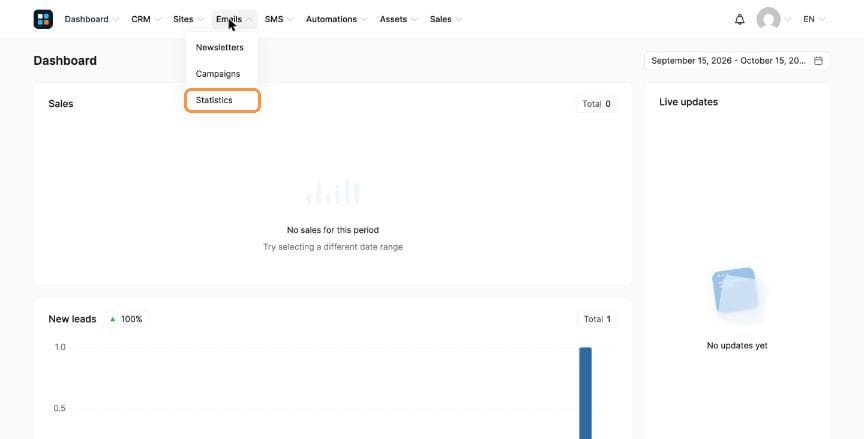
Emails → Statistics - At the top: the date range (top right), your sending Pool and the first graphs. The pool is your reputation level (New user, Low, Moderate or High risk) and affects how reliably your emails reach the inbox. Number of emails sent and Average percentage of opened emails show your volume and open rate.
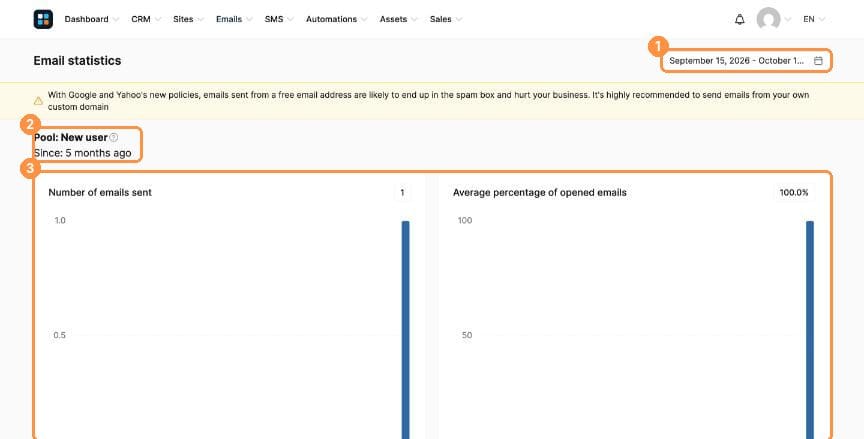
(1) Date range, (2) Pool, (3) Sent and opened - Below: spam reports and bounced emails. Keep both as close to zero as possible. Spam reports hurt your reputation, and bounces mean addresses on your list no longer work.
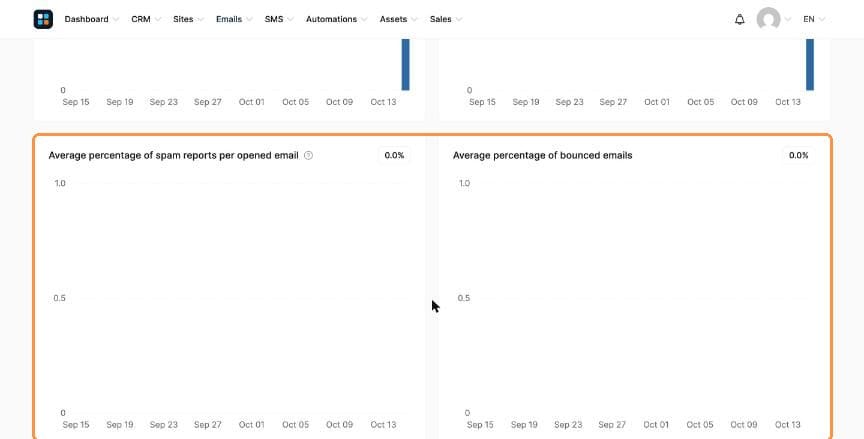
Spam reports and bounces - At the bottom, the Emails table lists every newsletter and campaign email with total sent, opened, spam reports and bounces. Click a subject to see its own statistics, including clicks on each link and which contacts opened or clicked.
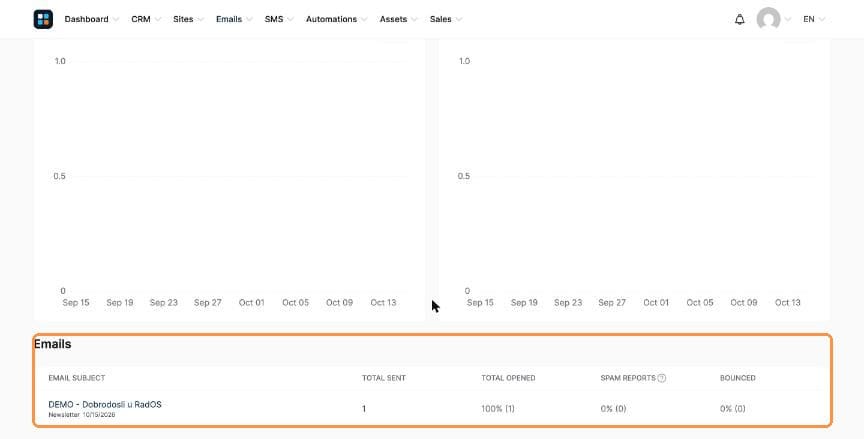
Every email's results - The email's own page shows its open, spam report, click and bounce rates, a row for every recipient (opened, clicked, reported, bounced; use Filter to narrow it down), and Links in this email with the clicks on each link.
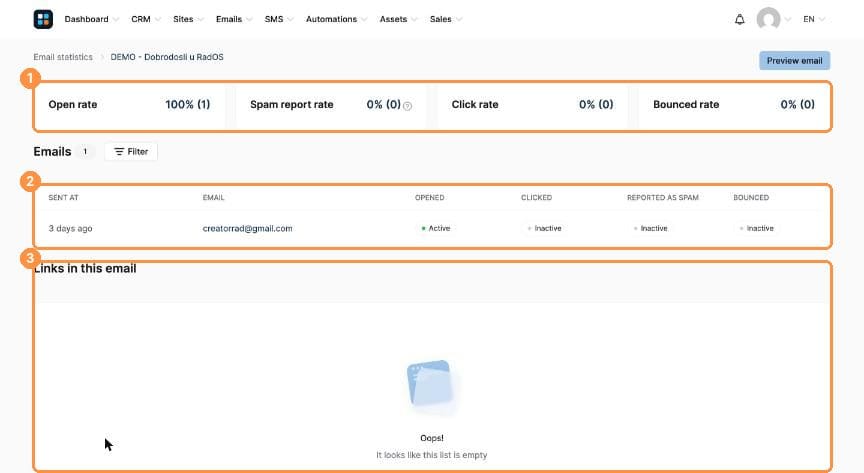
(1) Rates, (2) Every recipient, (3) Link clicks
Managing clients with pipelines
A pipeline is a Kanban board for tracking leads and deals as they move through your sales process. It is useful whenever a sale needs a personal follow-up, for example consulting, coaching or higher-priced offers.
Part 1: Create a pipeline
- Go to CRM → Pipelines.
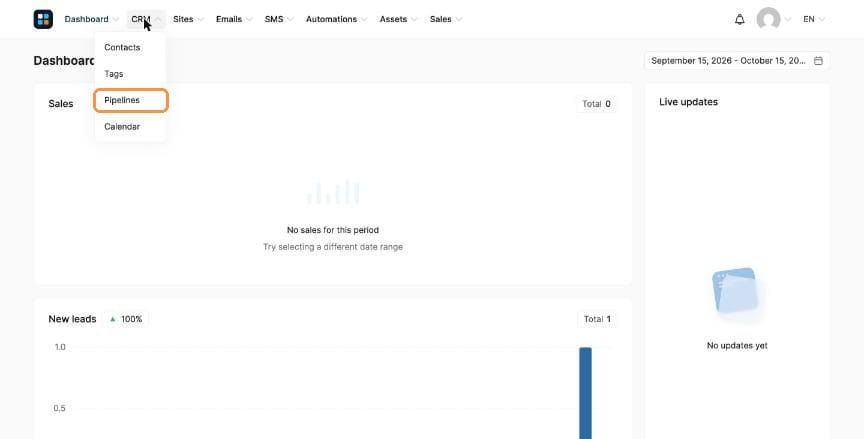
CRM → Pipelines - Click + Create.
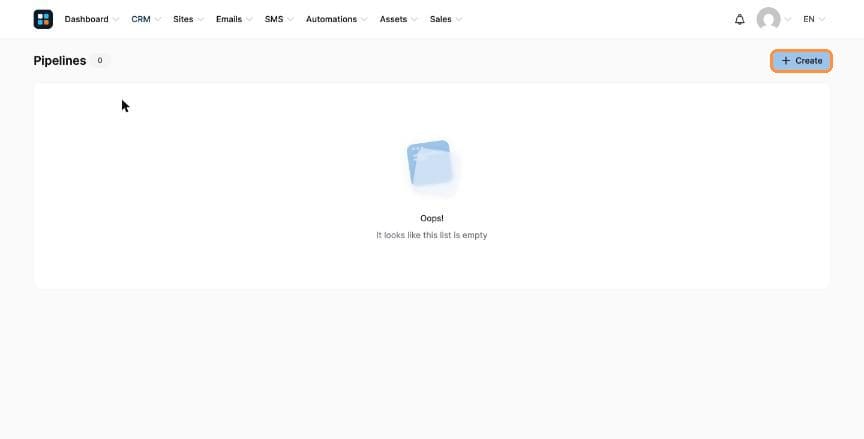
+ Create - Enter a Pipeline name. RadOS suggests stages (New leads, Initial contact made, Proposal sent, Negotiation, Deal won, Deal lost). Rename, drag to reorder, or click + to add your own. Click Save.
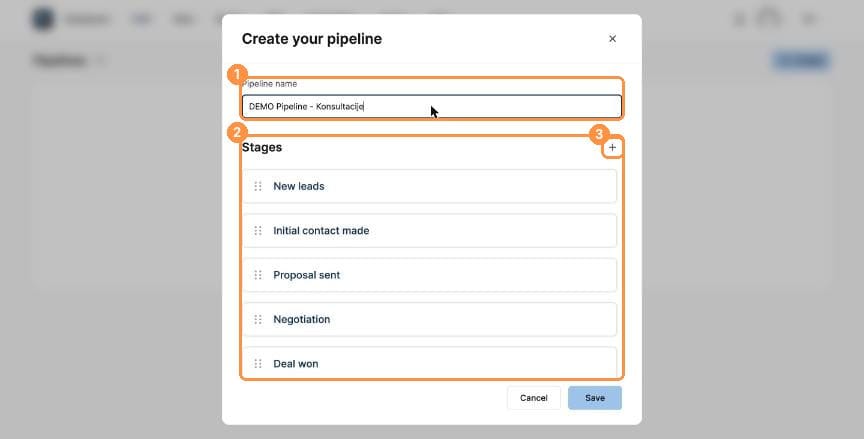
(1) Name, (2) Stages, (3) Add a stage - Click the pipeline name to open the board.
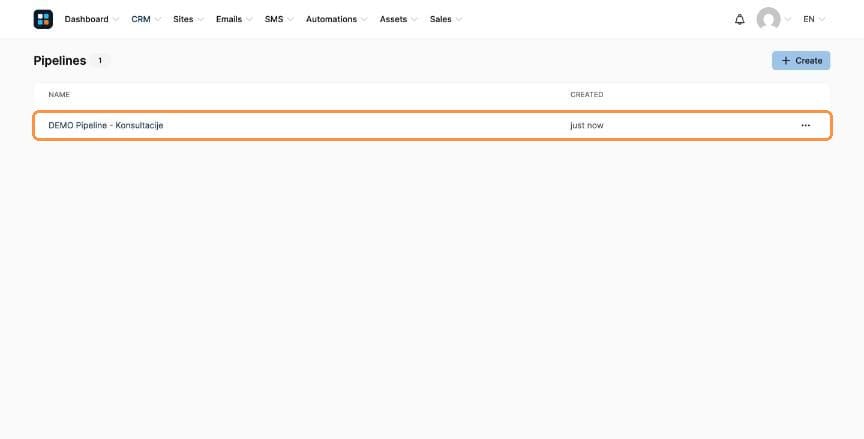
Your pipeline
Part 2: Add and move leads
- Each stage is a column. Click Add contact in the stage you want.
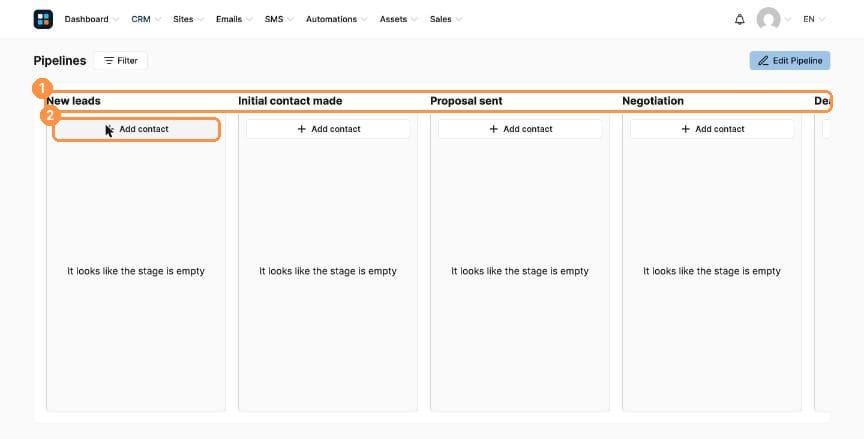
(1) Stages, (2) Add contact - Choose Add existing contact or Create new contact and click Next.
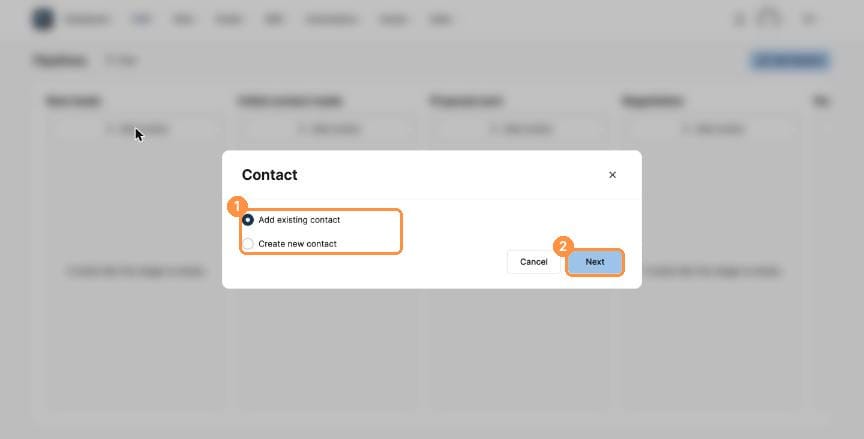
(1) Existing or new, (2) Next - Type at least 3 letters of the name or email, tick the contact and click Save.
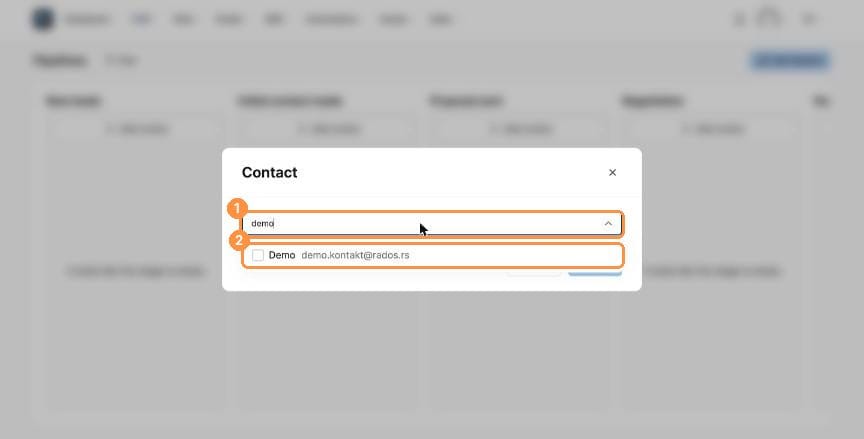
(1) Search, (2) Tick the contact - The contact appears as a card in that stage.
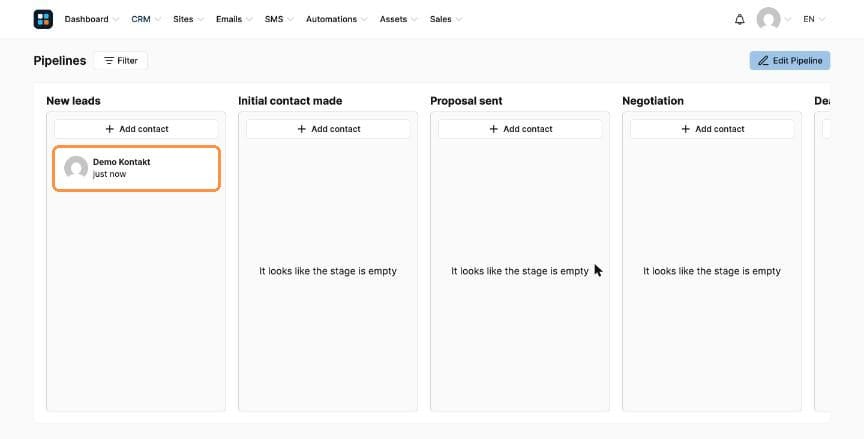
The contact card - As the deal progresses, drag the card to the next stage.
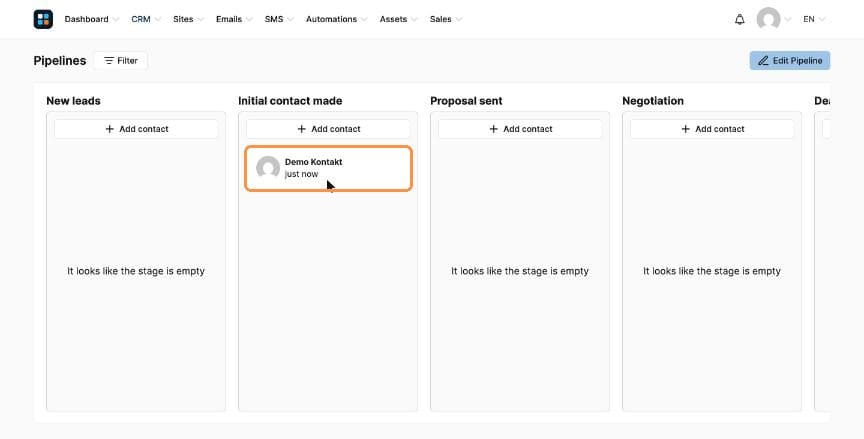
Drag cards between stages
Part 3: Keep notes
- Click a card to open Contact info, then click Notes.
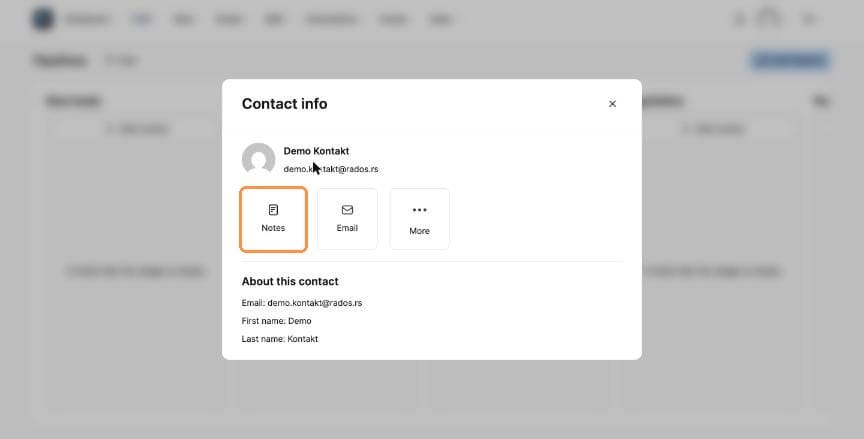
Notes - Write the note (call summary, next steps) and click Save.
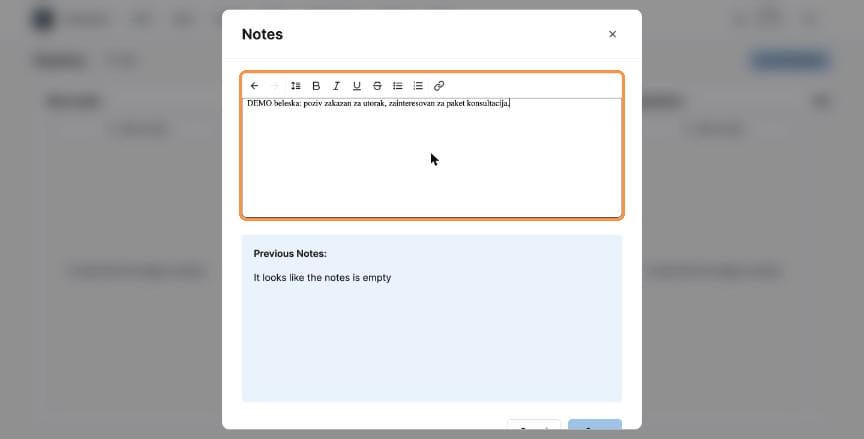
Write the note - Saved notes appear under Previous notes, where you can pin, edit or delete them.
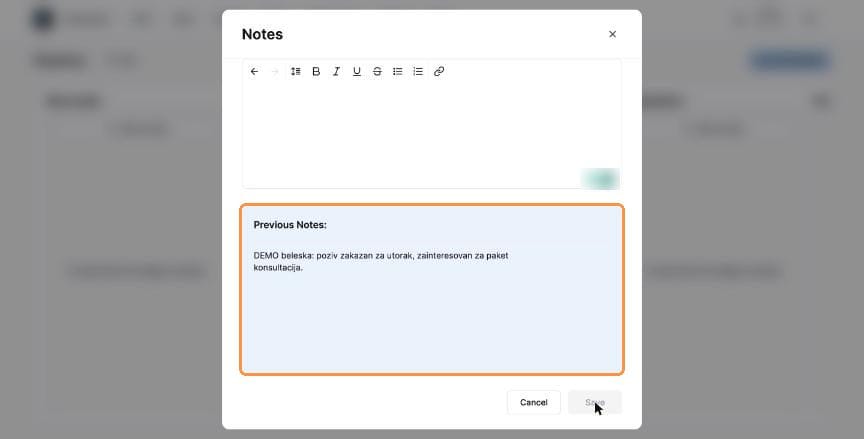
Previous notes
Automating bookings with the calendar
Let clients book time with you directly, get automatic reminders, and see every appointment in one place, without a separate scheduling tool.
Phase 1: Set your availability
- Go to CRM → Calendar.
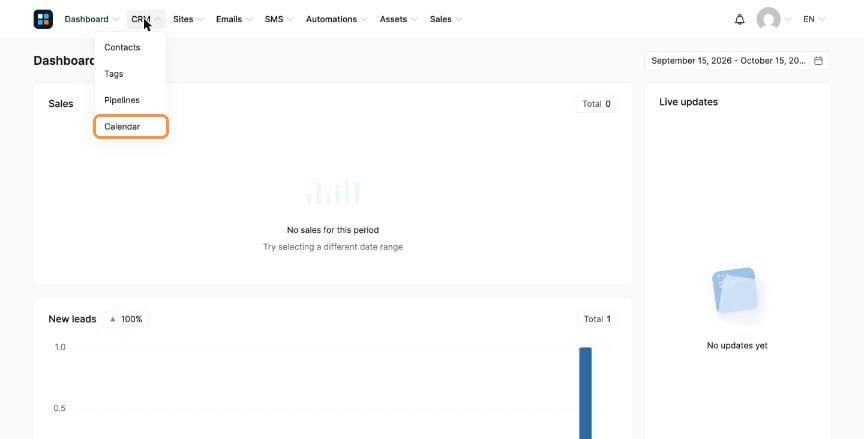
CRM → Calendar - You'll see three tabs: Events, Bookings and Availability. Open Availability.
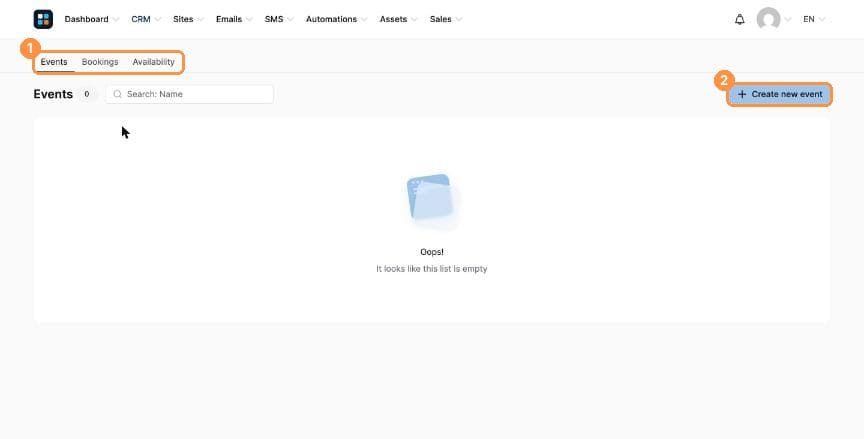
(1) Tabs, (2) Create new event - Set your Weekly availability. Use Date-specific availability for one-off changes and Time-off for holidays.
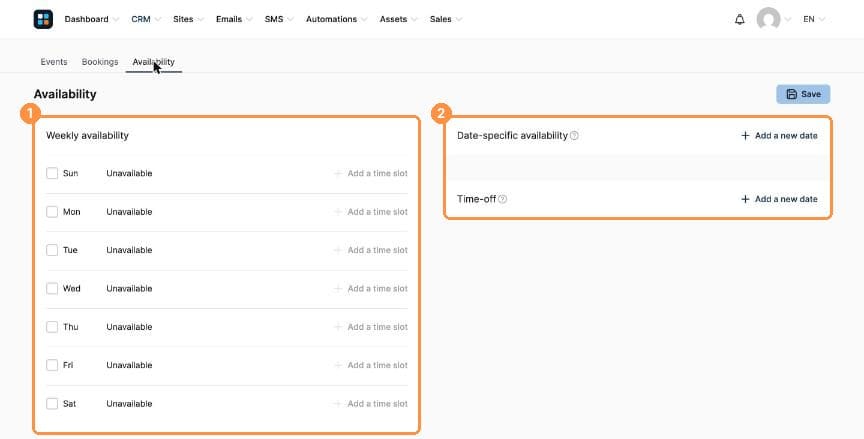
(1) Weekly availability, (2) Date-specific and time off - Tick a day, choose the start and end time (click Add a time slot for a second block, such as after lunch) and click Save.
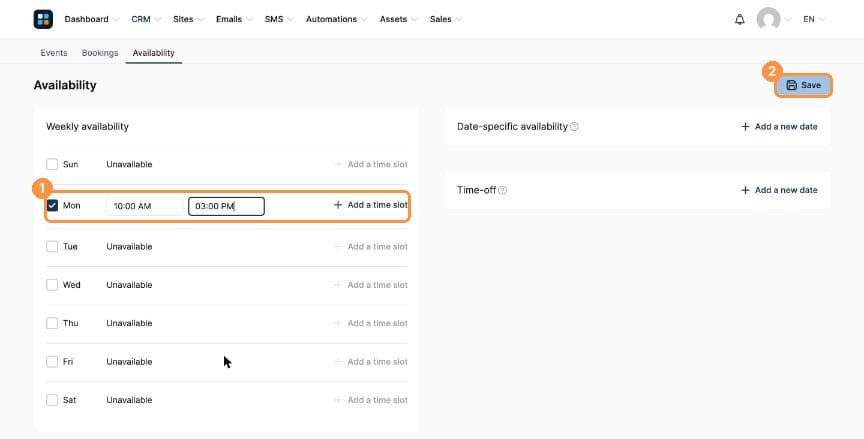
(1) Day and hours, (2) Save
Phase 2: Create an event
You need at least one event before anyone can book.
- On the Events tab click + Create new event and choose Individual event (one person per slot, ideal for 1-on-1 calls) or Group event (several people in the same slot, ideal for a workshop). Click Confirm.
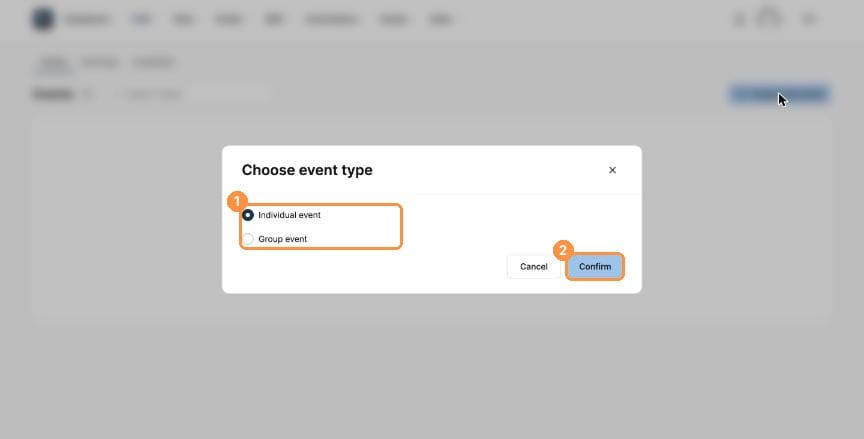
(1) Individual or Group, (2) Confirm - Enter the Name, Event duration and Host name, and choose a Location: Online meeting, Phone or In person.
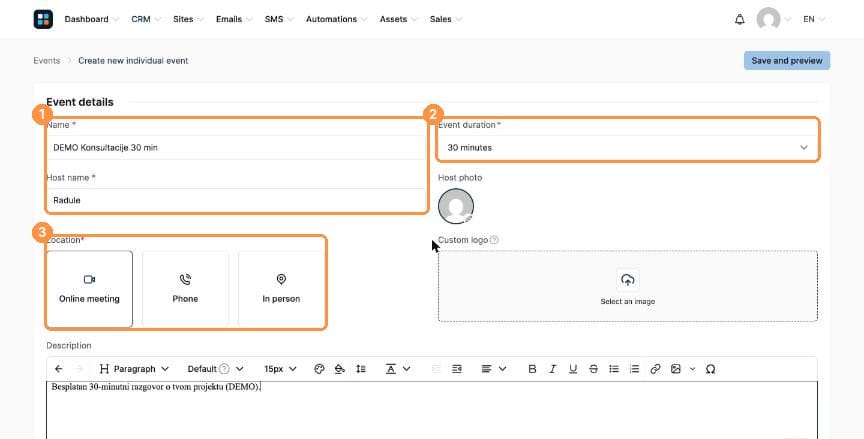
(1) Name and host, (2) Duration, (3) Location - For an online meeting, connect Zoom or Google Meet, or tick External link and paste your meeting link. Click Save.
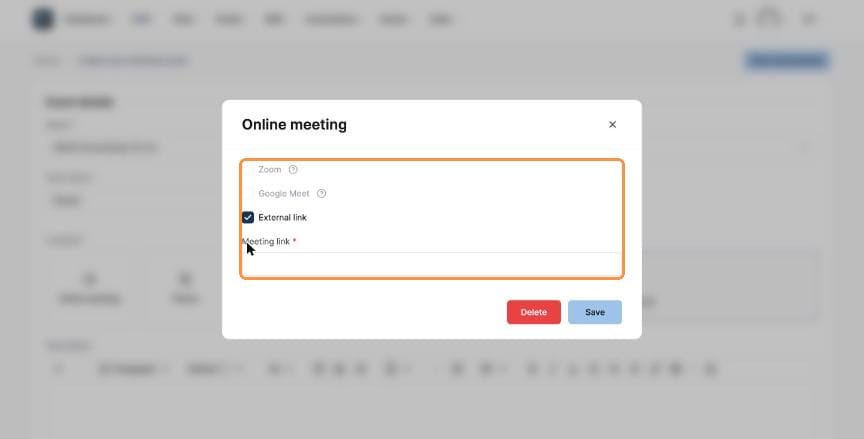
Online meeting options - Write a short Description for the booking page, then set when invitees can book (indefinitely, a number of days ahead, or within a date range), the minimum notice and the cancellation deadline.
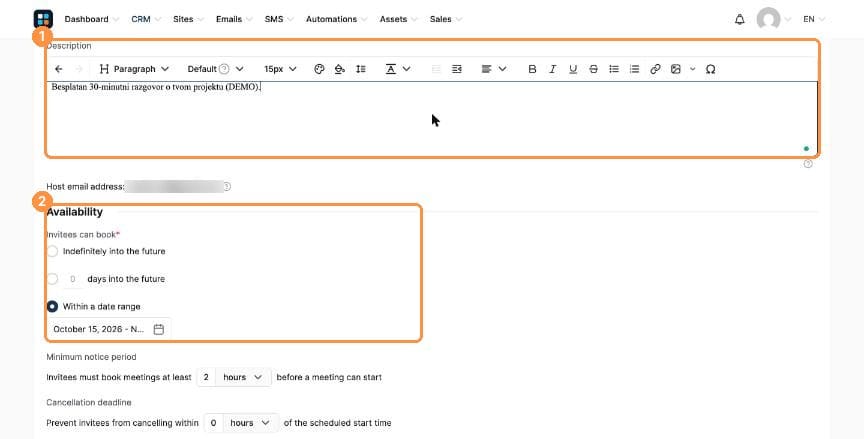
(1) Description, (2) Booking window - Choose the Start time increments (every 15, 30 or 60 minutes), an optional Daily limit and Buffer time between meetings.
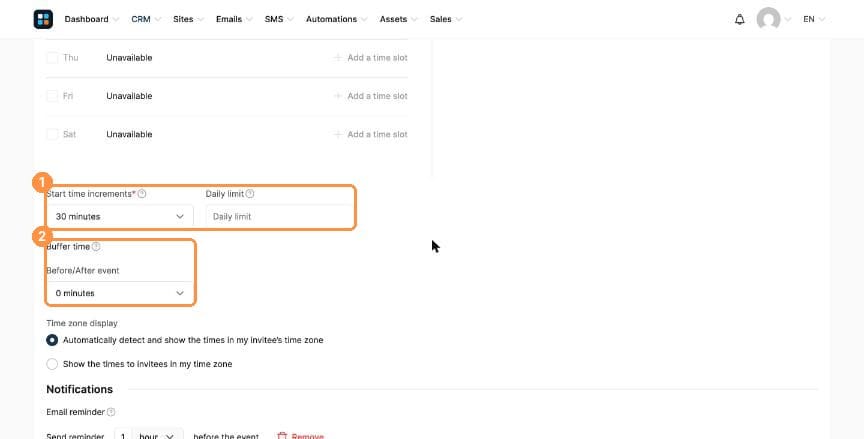
(1) Increments and daily limit, (2) Buffer time - Under Notifications, keep or change the automatic email reminders (for example 1 day and 1 hour before).
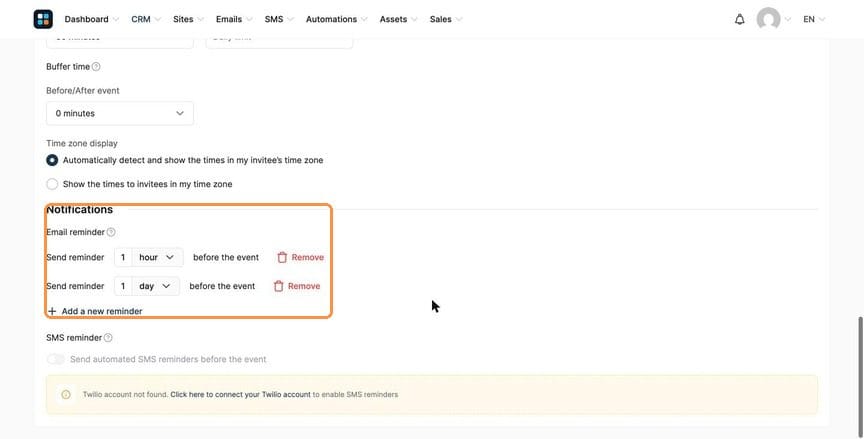
Email reminders - Scroll up and click Save and preview. You'll see the booking page your visitors get: they pick a day, then a time slot.
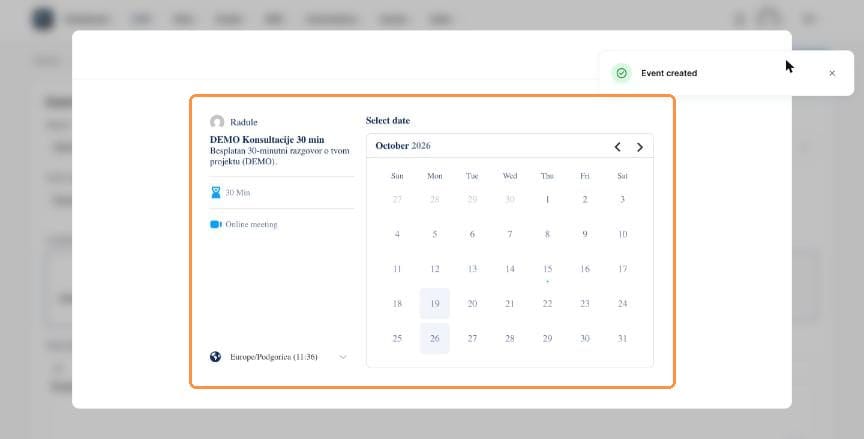
The booking page 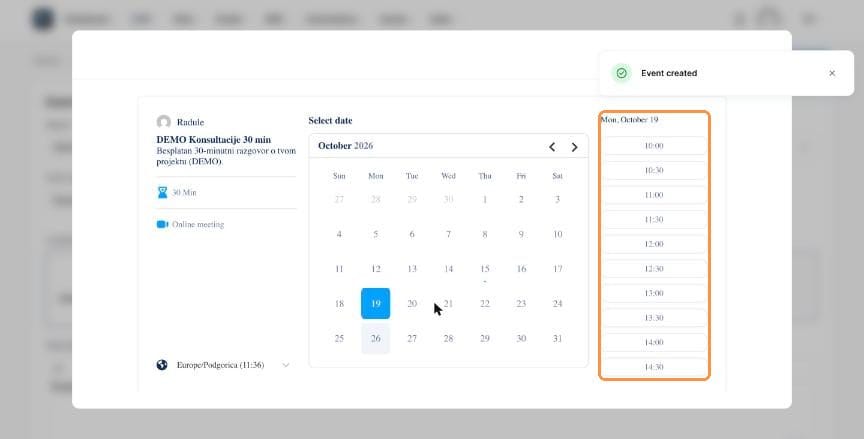
Available time slots - Your event is now on the Events tab.
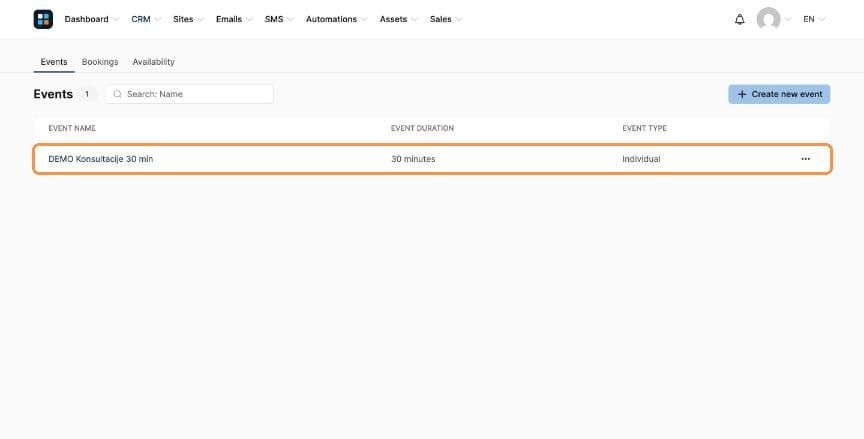
Your event
Phase 3: Put it on a page and manage bookings
- Open the page editor on any funnel step and add the calendar element. On an order form it is called Paid calendar (in the Payment section): link the event to a digital product so the client pays before the slot is confirmed.
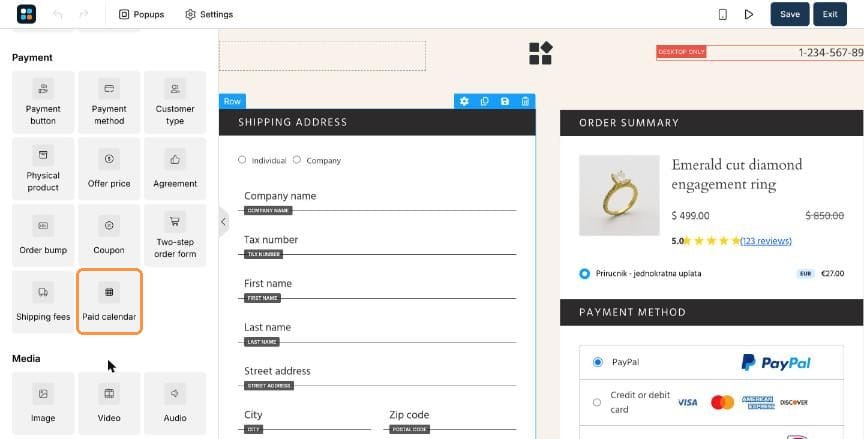
Payment → Paid calendar - Go to CRM → Calendar → Bookings to see every appointment, filtered by event, status or date. From here you can cancel or reschedule, and the client is notified by email.
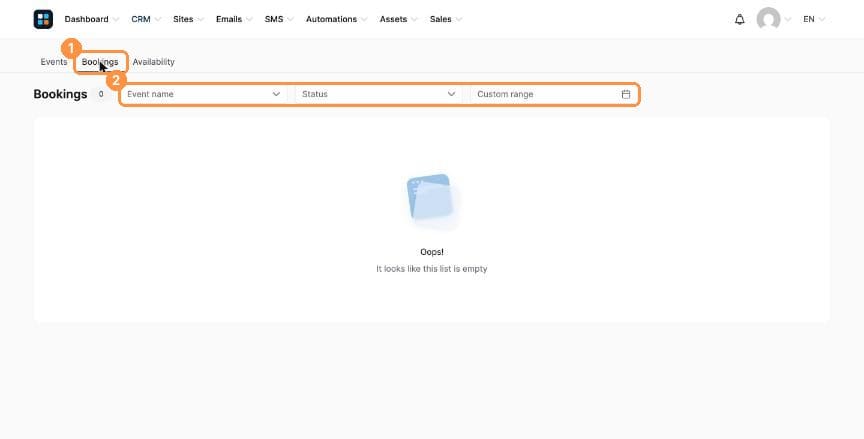
(1) Bookings, (2) Filters
Working with a team
When your business grows, you don't have to do everything yourself. Invite an assistant to your RadOS workspace so they can help with funnels, emails and contacts, without sharing your password.
Invite an assistant
- Click your profile picture in the top right, then Settings.
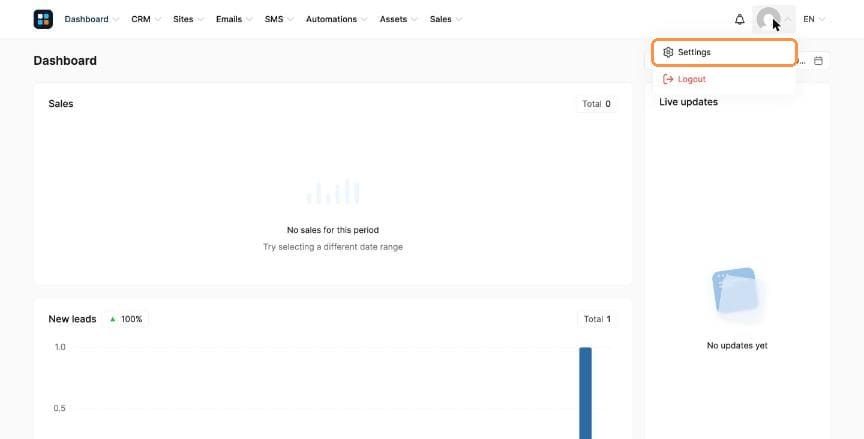
Profile picture → Settings - In the left menu, open Workspace members and click Invite.
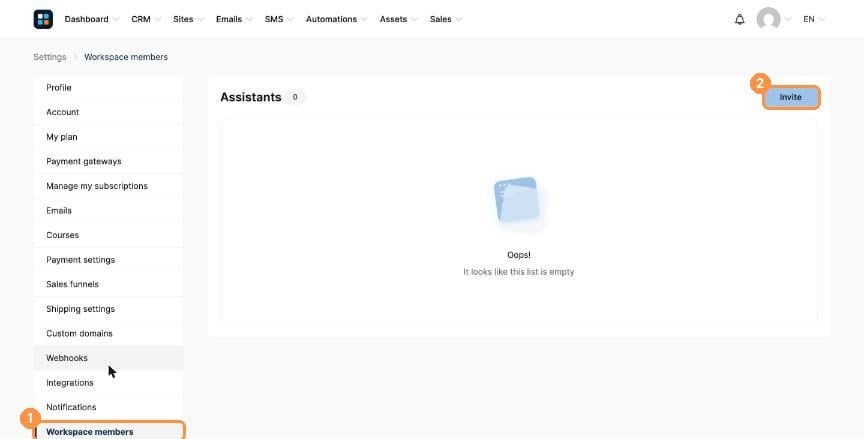
(1) Workspace members, (2) Invite - Enter your assistant's Email and click Invite. They receive an invitation email and get access as soon as they accept it.
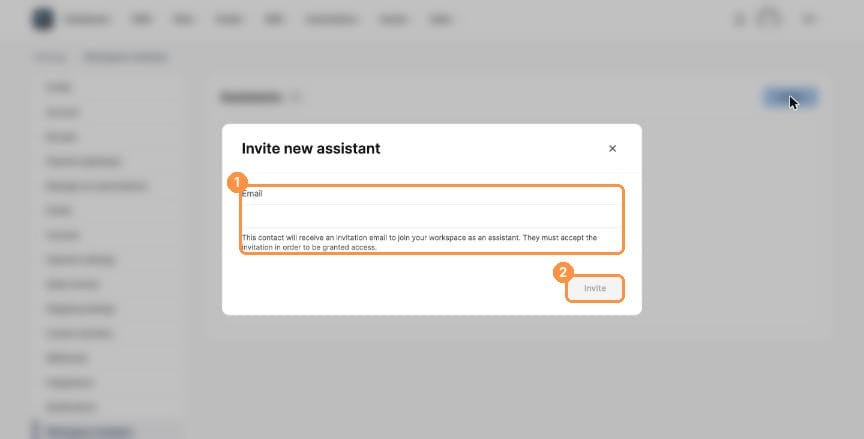
(1) Email, (2) Invite
Your first product, step by step: tag, funnel & digital product
A click-by-click walkthrough recorded inside a real RadOS account. By the end you'll have a working sales funnel that sells a digital product for €27 and automatically tags every buyer, so you can email them and build automations later. Every screenshot shows exactly what you'll see, with the button to click circled in orange.
What you'll need: a RadOS account (free is fine) and about 15 minutes. Connect a payment gateway before you share the funnel publicly. See the Help Center's Payments section.
Before you start: how the menu works
Everything in RadOS lives in the top menu bar: Dashboard · CRM · Sites · Emails · SMS · Automations · Assets · Sales. Hover over or click any item to open its sub-menu. You'll use three of them in this lesson:
- CRM → Tags to create the label that marks your buyers
- Sites → Sales funnels to build the pages people buy from
- The funnel's Order Form step, where you create the digital product and its price
Part 1: Create a tag for your buyers
A tag is a label RadOS sticks on a contact. When the tag is attached to your product, everyone who buys gets it automatically. Later you can send emails to just your buyers, or start an automation the moment the tag is added.
- In the top menu, click CRM, then Tags.
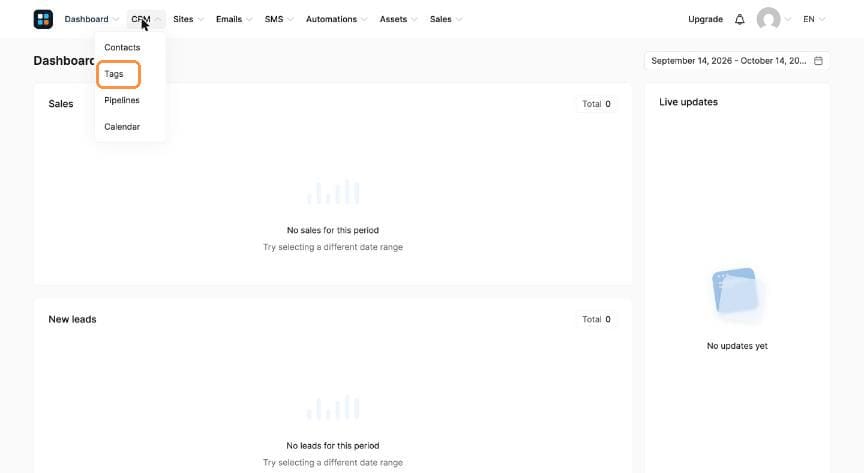
CRM → Tags - You'll see a list of your tags with four columns: All time sales, Sales per contact, Times added and Times removed. Click + Create in the top right.
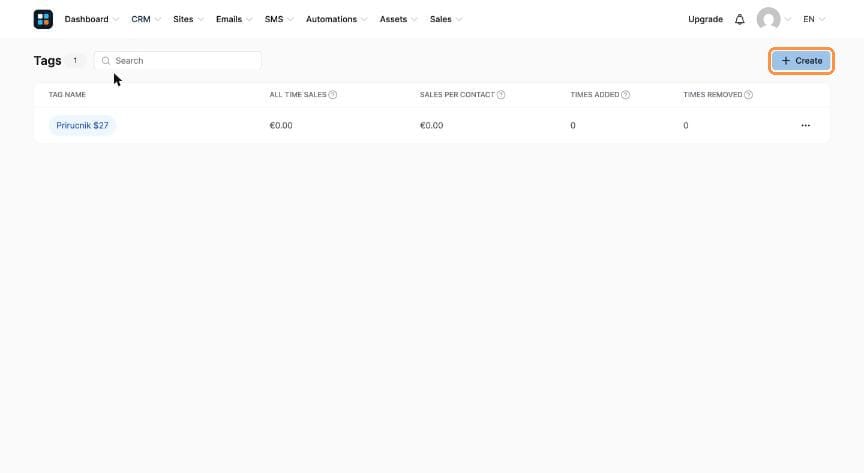
The Tags page, with + Create in the top right - Type a clear name into Tag name, for example Buyer – Guide €27, and click Create.
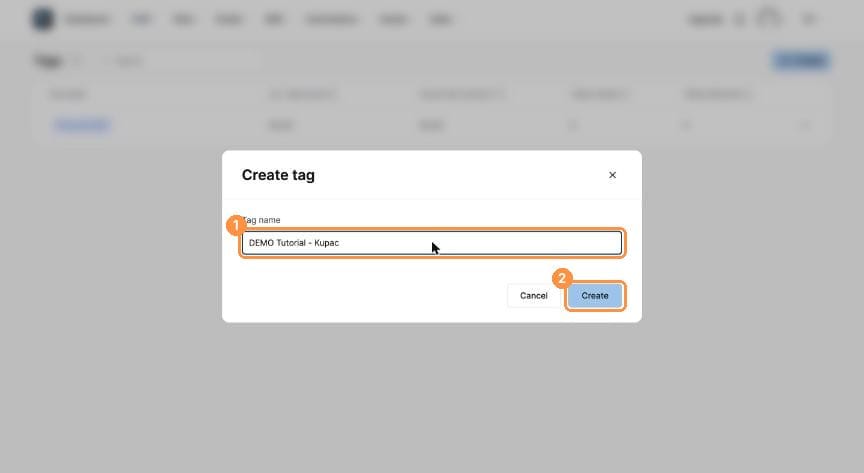
(1) Name the tag, then (2) click Create
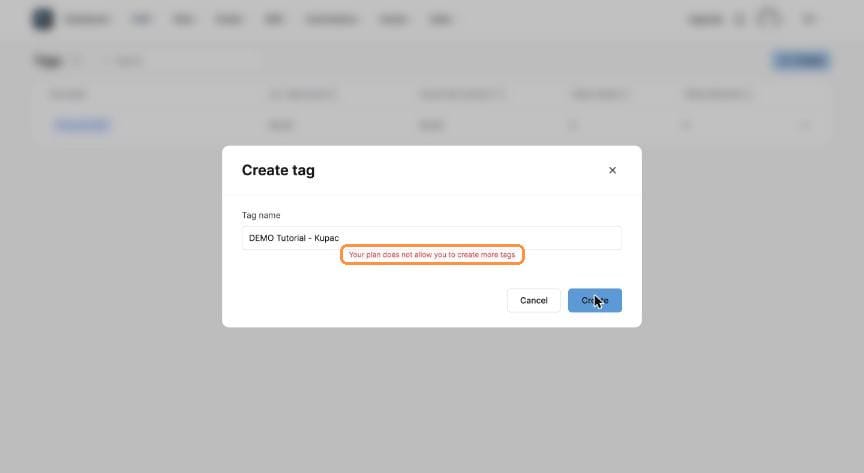
Part 2: Create a sales funnel
- In the top menu, click Sites, then Sales funnels.
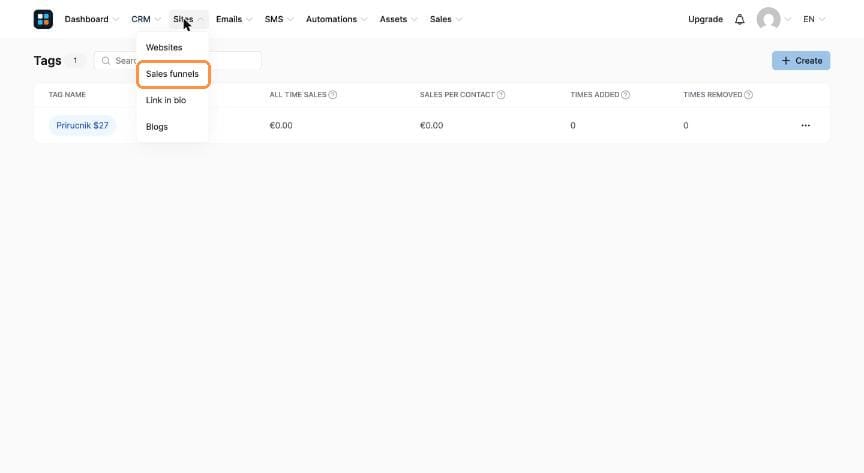
Sites → Sales funnels - Click + Create (top right, or the button in the middle of the page if you have no funnels yet).
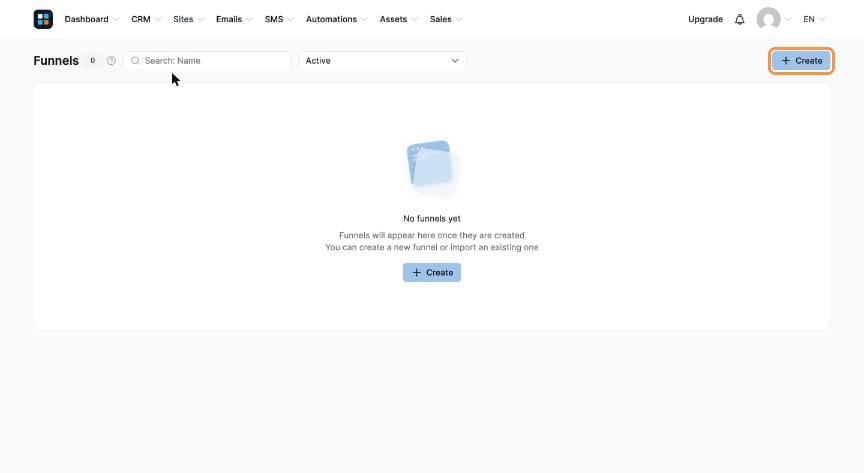
An empty Funnels page. Click + Create. - Fill in the Create funnel window:
- Name: only you see this, so name it after the product
- Funnel domain: leave your default RadOS address (yourname.rados.rs) unless you've connected your own domain
- Funnel type: choose Sell ("Sell a product or a service")
- Currency: click the field, type the currency name (e.g. Euro) and select it
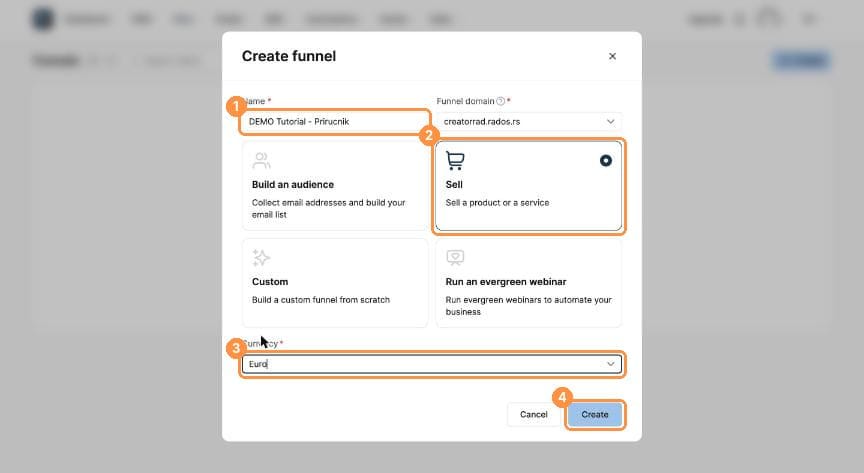
(1) Name, (2) Sell type, (3) Currency, (4) Create - A green "Funnel created" message appears and your funnel shows up in the list as Active. Click its name to open it.
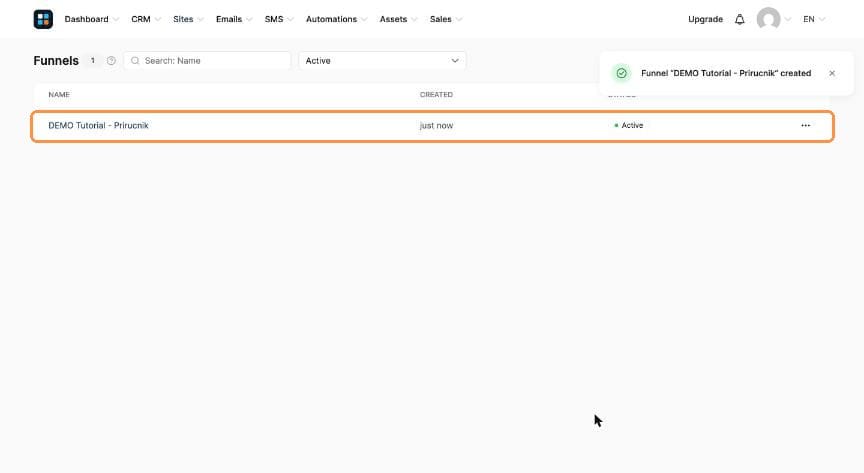
Your new funnel in the list
| Funnel type | Pick it when you want to… |
|---|---|
| Build an audience | collect email addresses (free guide, waitlist) |
| Sell | sell a product or service. Comes with an Order Form + Thank You Page. |
| Custom | build any combination of pages from scratch |
| Run an evergreen webinar | run an automated, pre-recorded webinar |
Part 3: Pick a design for the order form
Inside the funnel, the left panel lists your Steps: Order Form and Thank You Page. Below them is an Inactive Page, which visitors see if you ever switch the funnel off.
- With Order Form selected, scroll through the templates on the right. Hover over one you like (the small arrow icon previews it) and click Use template.
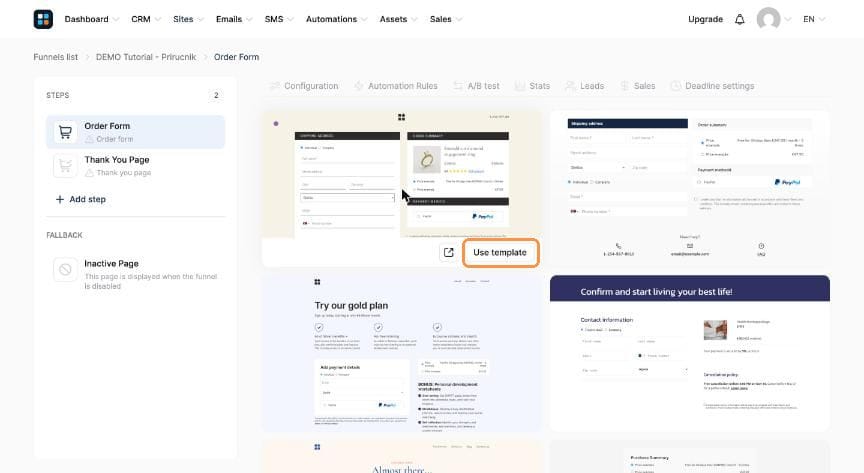
Hover a template, then click Use template - The step's settings open. Here you'll see the page Name, its URL Path (the end of the web address) and an optional Sales limit. Under Choose offer type, click Digital product.
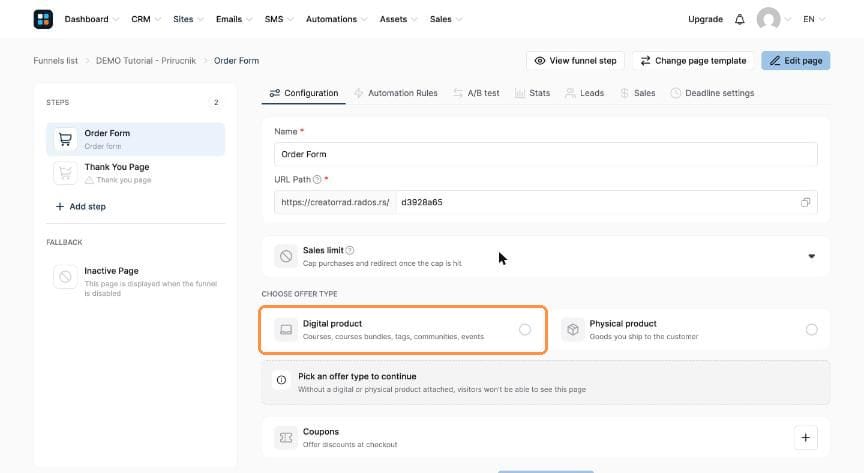
Choose offer type → Digital product
Part 4: Create the digital product and attach your tag
- The Add digital product window opens. Click + Create new product. If you've made the product before, use Select existing product instead.
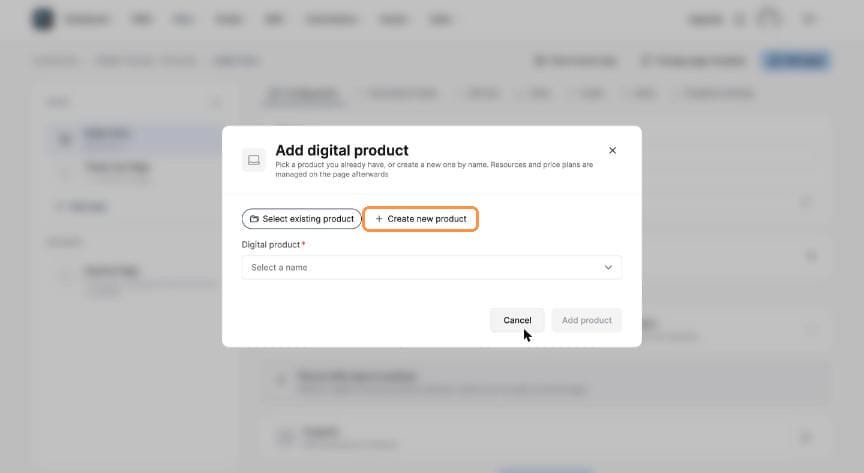
Switch to + Create new product - Type the Digital product name (e.g. Guide (PDF)) and click Add product.
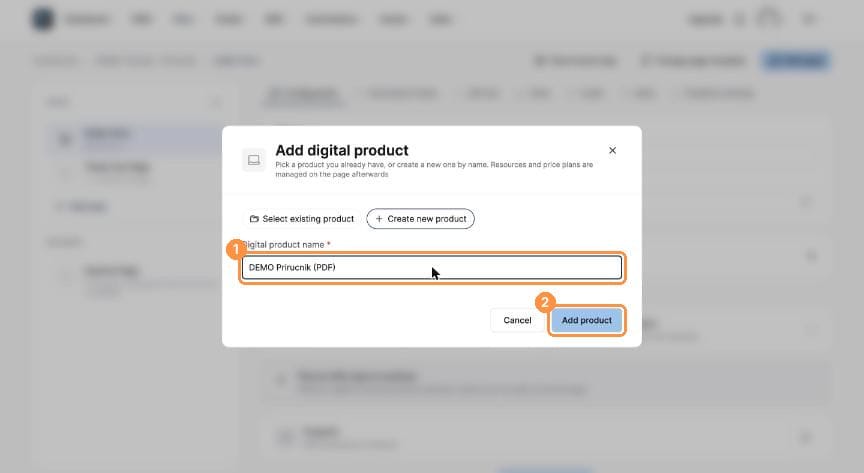
(1) Product name, (2) Add product - The product now appears with two empty boxes: Resources (what the customer gets after paying) and Price plans (what they pay). Click the + next to Resources.
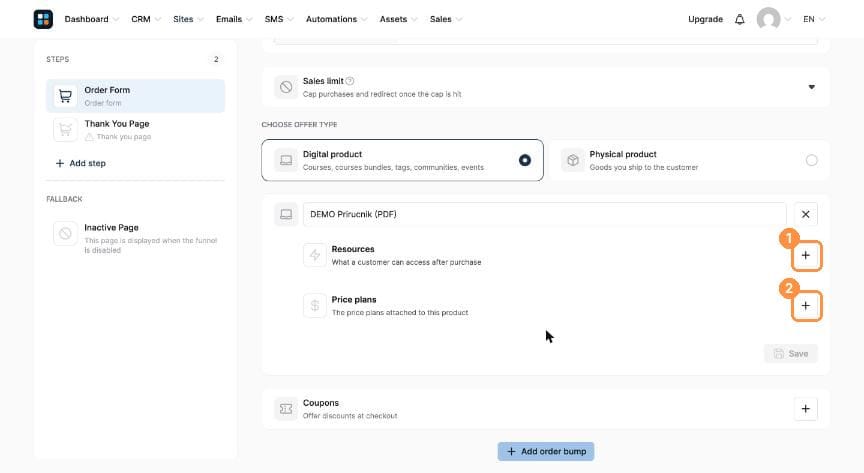
(1) Resources + first, then (2) Price plans + next - In Add resource, pick the type. You can choose Courses, Course bundles, Tags, Communities or Calendar events. Click Tags.
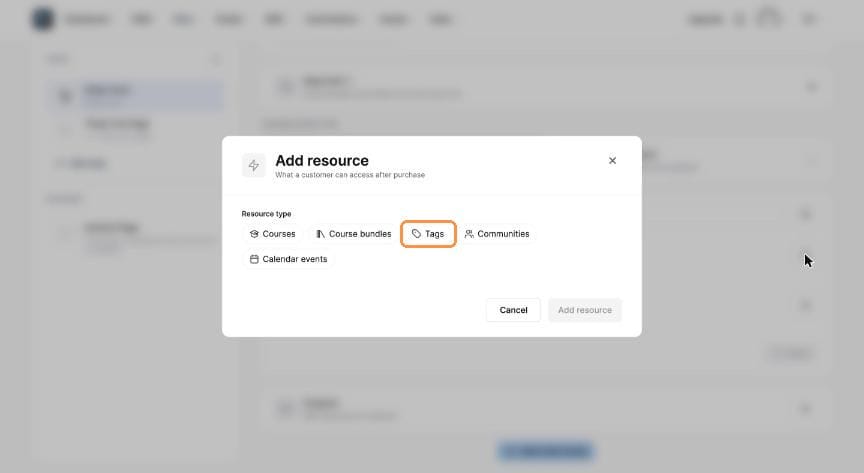
Resource type → Tags - Open the Tags dropdown, select the tag you created in Part 1, and click Add resource.
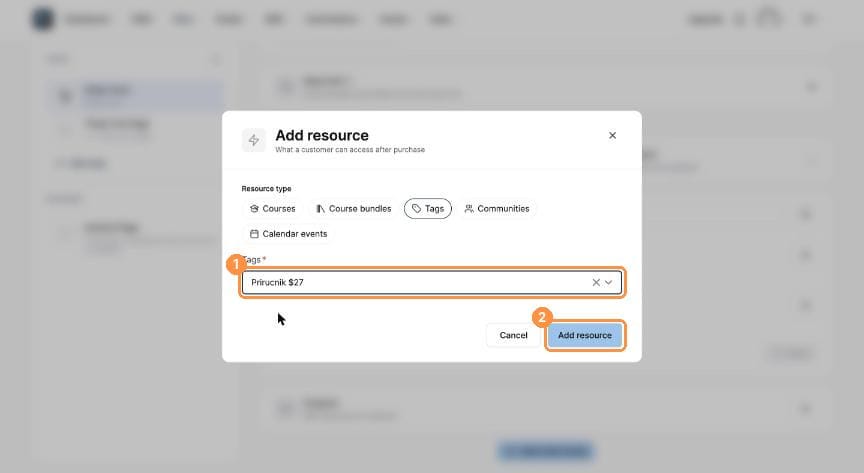
(1) Choose your tag, (2) Add resource - Your tag now appears under Resources. Next, click the + next to Price plans.
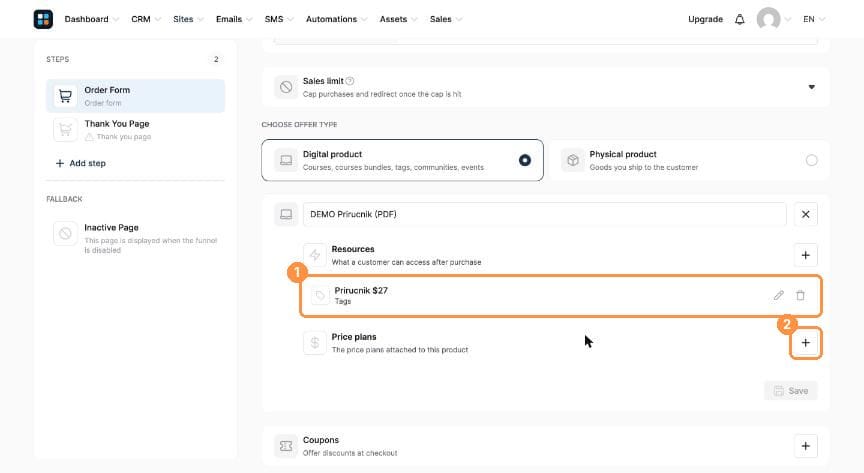
(1) Tag attached, (2) now add a price
Part 5: Set the price
- In Attach price plan, choose the plan type: One-time payment, Subscription or Payment plan (installments). For a single purchase, click One-time payment.
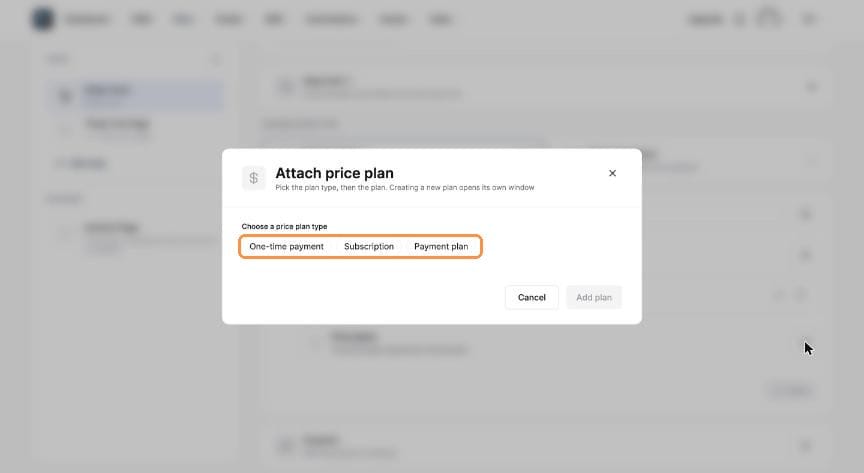
The three price plan types - The first time, you won't have a plan to choose, so click Create a new one!
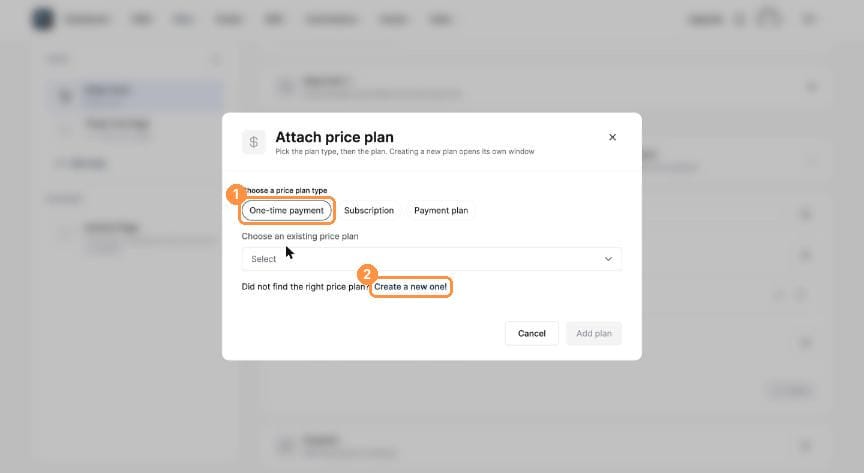
(1) One-time payment, (2) Create a new one! - Fill in the New price plan form, then click Create:
Field What to enter Price plan name displayed on the order form What the customer sees, e.g. "Guide – one-time payment" Price plan name displayed on your dashboard Your internal label, e.g. "Guide 27 EUR" Statement descriptor The text on the buyer's card statement. Keep it short and recognisable (e.g. "RADOS GUIDE"), which helps prevent chargebacks. Payment amount The price, e.g. 27 (the currency comes from your funnel) Tax behavior Exclusive = tax is added on top of the price; Inclusive = tax is already included 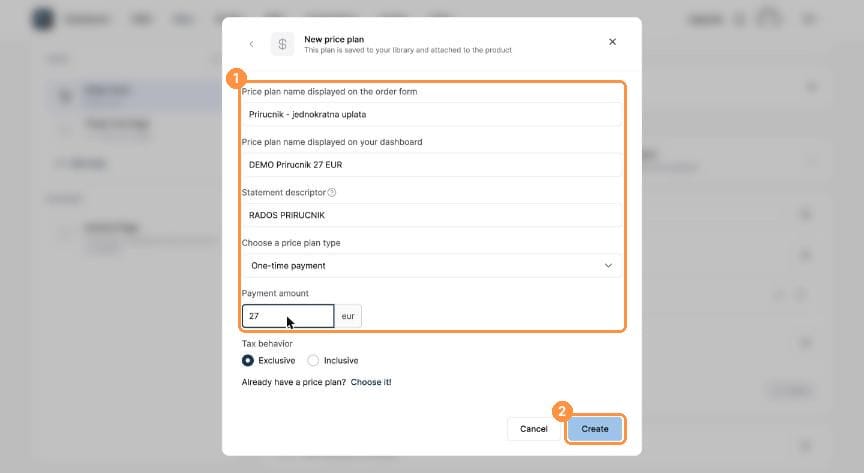
(1) Fill in the form, (2) Create - The plan appears under Price plans with its amount (here €27.00). Now click Save. Nothing is stored until you do.
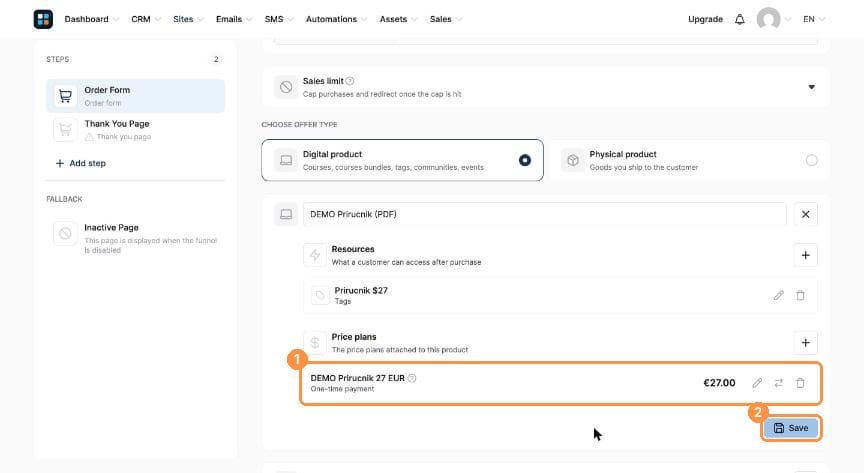
(1) Your price plan, (2) Save - A green Changes saved message confirms it. The product is now locked in. To change it later, click Edit product.
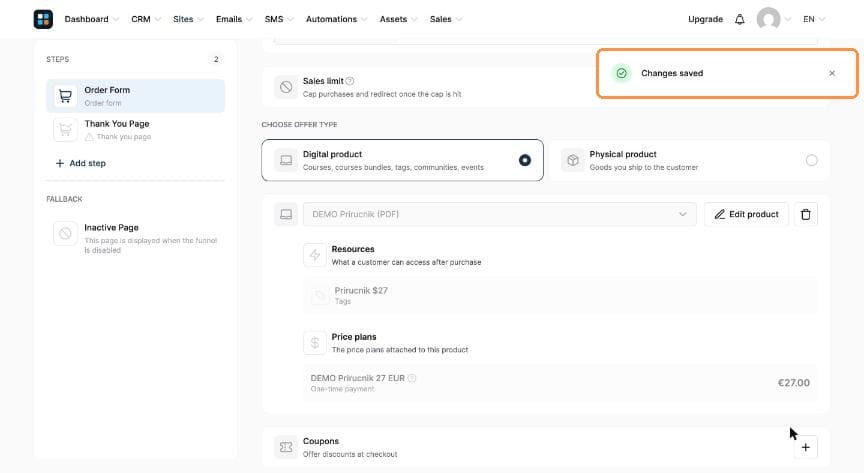
Changes saved
Part 6: Set up the thank-you page
- In the left panel, click Thank You Page, hover over a template and click Use template. Buyers land on this page right after paying.
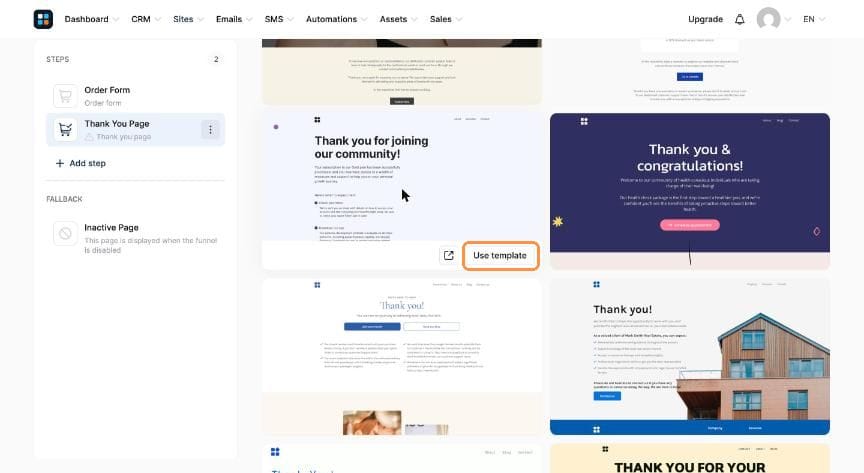
Pick a thank-you page design
Part 7: Preview, edit the text, and go live
- Go back to the Order Form step. Use the buttons at the top right: View funnel step opens the live page, and Edit page opens the drag-and-drop editor.
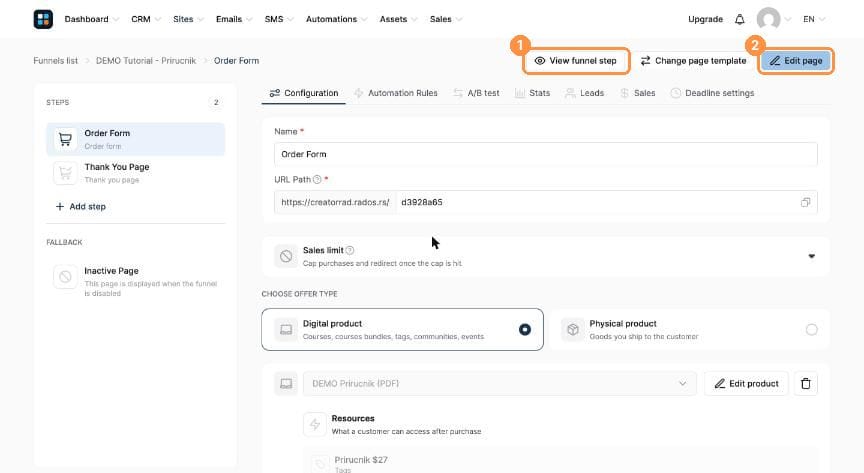
(1) View funnel step, (2) Edit page - On the live page, your price plan already appears in the order summary with the correct price.
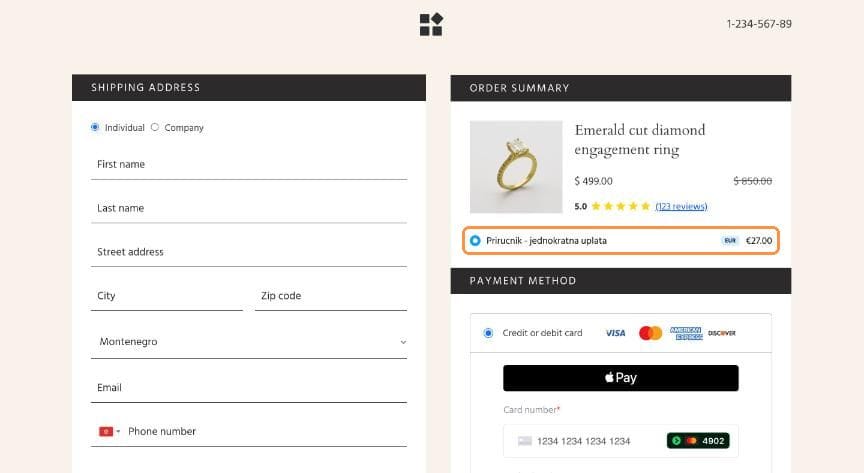
Your price plan on the live order form - The template still shows sample content (photo, product title, phone number). Click Edit page, click any text or image to replace it with your own, then click Save and Exit.
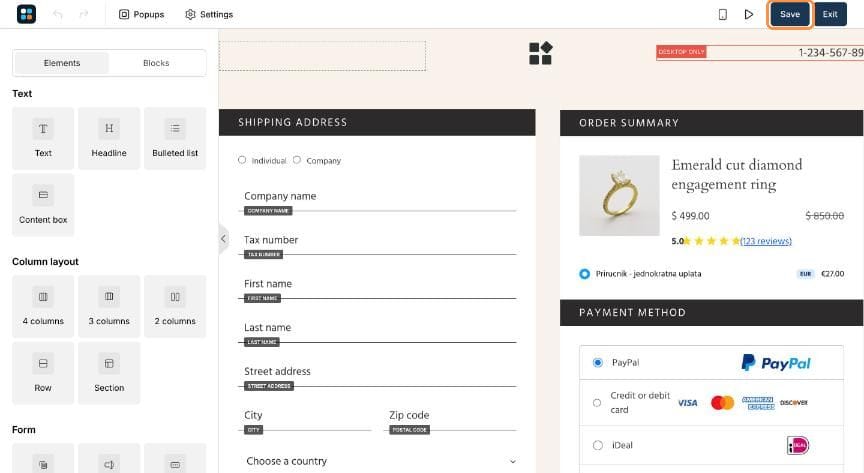
The editor: change the sample content, then Save - Copy your page link from the URL Path field (the copy icon on the right) and share it.
Next step: make the tag do the work
Open the Automation Rules tab on the Order Form step and click Add rule. A good first rule is New sale → Send email, which delivers the PDF link to every buyer automatically. Because buyers are tagged, you can also send them their own newsletters later (Emails → Newsletters, filtered by tag).
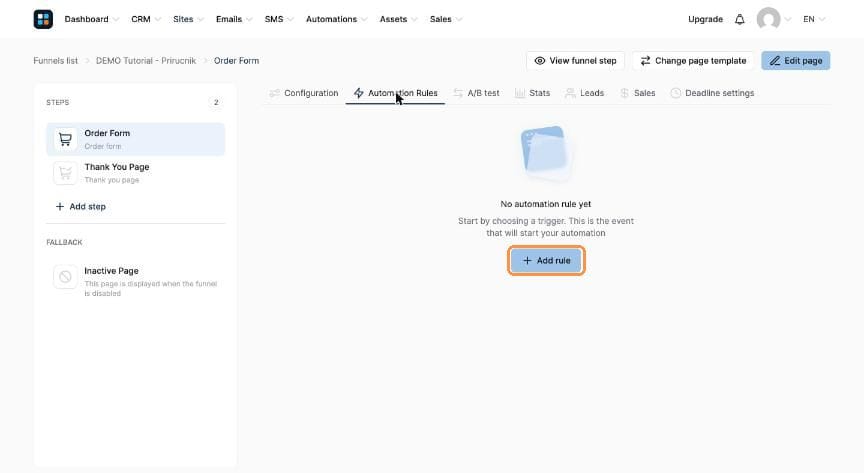
- A tag that marks every buyer
- A Sell funnel with an order form and a thank-you page
- A digital product with the tag as its resource and a €27 one-time price plan
Want the full detail on any topic?
Every lesson above links to a deeper, step-by-step article in the Help Center — or reach out and we'll walk you through it directly.